# Load Balancing Microsoft Exchange Servers with NGINX Plus
> Load balance Microsoft Exchange servers with the advanced features in F5 NGINX Plus, following our step-by-step setup instructions.
This deployment guide explains how to use F5 NGINX Plus to load balance traffic across a pool of Microsoft ExchangeTM servers. You can deploy Exchange and NGINX Plus on premises, in a private cloud, or in public clouds including Amazon Web Services (AWS), the Google Cloud Platform, and Microsoft Azure. The guide covers the different installation types, and provides complete instructions for customizing both NGINX Plus and Exchange as required.
## About NGINX Plus
[NGINX Plus](https://www.f5.com/products/nginx/nginx-plus) is the commercially supported version of the [NGINX Open Source](https://nginx.org/en) software. NGINX Plus is a complete application delivery platform, extending the power of NGINX Open Source with a host of enterprise‑ready capabilities that enhance a Microsoft Exchange server deployment and are instrumental to building web applications at scale:
- Full‑featured [HTTP](nginx/admin-guide/load-balancer/http-load-balancer.md), [TCP, and UDP](nginx/admin-guide/load-balancer/tcp-udp-load-balancer.md) load balancing
- [Intelligent session persistence](nginx/admin-guide/load-balancer/http-load-balancer.md#session-persistence)
- [High‑performance reverse proxy](nginx/admin-guide/web-server/reverse-proxy.md)
- [Caching and offload of dynamic and static content](nginx/admin-guide/content-cache/content-caching.md)
- Adaptive streaming to deliver audio and video to any device
- [Application-aware health checks](nginx/admin-guide/load-balancer/http-health-check.md) and [high availability](nginx/admin-guide/high-availability/ha-keepalived.md)
- Advanced activity monitoring available via a [Dashboard](nginx/admin-guide/monitoring/live-activity-monitoring.md#using-the-dashboard) or [REST API](nginx/admin-guide/monitoring/live-activity-monitoring.md#using-the-rest-api)
- [Management and real‑time configuration changes with DevOps‑friendly tools](https://www.nginx.com/products/nginx/load-balancing/#load-balancing-api)
[NGINX Plus Release 6 R6](https://www.nginx.com/blog/nginx-plus-r6-released/#tcp-load-balancing) introduced full‑featured load balancing of TCP traffic, with support extended to UDP in [NGINX Plus R9](https://www.nginx.com/blog/nginx-plus-r9-released/#udp-lb) and continuing enhancements for both protocols included in subsequent releases (for details, see [NGINX Plus Releases](/nginx/releases.md). Because NGINX Plus load balances TCP, HTTP, and HTTPS traffic, it's ideal for Microsoft Exchange deployments, which use all three protocols.
## Using This Guide
After reviewing [Prerequisites and System Requirements](#prereqs), perform the instructions in these sections:
- [Configuring DNS, Exchange, and Firewalls](#dns-exchange-firewall)
- [Configuring an SSL/TLS Certificate for Client Traffic](#tls-certificate)
- [Configuring NGINX Plus](#config)
- [Completing the Configuration of Load Balancing](#config-completing)
In the final section, you choose between basic Exchange load balancing and an enhanced configuration with greater fault tolerance, application health checks, and live activity monitoring.
### About Sample Values and Copying of Text
- `company.com` is used as a sample organization name (mostly in key names and DNS entries). Replace it with your organization's name.
- Many NGINX Plus configuration blocks in this guide list two sample client access servers (CASs) with IP addresses 10.0.0.237 and 10.0.0.238. Replace these addresses with the IP addresses of your CASs. Include a line in the configuration block for each CAS if you have more or fewer than two. In contrast, port numbers are obligatory values except where noted.
- For readability reasons, some commands appear on multiple lines. If you want to copy and paste them into a terminal window, we recommend that you first copy them into a text editor, where you can substitute the object names that are appropriate for your deployment and remove any extraneous formatting characters that your browser might insert.
- We recommend that you do not copy text from the configuration snippets in this guide into your configuration files. For the recommended way to create configuration files, see [Creating and Modifying Configuration Files](#config-files).
## Prerequisites and System Requirements
- Microsoft Exchange 2013 or later, installed and configured on a system running Windows Server 2012 or later. The load balancing functionality is not supported for earlier versions of Microsoft Exchange.
Exchange CASs can be configured for [HTTP Basic authentication](https://tools.ietf.org/html/rfc7617), as specified in this guide.
- A Linux system to host NGINX Plus (in on‑premises and private‑cloud deployments). To avoid potential conflicts with other applications, we recommend that you install NGINX Plus on a fresh system. For the list of Linux distributions supported by NGINX Plus, see [NGINX Plus Technical Specifications](nginx/technical-specs.md).
- NGINX Plus R7 or later. TCP load balancing is available in NGINX Plus R6 and later. Support for the Microsoft NT LAN Manager (NTLM) is available in NGINX Plus R7 and later.
The instructions assume you have basic Linux system administration skills, including the following. Full instructions are not provided for these tasks.
- Installing Linux software from vendor‑supplied packages
- Editing configuration files
- Copying files between a central administrative system and Linux servers
- Running basic commands to start and stop services
- Reading log files
Similarly, the instructions assume you have basic Windows system administration skills, including the following.
- Logging in to a system through Microsoft Remote Desktop
- Running PowerShell commands
- Restarting Internet Information Services (IIS) services
## Configuring DNS, Exchange, and Firewalls
To prepare for the configuration of NGINX Plus as your Exchange load balancer, first perform the steps in these sections:
- [Configuring DNS](#dns)
- [Configuring Exchange](#exchange)
- [Configuring Firewalls](#firewall)
### Configuring DNS
Exchange requires the following Domain Name System (DNS) records for normal operation. Create or modify them as necessary.
- An `MX` record for mail delivery.
```none
company.com. 300 MX 10 mail.company.com
```å
- An `A` record for the main email server. Replace `X.X.X.X` with the public IP address of your NGINX Plus server.
```none
mail.company.com. 60 A X.X.X.X
```
- A `TXT` record for Sender Policy Framework (SPF). Replace `X.X.X.X` with the public IP address of your NGINX Plus server. For more information about SPF records, see the [Microsoft documentation](https://docs.microsoft.com/en-us/microsoft-365/security/office-365-security/set-up-spf-in-office-365-to-help-prevent-spoofing).
```none
company.com. 300 TXT "v=spf1 mx a ip4:X.X.X.X/32 -all"
```
- An `SRV` record for the Autodiscover service.
```none
_autodiscover._tcp.company.com. 60 SRV 1 10 443 mail.company.com
```
### Configuring Exchange
Use Exchange Management Shell (PowerShell) to configure Exchange on each CAS. When running the `Set` command, you must always specify the CAS name and directory (together referred to as the _identity_) for the object being configured. You can either include the `-Identity` flag on the `Set` command line, or type the identity at the prompt that appears if you don't include the `-Identity` flag (as in the commands in this section).
To obtain an identity if you don't know it, run the `Get` command that corresponds to the `Set` command you need to run. Include the `fl` (formatted list) keyword on the `Get` command line to view the complete output from the command. For example, to obtain identity information for the `Set-OutlookAnywhere` command, run this command:
```none
C:\> Get-OutlookAnywhere | fl
```
Identities are case insensitive, and generally include spaces, parentheses, and backslashes, as in these examples for a CAS called **CAS01**.
```none
CAS01\Rpc (Default Web Site)
CAS01\mapi (Default Web Site)
CAS01\Autodiscover (Default Web Site)
```
Repeat these commands on each CAS in your deployment:
1. Working on the CAS, log in to PowerShell under an account with administrative privileges.
2. Open the Start menu and run the Exchange Management Shell, which is a terminal window.
3. Configure the external hostname for Outlook Anywhere.
```none
C:\> Set-OutlookAnywhere -ExternalHostname mail.company.com
```
4. Configure the desired authentication methods for Outlook Anywhere. This sample command configures [HTTP Basic authentication](https://tools.ietf.org/html/rfc7617).
```none
C:\> Set-OutlookAnywhere -ExternalClientsRequireSsl 1
-DefaultAuthenticationMethod basic
-ExternalClientAuthenticationMethod basic
-IISAuthenticationMethods basic
-InternalClientAuthenticationMethod basic
```
5. Configure the desired authentication methods for Autodiscover. This sample command configures HTTP Basic authentication.
```none
C:\> Set-AutodiscoverVirtualDirectory
-LiveIdNegotiateAuthentication 0
-WSSecurityAuthentication 0 -LiveIdBasicAuthentication 0
-BasicAuthentication 1 -DigestAuthentication 0
-WindowsAuthentication 0 -OAuthAuthentication 0
-AdfsAuthentication 0
```
6. Configure the desired authentication methods for Offline Address Book (OAB). This sample command configures HTTP Basic authentication.
```none
C:\> Set-OabVirtualDirectory -WindowsAuthentication 0
-BasicAuthentication 1
-ExternalUrl https://mail.company.com/OAB
```
7. If Exchange 2013 Service Pack 1 (SP 1) or later is installed, configure the desired authentication methods for MAPI over HTTP. This sample command configures HTTP Basic authentication. (Note that MAP over HTTP is not available in Exchange 2013 without SP 1.)
```none
C:\> Set-MapiVirtualDirectory
-InternalURL http://mail.company.com/mapi
-ExternalURL https://mail.company.com/mapi
-IISAuthenticationMethods Basic
```
8. If Exchange 2013 SP 1 or later is installed, enable MAPI Over HTTP.
```none
C:\> Set-OrganizationConfig -MapiHTTPEnabled
```
### Configuring Firewalls
If there is a firewall between the NGINX Plus server and other applications in your Exchange deployment, configure it to pass through traffic on the ports specified in the table. The columns represent the three types of applications that communicate with the NGINX Plus server – email clients, the NGINX Plus live activity monitoring dashboard on your administrative network, and CASs – and the **x** indicates that the port must be open.
|**Port** | **Protocol** | **Email clients** | **Admin network** | **CASs** |
| ---| ---| ---| ---| --- |
|25 | SMTP | x | x | x |
|80 | HTTP | x | | |
|443 | HTTPS | x | x | |
|993 | IMAPS | x | x | |
|8080 | HTTP (NGINX Plus dashboard) | x | | |
## Configuring an SSL/TLS Certificate for Client Traffic
To enable SSL/TLS encryption of traffic between NGINX Plus and Exchange clients, you need to configure a server certificate for NGINX Plus.
There are several ways to obtain the required certificate, including the following. For your convenience, step-by-step instructions are provided for the second and third options.
- If you already have an SSL/TLS server certificate installed on another UNIX or Linux system (including systems running NGINX Open Source, NGINX Plus, or Apache HTTP Server), copy it to the **/etc/nginx/ssl** directory on the NGINX Plus server.
- Request a new certificate from a certificate authority (CA) or your organization's security group, as described in [Generating a Certificate Request with the openssl Command](#certificate-request).
- If you already have an SSL/TLS certificate on a Windows system, see [Exporting and Converting an SSL/TLS Certificate from an IIS Server](#certificate-iis).
### Generating a Certificate Request with the openssl Command
1. Log in as the root user on a machine that has the `openssl` software installed.
2. Create a private key to be packaged in the certificate.
```shell
root# openssl genrsa -out ~/company.com.key 2048
```
3. Create a backup of the key file in a secure location. If you lose the key, the certificate becomes unusable.
```shell
root# cp ~/company.com.key /company.com.key.backup
```
4. Create a Certificate Signing Request (CSR) file.
```shell
root# openssl req -new -sha256 -key ~/company.com.key -out ~/company.com.csr
```
5. Request a certificate from a CA or your internal security group, providing the CSR file (**company.com.csr**). As a reminder, never share private keys (**.key** files) directly with third parties.
The certificate needs to be PEM format rather than in the Windows‑compatible PFX format. If you request the certificate from a CA website yourself, choose NGINX or Apache (if available) when asked to select the server platform for which to generate the certificate.
6. Copy or move the certificate file and associated key files to the **/etc/nginx/ssl** directory on the NGINX Plus server.
In the configuration files for Exchange load balancing that you can download from the NGINX website, the filenames for the certificate and private key are **company.com.crt** and **company.com.key**. For a discussion of the file and download instructions, see [Creating and Modifying Configuration Files](#config-files).
### Exporting and Converting an SSL/TLS Certificate from an IIS Server
On Windows systems, SSL/TLS certificates are packaged in a Public‑Key Cryptography Standards (PKCS) archive file with extension **.pfx**. You need to export the **.pfx** file and convert the contents to the Linux‑compatible PEM format.
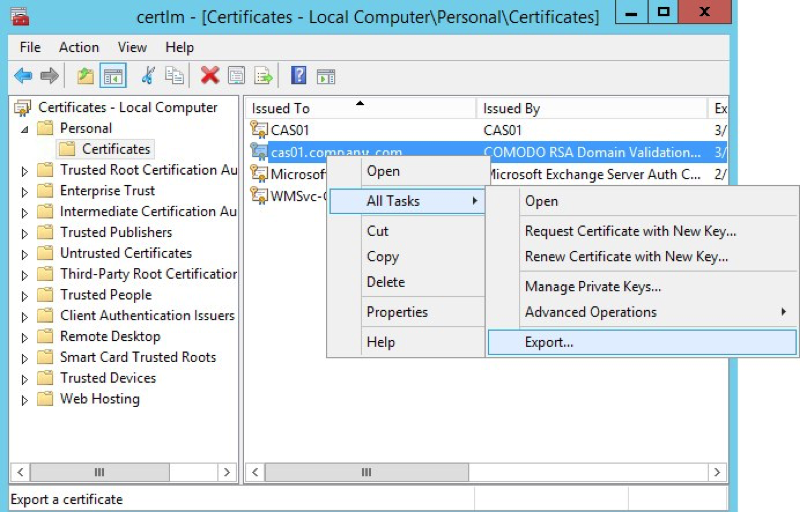
Working in the Microsoft Management Console, perform these steps:
1. Open the **Certificates** snap‑in.
2. In the left‑hand navigation pane, click the **Certificates** folder in the logical store for the certificate you want to export (in the following figure, it is Personal > Certificates).
3. In the main pane, right‑click the certificate to be exported (in the following figure, it is **cas01.company.com**).
4. On the menu that pops up, select **All Tasks**, then click **Export**.
5. In the Certificate Export Wizard window that pops up, click **Yes, export the private key**. (This option appears only if the private key is marked as exportable and you have access to it.)
6. If prompted for a password (used to encrypt the **.pfx** file before export), type it in the **Password** and **Confirm** fields. (Remember the password, as you need to provide it when importing the bundle to NGINX Plus.)
7. Click **Next**.
8. In **File name** field, type the filename and path to the location for storing the exported file (certificate and private key). Click **Next**, then **Finish**.
9. Copy the **.pfx** file to the NGINX Plus server.
Working on the NGINX Plus server (which must have the `openssl` software installed), perform these steps:
1. Log in as the root user.
2. Extract the private key file from the **.pfx** file. You are prompted first for the password protecting the **.pfx** file (see Step 6 above), then for a new password used to encrypt the private key file being created (**company.com.key.encrypted** in the following sample command).
```shell
root# openssl pkcs12 -in exported-certs.pfx -nocerts -out company.com.key.encrypted
```
3. Decrypt the key file. At the prompt, type the password you created in the previous step for the private key file.
```shell
root# openssl rsa -in company.com.key.encrypted -out company.com.key
```
4. Extract the certificate file.
```shell
root# openssl pkcs12 -in exported-cert.pfx -clcerts -nokeys -out company.com.crt
```
5. Copy or move the certificate file and associated key files to the **/etc/nginx/ssl** directory on the NGINX Plus server.
In the configuration files for Exchange load balancing that you can download from the NGINX website, the filenames for the certificate and private key are **company.com.crt** and **company.com.key**. For a discussion of the file and download instructions, see [Creating and Modifying Configuration Files](#config-files).
## Configuring NGINX Plus
You can set up NGINX Plus as your Exchange load balancer in either a basic or enhanced configuration. Basic configuration provides complete load‑balancing and reverse‑proxy functions. The enhanced configuration adds the following features to make your deployment more reliable and easier to manage:
- Fine‑grained URL location control – Exchange CASs interact with the various applications used by clients on different types of devices. Creating a separate `location` block for each application isolates the effect of an application outage to users of that application only. Other applications on the CAS continue to run normally.
- Health checks – Exchange includes a health‑check mechanism for several applications that integrates easily with NGINX Plus health checks.
- Live activity monitoring – NGINX Plus includes a dashboard that provides key load and performance metrics in real time, including TCP metrics in NGINX Plus R6 and later.
For more information about these features in an Exchange load balancer, see [Completing the Configuration of Enhanced Load Balancing](#config-enhanced).
The instructions in these sections are mandatory:
- [Installing NGINX Plus](#installing)
- [Creating and Modifying Configuration Files](#config-files)
- [Configuring Global Settings](#global-settings)
- [Configuring TCP Load Balancing](#tcp-load-balancing)
- [Configuring Global HTTP and HTTPS Settings](#global-http)
- [Configuring Virtual Servers for HTTP and HTTPS Traffic](#virtual-servers)
Optionally, you can enable support for HTTP/2 in [Configuring HTTP/2 Support](#http2).
### Installing NGINX Plus
You can install NGINX Plus on premises, in a private cloud, or in a public cloud such as the Amazon Elastic Compute Cloud (EC2), the Google Cloud Platform, or Microsoft Azure. See the instructions for your installation type:
- On‑premises or private cloud – [Installing NGINX Plus](nginx/admin-guide/installing-nginx/installing-nginx-plus.md)
- Amazon EC2 – [Installing NGINX Plus AMIs on Amazon EC2](nginx/admin-guide/installing-nginx/installing-nginx-plus-amazon-web-services.md)
- Google Compute Cloud – [Installing NGINX Plus on the Google Cloud Platform](../../admin-guide/installing-nginx/installing-nginx-plus-google-cloud-platform.md)
- Microsoft Azure – [Installing NGINX Plus on Microsoft Azure](nginx/admin-guide/installing-nginx/installing-nginx-plus-microsoft-azure.md)
### Creating and Modifying Configuration Files
To reduce errors, this guide has you copy directives from files provided by NGINX into your configuration files, instead of using a text editor to type in the directives yourself. Then you go through the sections in this guide (starting with [Configuring Global Settings](#global-settings)) to learn how to modify the directives as required for your deployment.
As provided, there is one file for basic load balancing and one file for enhanced load balancing. If you are installing and configuring NGINX Plus on a fresh Linux system and using it only to load balance Exchange traffic, you can use the provided file as your main NGINX Plus configuration file, which by convention is called **/etc/nginx/nginx.conf**.
We recommend, however, that instead of a single configuration file you use the scheme that is set up automatically when you install an NGINX Plus package – especially if you already have an existing NGINX Open Source or NGINX Plus deployment or plan to expand your use of NGINX Plus to other purposes in future. In the conventional scheme, the main configuration file is still called **/etc/nginx/nginx.conf**, but instead of including all directives in it, you create separate configuration files for different functions and store the files in the **/etc/nginx/conf.d** directory. You then use the [include](https://nginx.org/en/docs/ngx_core_module.html#include) directive in the appropriate contexts of the main file to read in the contents of the function‑specific files.
To download the complete configuration file for basic or enhanced load balancing from the NGINX website, run the appropriate commands:
```none
root# cd /etc/nginx/conf.d
root# curl https://www.nginx.com/resource/conf/exchange-basic.conf > exchange-basic.conf
```
or
```none
root# cd /etc/nginx/conf.d
root# curl https://www.nginx.com/resource/conf/exchange-enhanced.conf > exchange-enhanced.conf
```
(You can also access the URL in a browser and download the file.)
To set up the conventional configuration scheme, perform these steps:
1. In the main **nginx.conf** file, add `http` and `stream` configuration blocks, if they do not already exist. (The standard placement is below any global directives; see [Configuring Global Settings](#global-settings).) Add the indicated `include` directives (you can change the filenames if you wish).
```nginx
http {
include conf.d/exchange-http.conf;
}
stream {
include conf.d/exchange-stream.conf;
}
```
Directive documentation: [include](https://nginx.org/en/docs/ngx_core_module.html#include)
You can also use wildcard notation to read all function‑specific files for either HTTP or TCP traffic into the appropriate context block. For example, if you name all HTTP configuration files **_function_-http.conf** and all TCP configuration files **_function_-stream.conf** (the filenames we specify in this section conform to this pattern), the wildcarded `include` directives are:
```nginx
http {
include conf.d/*-http.conf;
}
stream {
include conf.d/*-stream.conf;
}
```
2. In the **/etc/nginx/conf.d** directory, create a new file called **exchange-http.conf** for directives that pertain to Exchange HTTP and HTTPS traffic (or substitute the name you chose in Step 1). Copy in the directives from the `http` configuration block in the downloaded configuration file. Remember not to copy the first line (`http` `{`) or the closing curly brace (`}`) for the block, because the `http` block you created in Step 1 already has them.
3. Also in the **/etc/nginx/conf.d** directory, create a new file called **exchange-stream.conf** for directives that pertain to Exchange TCP traffic (or substitute the name you chose in Step 1). Copy in the directives from the `stream` configuration block in the dowloaded configuration file. Again, do not copy the first line (`stream` `{`) or the closing curly brace (`}`).
For reference purposes, the text of the full configuration files is included in this document:
- [Full Configuration for Basic Load Balancing](#full-configuration-basic)
- [Full Configuration for Enhanced Load Balancing](#full-configuration-enhanced)
We recommend, however, that you do not copy text directly from this document. It does not necessarily use the same mechanisms for positioning text (such as line breaks and white space) as text editors do. In text copied into an editor, lines might run together and indenting of child statements in configuration blocks might be missing or inconsistent. The absence of formatting does not present a problem for NGINX Plus, because (like many compilers) it ignores white space during parsing, relying solely on semicolons and curly braces as delimiters. The absence of white space does, however, make it more difficult for humans to interpret the configuration and modify it without making mistakes.
#### About Reloading Updated Configuration
We recommend that each time you complete a set of updates to the configuration, you run the `nginx -t` command to test the configuration file for syntactic validity.
```none
root# nginx -t
nginx: the configuration file /etc/nginx/nginx.conf syntax is ok
nginx: configuration file /etc/nginx/nginx.conf test is successful
```
To tell NGINX Plus to start using the new configuration, run one of the following commands:
```none
root# nginx -s reload
```
or
```none
root# service nginx reload
```
### Configuring Global Settings
Verify that the main **nginx.conf** file includes these global directives, adding them as necessary.
```nginx
user nginx;
worker_processes auto;
error_log /var/log/nginx/error.log info;
pid /var/run/nginx.pid;
events {
worker_connections 1024;
}
# If using the standard configuration scheme, the 'http' and 'stream' blocks are
# usually placed here and enclose 'include' directives that refer to files in
# the conf.d directory.
```
Directive documentation: [error_log](https://nginx.org/en/docs/ngx_core_module.html#error_log), [events](https://nginx.org/en/docs/ngx_core_module.html#events), [pid](https://nginx.org/en/docs/ngx_core_module.html#pid), [user](https://nginx.org/en/docs/ngx_core_module.html#user), [worker_connections](https://nginx.org/en/docs/ngx_core_module.html#worker_connections), [worker_processes](https://nginx.org/en/docs/ngx_core_module.html#worker_processes)
### Configuring TCP Load Balancing
The directives in the top‑level `stream` configuration block configure TCP load balancing, and are the same for both basic and enhanced load balancing. Modify them as indicated:
1. In the `upstream` block that defines the group of load‑balanced Internet Message Access Protocol (IMAP) servers, include a `server` directive for each of your CASs. For information about the `zone` directive, see .
```nginx
# In the 'stream' block
upstream exchange-imaps {
zone exchange-imaps 64k;
server 10.0.0.237:993; # Replace with IP address of a CAS
server 10.0.0.238:993; # Replace with IP address of a CAS
}
```
Directive documentation: [server](https://nginx.org/en/docs/stream/ngx_stream_upstream_module.html#server), [upstream](https://nginx.org/en/docs/stream/ngx_stream_upstream_module.html#upstream), [zone](https://nginx.org/en/docs/stream/ngx_stream_upstream_module.html#zone)
2. In the `upstream` block that defines the group of load‑balanced Simple Mail Transfer Protocol (SMTP) servers, include a `server` directive for each of your CASs.
```nginx
# In the 'stream' block
upstream exchange-smtp {
zone exchange-smtp 64k;
server 10.0.0.237:25; # Replace with IP address of a CAS
server 10.0.0.238:25; # Replace with IP address of a CAS
}
```
3. This `server` block defines the virtual server that proxies traffic on port 993 to the **exchange-imaps** upstream group configured in Step 1.
```nginx
# In the 'stream' block
server {
listen 993;
status_zone exchange-imaps;
proxy_pass exchange-imaps;
}
```
Directive documentation: [listen](https://nginx.org/en/docs/stream/ngx_stream_core_module.html#listen), [proxy_pass](https://nginx.org/en/docs/stream/ngx_stream_proxy_module.html#proxy_pass), [server](https://nginx.org/en/docs/stream/ngx_stream_core_module.html#server), [status_zone](https://nginx.org/en/docs/http/ngx_http_status_module.html#status_zone)
4. This `server` block defines the virtual server that proxies traffic on port 25 to the **exchange-smtp** upstream group configured in Step 2. If you wish to change the port number from 25 (for example, to 587), change the `listen` directive.
```nginx
# In the 'stream' block
server {
listen 25; # SMTP port can be changed here (to 587, for example)
status_zone exchange-smtp;
proxy_pass exchange-smtp;
}
```
The `status_zone` directives create an entry for each virtual server on the **TCP Zones** tab of the NGINX Plus live activity monitoring dashboard, which you activate as part of [enhanced load balancing](#config-enhanced). We recommend including the directives even in a basic configuration, in case you decide to enable monitoring in the future.
Similarly, the `zone` directives create an entry for each upstream group on the **TCP Upstreams** tab of the NGINX Plus live activity monitoring dashboard. They also create a shared memory zone for storing configuration and run‑time state information about the servers in the upstream group, which the `nginx` worker processes on the NGINX Plus host use to improve proxying and load‑balancing efficiency.
### Configuring Global HTTP and HTTPS Settings
These directives in the top‑level `http` configuration block configure global HTTP and HTTPS settings. Modify them as indicated:
1. These directives define the file in which access events are logged, and modify the default format of access log messages to include the `$upstream_addr` variable, which captures the address of the CAS.
```nginx
# In the 'http' block
log_format main '$remote_addr - $remote_user [$time_local] '
'"$request" $status $body_bytes_sent '
'"$http_user_agent" "$upstream_addr"';
access_log /var/log/nginx/access.log main;
```
Directive documentation: [access_log](https://nginx.org/en/docs/http/ngx_http_log_module.html#access_log), [log_format](https://nginx.org/en/docs/http/ngx_http_log_module.html#log_format)
2. These directives set the duration of the indicated timeouts to 3 hours each, to support HTTP long polling by Exchange clients.
```nginx
# In the 'http' block
keepalive_timeout 3h;
proxy_read_timeout 3h;
```
Directive documentation: [keepalive_timeout](https://nginx.org/en/docs/http/ngx_http_core_module.html#keepalive_timeout), [proxy_read_timeout](https://nginx.org/en/docs/http/ngx_http_proxy_module.html#proxy_read_timeout)
3. The `tcp_nodelay` directive enables use of the operating system's `TCP_NODELAY` option. (This option disables the aggregating of many small messages into a larger one, which is often done to reduce the number of packets being sent on the network.)
```nginx
# In the 'http' block
tcp_nodelay on;
```
Directive documentation: [tcp_nodelay](https://nginx.org/en/docs/http/ngx_http_core_module.html#tcp_nodelay)
### Configuring Virtual Servers for HTTP and HTTPS Traffic
These directives define virtual servers for HTTP and HTTPS traffic in the top‑level `http` configuration block.
1. Configure a `server` block that defines the port for HTTPS traffic (443) and enables NGINX Plus to accept client traffic encrypted with SSL/TLS.
```nginx
# In the 'http' block
server {
listen 443 ssl;
status_zone exchange-combined;
}
```
Directive documentation: [listen](https://nginx.org/en/docs/stream/ngx_stream_core_module.html#listen), [server](https://nginx.org/en/docs/stream/ngx_stream_core_module.html#server), [status_zone](https://nginx.org/en/docs/http/ngx_http_status_module.html#status_zone)
The `status_zone` directive creates an entry for the virtual server on the **Server zones** tab of the NGINX Plus live activity monitoring dashboard, which you activate as part of [enhanced load balancing](#config-enhanced). We recommend including the directive even in a basic configuration, in case you decide to enable monitoring in the future.
2. This directive increases the default file upload size, which is required for Microsoft RPC Over HTTP. (Note that the directive does not set the maximum size of an email message.)
```nginx
# In the 'server' block for HTTPS traffic
client_max_body_size 2G;
```
Directive documentation: [client_max_body_size](https://nginx.org/en/docs/http/ngx_http_core_module.html#client_max_body_size)
3. These directives name the SSL certificate and private key, and disable use of any protocol less secure than TLS version 1.
```nginx
# In the 'server' block for HTTPS traffic
ssl_certificate /etc/nginx/ssl/company.com.crt;
ssl_certificate_key /etc/nginx/ssl/company.com.key;
ssl_protocols TLSv1.2 TLSv1.3;
```
Directive documentation: [ssl_certificate](https://nginx.org/en/docs/http/ngx_http_ssl_module.html#ssl_certificate), [ssl_certificate_key](https://nginx.org/en/docs/http/ngx_http_ssl_module.html#ssl_certificate_key), [ssl_protocols](https://nginx.org/en/docs/http/ngx_http_ssl_module.html#ssl_protocols)
4. This location block redirects traffic from the main mail page (corresponding to **/**) to the Outlook Web App (OWA), which IIS does not do by default:
```nginx
# In the 'server' block for HTTPS traffic
location / {
return 301 /owa/";
}
```
Directive documentation: [location](https://nginx.org/en/docs/http/ngx_http_core_module.html#location), [return](https://nginx.org/en/docs/http/ngx_http_rewrite_module.html#return)
5. (Optional) If a browser requests the **favicon.ico** file and it is not available, this `location` block disables logging of any resulting errors and supplies an empty image file. Many applications provide a **favicon.ico** file containing the icon that appears on a page's tab in the browser to indicate the application. IIS by default does not make the **favicon.ico** file available for the main mail page.
```nginx
# In the 'server' block for HTTPS traffic
location = /favicon.ico {
empty_gif;
access_log off;
}
```
Directive documentation: [access_log](https://nginx.org/en/docs/http/ngx_http_log_module.html#access_log), [empty_gif](https://nginx.org/en/docs/http/ngx_http_empty_gif_module.html#empty_gif)
6. Configure a `server` block that permanently redirects requests received on port 80 to the HTTPS server, which is defined in Step 1 above.
```nginx
# In the 'http' block
server {
listen 80;
location / {
return 301 https://$host$request_uri;
}
}
```
Directive documentation: [listen](https://nginx.org/en/docs/stream/ngx_stream_core_module.html#listen), [location](https://nginx.org/en/docs/http/ngx_http_core_module.html#location), [return](https://nginx.org/en/docs/http/ngx_http_rewrite_module.html#return), [server](https://nginx.org/en/docs/stream/ngx_stream_core_module.html#server)
### Configuring HTTP/2 Support
HTTP/2 is fully supported in NGINX Plus R7 and later (as well as NGINX 1.9.5 and later). As always, we recommend you run the latest version of software to take advantage of improvements and bug fixes.
In NGINX Plus R8 and later, NGINX Plus supports HTTP/2 by default, and does not support SPDY:
- In NGINX Plus R11 and later, the **nginx-plus** package continues to support HTTP/2 by default, but the **nginx-plus-extras** package available in previous releases is deprecated by [dynamic modules](https://www.f5.com/go/product/nginx-modules/).
- For NGINX Plus R8 through R10, the **nginx-plus** and **nginx-plus-extras** packages support HTTP/2 by default.
If using NGINX Plus R7, you must install the **nginx-plus-http2** package instead of the **nginx-plus** or **nginx-plus-extras** package.
To enable HTTP/2 support, add the `http2` directive in the `server` block for HTTPS traffic that we created in [Configuring Virtual Servers for HTTP and HTTPS Traffic](#virtual-servers), so that it looks like this:
```nginx
# In the 'server' block for HTTPS traffic
listen 443 ssl;
http2 on;
```
Directive documentation: [http2](https://nginx.org/en/docs/http/ngx_http_v2_module.html#http2)
To verify that HTTP/2 translation is working, you can use the "HTTP/2 and SPDY indicator" plug‑in available for [Google Chrome](https://chrome.google.com/webstore/detail/http2-and-spdy-indicator/mpbpobfflnpcgagjijhmgnchggcjblin?hl=en) and [Firefox](https://addons.mozilla.org/en-US/firefox/addon/http2-indicator/).
## Completing the Configuration of Load Balancing
The preceding instructions in [Configuring NGINX Plus](#config) are required for both basic and enhanced load balancing. At this point, you proceed to the section for the final desired configuration:
- [Completing the Configuration of Basic Load Balancing](#config-basic)
- [Completing the Configuration of Enhanced Load Balancing](#config-enhanced)
### Completing the Configuration of Basic Load Balancing
These directives complete the configuration for basic load balancing of Exchange traffic. (To finalize enhanced load balancing instead, proceed to [Completing the Configuration of Enhanced Load Balancing](#config-enhanced).)
1. In the `upstream` block that defines the group of servers across which NGINX Plus load balances HTTPS traffic, include a `server` directive for each of your CASs. With NGINX Plus R7 and later, you can include the `ntlm` directive to use Microsoft NT LAN Manager for authentication.
```nginx
# In the 'http' block
upstream exchange {
zone exchange-general 64k;
ntlm;
server 10.0.0.237:443; # Replace with IP address of a CAS
server 10.0.0.238:443; # Replace with IP address of a CAS
sticky learn create=$remote_addr lookup=$remote_addr
zone=client_sessions:10m timeout=3h;
}
```
Directive documentation: [ntlm](https://nginx.org/en/docs/http/ngx_http_upstream_module.html#ntlm), [server](https://nginx.org/en/docs/http/ngx_http_upstream_module.html#server), [`sticky learn`](https://nginx.org/en/docs/http/ngx_http_upstream_module.html#sticky), [upstream](https://nginx.org/en/docs/http/ngx_http_upstream_module.html#upstream), [zone](https://nginx.org/en/docs/http/ngx_http_upstream_module.html#zone)
2. In the `server` block for HTTPS traffic (created in [Configuring a Virtual Server for HTTPS Traffic](#https)), this `location` block disables buffering of both uploads and downloads, as required by Microsoft RPC Over HTTP.
```nginx
# In the 'server' block for HTTPS traffic
location / {
proxy_pass https://exchange;
proxy_buffering off;
proxy_http_version 1.1;
proxy_request_buffering off;
proxy_set_header Connection "Keep-Alive";
}
```
Directive documentation: [location](https://nginx.org/en/docs/http/ngx_http_core_module.html#location), [proxy_buffering](https://nginx.org/en/docs/http/ngx_http_proxy_module.html#proxy_buffering), [proxy_http_version](https://nginx.org/en/docs/http/ngx_http_proxy_module.html#proxy_http_version), [proxy_pass](https://nginx.org/en/docs/http/ngx_http_proxy_module.html#proxy_pass),[proxy_request_buffering](https://nginx.org/en/docs/http/ngx_http_proxy_module.html#proxy_request_buffering), [proxy_set_header](https://nginx.org/en/docs/http/ngx_http_proxy_module.html#proxy_set_header)
### Full Configuration for Basic Load Balancing
```nginx
user nginx;
worker_processes auto;
error_log /var/log/nginx/error.log info;
pid /var/run/nginx.pid;
events {
worker_connections 1024;
}
# If placing all directives in the main nginx.conf file, copy the following
# 'http' block into it, including the initial and final lines which open
# and close the 'http' context.
# If creating a separate conf.d/exchange-http.conf file, either exclude the
# initial and final lines from the copied region, or copy them but comment
# them out in the exchange-http.conf file.
http {
log_format main '$remote_addr - $remote_user [$time_local] '
'"$request" $status $body_bytes_sent '
'"$http_user_agent" "$upstream_addr"';
access_log /var/log/nginx/access.log main;
keepalive_timeout 3h;
proxy_read_timeout 3h;
tcp_nodelay on;
upstream exchange {
zone exchange-general 64k;
ntlm;
server 10.0.0.237:443; # Replace with IP address of a CAS
server 10.0.0.238:443; # Replace with IP address of a CAS
sticky learn create=$remote_addr lookup=$remote_addr
zone=client_sessions:10m timeout=3h;
}
server {
listen 80;
location / {
return 301 https://$host$request_uri;
}
}
server {
listen 443 ssl;
http2 on;
client_max_body_size 2G;
ssl_certificate /etc/nginx/ssl/company.com.crt;
ssl_certificate_key /etc/nginx/ssl/company.com.key;
ssl_protocols TLSv1.2 TLSv1.3;
status_zone exchange-combined;
location = / {
return 301 "/owa/";
}
location = /favicon.ico {
empty_gif;
access_log off;
}
location / {
proxy_pass https://exchange;
proxy_buffering off;
proxy_http_version 1.1;
proxy_request_buffering off;
proxy_set_header Connection "Keep-Alive";
}
}
}
# If placing all directives in the main nginx.conf file, copy the following
# 'stream' block into it, including the initial and final lines which open
# and close the 'stream' context.
# If using a separate conf.d/exchange-stream.conf file, either exclude
# the initial and final lines from the copied region, or copy them but
# comment them out in the exchange-stream.conf file.
stream {
upstream exchange-imaps {
zone exchange-imaps 64k;
server 10.0.0.237:993; # Replace with IP address of a CAS
server 10.0.0.238:993; # Replace with IP address of a CAS
}
upstream exchange-smtp {
zone exchange-smtp 64k;
server 10.0.0.237:25; # Replace with IP address of a CAS
server 10.0.0.238:25; # Replace with IP address of a CAS
}
server {
listen 993;
status_zone exchange-imaps;
proxy_pass exchange-imaps;
}
server {
listen 25; # SMTP port can be changed here (to 587, for example)
status_zone exchange-smtp;
proxy_pass exchange-smtp;
}
}
```
### Completing the Configuration of Enhanced Load Balancing
This section describes the configuration for enhanced load balancing of Exchange traffic. The enhancements improve the performance of your NGINX Plus deployment and make it easier to manage.
(To finalize basic load balancing instead, return to [Completing the Configuration of Basic Load Balancing](#config-basic).)
- [Configuring Application‑Specific Load Balancing](#app-specific-load-balancing)
- [Enabling the Live Activity Monitoring Dashboard](#monitoring)
#### Configuring Application-Specific Load Balancing
Exchange CASs interact with various applications used by clients on different types of devices. The clients access virtual directories and URIs specific to their application. To improve the performance of applications and of NGINX Plus, configure a separate `location` block for each application to enable the features listed in the table.
|**Application** | **Virtual Directory or URI** | **Enhanced Features** |
| ---| ---| --- |
|ActiveSync | **/Microsoft-Server-ActiveSync** | Exchange Control Panel |
|Health checks | **/ecp** | Restricted access and health checks |
|MAPI over HTTP | **/mapi** | Health checks |
|OWA | **/owa** | Health checks |
|RPC Over HTTP | **/rpc/rpcproxy.dll** | Unbuffered upload and download; session persistence |
##### Configuring Granular URL Location Control
1. In the top‑level `http` configuration block, there is a separate `upstream` block for each application, which improves Exchange's overall reliability by isolating the effect of outages to just the affected application. (In other words, creating separate upstream groups means that if an application or directory becomes unavailable, clients can still access the other applications and directories that are functioning and accessible.)
In each `upstream` block, include a `server` directive for each of your CASs. With NGINX Plus R7 and later, you can include the `ntlm` directive to use Microsoft NT LAN Manager for authentication.
```nginx
# In the 'http' block
upstream exchange {
zone exchange-general 64k;
ntlm;
server 10.0.0.237:443; # Replace with IP address of a CAS
server 10.0.0.238:443; # Replace with IP address of a CAS
}
upstream exchange-activesync {
zone exchange-activesync 64k;
ntlm;
server 10.0.0.237:443; # Replace with IP address of a CAS
server 10.0.0.238:443; # Replace with IP address of a CAS
}
upstream exchange-ecp {
zone exchange-ecp 64k;
ntlm;
server 10.0.0.237:443; # Replace with IP address of a CAS
server 10.0.0.238:443; # Replace with IP address of a CAS
}
upstream exchange-mapi {
zone exchange-mapi 64k;
ntlm;
server 10.0.0.237:443; # Replace with IP address of a CAS
server 10.0.0.238:443; # Replace with IP address of a CAS
}
upstream exchange-owa {
zone exchange-owa 64k;
ntlm;
server 10.0.0.237:443; # Replace with IP address of a CAS
server 10.0.0.238:443; # Replace with IP address of a CAS
}
upstream exchange-rpc {
zone exchange-rpc 64k;
ntlm;
server 10.0.0.237:443; # Replace with IP address of a CAS
server 10.0.0.238:443; # Replace with IP address of a CAS
sticky learn create=$remote_addr lookup=$remote_addr
zone=client_sessions:10m timeout=3h;
}
```
Directive documentation: [ntlm](https://nginx.org/en/docs/http/ngx_http_upstream_module.html#ntlm), [server](https://nginx.org/en/docs/http/ngx_http_upstream_module.html#server), [upstream](https://nginx.org/en/docs/http/ngx_http_upstream_module.html#upstream), [zone](https://nginx.org/en/docs/http/ngx_http_upstream_module.html#zone)
2. In the `server` block for HTTPS traffic (created in [Configuring a Virtual Server for HTTPS Traffic](#https)), a separate `location` block for each client application configures different handling of each type of traffic:
- Clients that don't specify an application access the main page.
```nginx
# In the 'server' block for HTTPS traffic
location / {
proxy_pass https://exchange;
proxy_http_version 1.1;
proxy_set_header Connection "";
}
```
Directive documentation: [location](https://nginx.org/en/docs/http/ngx_http_core_module.html#location), [proxy_http_version](https://nginx.org/en/docs/http/ngx_http_proxy_module.html#proxy_http_version), [proxy_pass](https://nginx.org/en/docs/http/ngx_http_proxy_module.html#proxy_pass), [proxy_set_header](https://nginx.org/en/docs/http/ngx_http_proxy_module.html#proxy_set_header)
- Administrators using the Exchange Control Panel (ECP) access **/ecp**. Presumably you want to restrict access to this location, and one of the simplest ways is to uncomment the `allow` and `deny` directives, which allow access from your administrative network (substitute its IP address and prefix for 172.16.0.0/16) and deny access to everyone else. You could also use other security methods, like SSL certificates or an additional layer of HTTP Basic authentication.
```nginx
# In the 'server' block for HTTPS traffic
location /ecp {
#allow 172.16.0.0/16; # Replace with your admin network
#deny all;
proxy_pass https://exchange-ecp;
proxy_http_version 1.1;
proxy_set_header Connection "";
}
```
Directive documentation: [allow](https://nginx.org/en/docs/http/ngx_http_access_module.html#allow), [deny](https://nginx.org/en/docs/http/ngx_http_access_module.html#deny)
- Outlook 2013 SP1 clients using MAPI Over HTTP access **/mapi**.
```nginx
# In the 'server' block for HTTPS traffic
location /mapi {
proxy_pass https://exchange-mapi;
proxy_http_version 1.1;
proxy_set_header Connection "";
}
```
- Mobile clients like iPhone and Android access the ActiveSync location (**/Microsoft-Server-ActiveSync**).
```nginx
# In the 'server' block for HTTPS traffic
location /Microsoft-Server-ActiveSync {
proxy_pass https://exchange-activesync;
proxy_http_version 1.1;
proxy_set_header Connection "";
}
```
- Clients using a browser for webmail access the OWA location (**/owa**).
```nginx
# In the 'server' block for HTTPS traffic
location /owa {
proxy_pass https://exchange-owa;
proxy_http_version 1.1;
proxy_set_header Connection "";
}
```
- Outlook Anywhere clients access the RPC Over HTTP location (**/rpc/rpcproxy.dll**). The two additional directives disable buffering for both upload and download of content, as required by RPC Over HTTP.
```nginx
# In the 'server' block for HTTPS traffic
location /rpc/rpcproxy.dll {
proxy_pass https://exchange-rpc;
proxy_buffering off;
proxy_http_version 1.1;
proxy_request_buffering off;
proxy_set_header Connection "Keep-Alive";
}
```
Directive documentation: [proxy_buffering](https://nginx.org/en/docs/http/ngx_http_proxy_module.html#proxy_buffering), [proxy_request_buffering](https://nginx.org/en/docs/http/ngx_http_proxy_module.html#proxy_request_buffering)
##### Configuring Application-Specific Health Checks
For several applications, Exchange includes a health‑check mechanism that you can easily integrate with the health‑check feature in NGINX Plus. Specifically, you configure the NGINX Plus health check to succeed when the Exchange health check succeeds.
When an Exchange health check succeeds for an application, the following lines are written at the end of the application's **healthcheck.htm** file.
```none
200 OK
server-name.FQDN
```
Here's an example of the full contents of a **healthcheck.htm** file for the MAPI application:
```none
root# curl -v https://mail.company.com/mapi/healthcheck.htm
> GET /mapi/healthcheck.htm HTTP/1.1
> User-Agent: curl/7.37.1
> Host: mail.company.com
> Accept: */*
>
< HTTP/1.1 200 OK
* Server nginx/1.7.11 is not blacklisted
< Server: nginx/1.7.11
< Date: Thu, 02 Apr 2015 00:36:34 GMT
< Content-Length: 34
< Connection: keep-alive
< X-Powered-By: ASP.NET
< X-FEServer: CAS02
<
200 OK
CAS02.CORP.Company.com
```
These directives configure NGINX Plus health checks.
1. In the `server` block for HTTPS traffic (described in [Configuring a Virtual Server for HTTPS Traffic](#https)), this `match` block checks for status code `200` and the string `200 OK` in the response body.
```nginx
# In the 'server' block for HTTPS traffic
match exchange-health {
status 200;
body ~ "200 OK";
}
```
Directive documentation: [match](https://nginx.org/en/docs/http/ngx_http_upstream_hc_module.html#match)
2. In these `location` blocks (described in their basic form in [Configuring Granular URL Location Control](#url-control)), the addition of `health_check` directives configures NGINX Plus health checks:
```nginx
# In the 'server' block for HTTPS traffic location
location /ecp {
#allow 172.16.0.0/16; # Replace with your admin network
#deny all;
proxy_pass https://exchange-ecp;
proxy_http_version 1.1;
proxy_set_header Connection "";
health_check uri=/ecp/healthcheck.htm interval=3s
match=exchange-health;
}
location /mapi {
proxy_pass https://exchange-mapi;
proxy_http_version 1.1;
proxy_set_header Connection "";
health_check uri=/mapi/healthcheck.htm interval=3s
match=exchange-health;
}
location /owa {
proxy_pass https://exchange-owa;
proxy_http_version 1.1;
proxy_set_header Connection "";
health_check uri=/owa/healthcheck.htm interval=3s
match=exchange-health;
}
```
Directive documentation: [health_check](https://nginx.org/en/docs/http/ngx_http_upstream_hc_module.html#health_check), [location](https://nginx.org/en/docs/http/ngx_http_core_module.html#location), [proxy_http_version](https://nginx.org/en/docs/http/ngx_http_proxy_module.html#proxy_http_version), [proxy_pass](https://nginx.org/en/docs/http/ngx_http_proxy_module.html#proxy_pass), [proxy_set_header](https://nginx.org/en/docs/http/ngx_http_proxy_module.html#proxy_set_header)
3. Together, this `match` configuration block (in the top‑level `http` context) and this `health_check` directive (added to the existing `location` block for Outlook Anywhere clients) direct RPC traffic away from servers that don't have HTTP Basic authentication enabled.
```nginx
# In the 'http' block
match exchange-auth {
status 401;
header WWW-Authenticate ~ Basic;
}
# In the 'server' block for HTTPS traffic
location /rpc/rpcproxy.dll {
proxy_pass https://exchange-rpc;
proxy_buffering off;
proxy_request_buffering off;
proxy_http_version 1.1;
proxy_set_header Connection "Keep-Alive";
health_check uri=/rpc/rpcproxy.dll interval=3s
match=exchange-auth;
}
```
Directive documentation: [proxy_buffering](https://nginx.org/en/docs/http/ngx_http_proxy_module.html#proxy_buffering), [proxy_request_buffering](https://nginx.org/en/docs/http/ngx_http_proxy_module.html#proxy_request_buffering)
#### Enabling the Live Activity Monitoring Dashboard
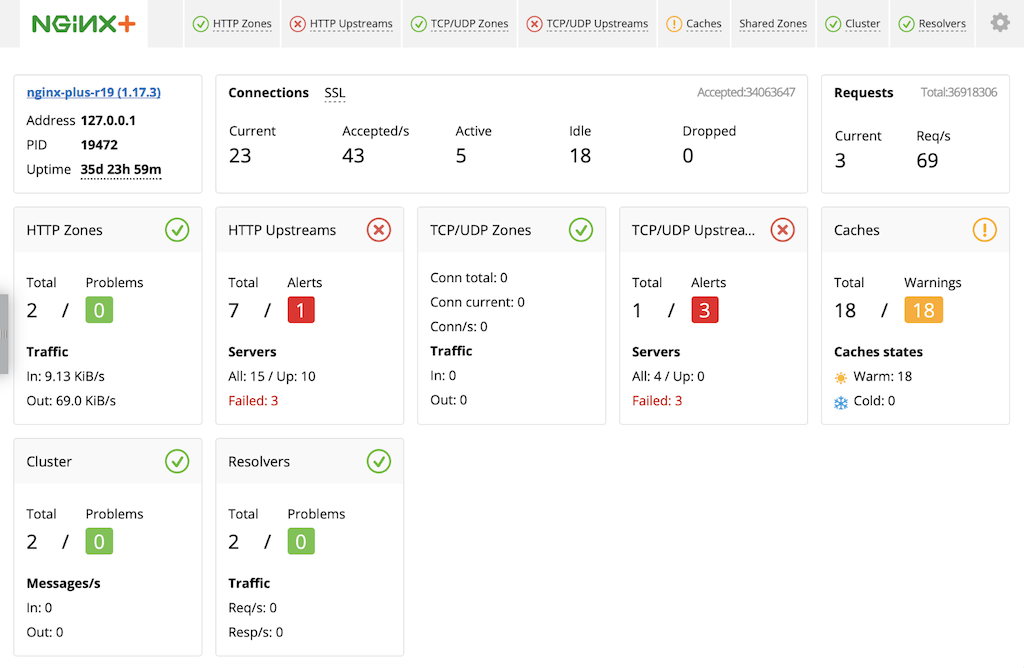
NGINX Plus includes a live activity monitoring interface that provides key load and performance metrics in real time, including TCP metrics in NGINX Plus R6 and later. Statistics are reported through a RESTful JSON interface, making it very easy to feed the data to a custom or third‑party monitoring tool. There is also a built‑in dashboard in NGINX Plus. Follow these instructions to deploy it.
 For more information about live activity monitoring, see the [NGINX Plus Admin Guide](nginx/admin-guide/monitoring/live-activity-monitoring.md).
The quickest way to configure the module and the built‑in dashboard is to download the sample configuration file from the NGINX website, and modify it as necessary. For more complete instructions, see [Live Activity Monitoring of NGINX Plus in 3 Simple Steps](https://www.nginx.com/blog/live-activity-monitoring-nginx-plus-3-simple-steps/).
1. Download the **status.conf** file to the NGINX Plus server:
```none
# cd /etc/nginx/conf.d
# curl https://www.nginx.com/resource/conf/status.conf > status.conf
```
2. Read in **status.conf** at the top‑level `http` configuration block in the main **nginx.conf** file:
```nginx
# In the 'http' block
include conf.d/status.conf;
```
If you are using the conventional configuration scheme and your existing `include` directives use the wildcard notation discussed in [Creating and Modifying Configuration Files](#config-files), you can either add a separate `include` directive for **status.conf** as shown above, or change the name of **status.conf** so it is captured by the wildcard in an existing `include` directive in the `http` block. For example, changing it to **status-http.conf** means it is captured by the `include` directive for `*-http.conf`.
Directive documentation: [include](https://nginx.org/en/docs/ngx_core_module.html#include)
3. Comments in **status.conf** explain which directives you must customize for your deployment. In particular, the default settings in the sample configuration file allow anyone on any network to access the dashboard. We strongly recommend that you restrict access to the dashboard with one or more of the following methods:
- **IP address‑based access control lists (ACLs)**. In the sample configuration file, uncomment the `allow` and `deny` directives, and substitute the address of your administrative network for 10.0.0.0/8. Only users on the specified network can access the status page.
```nginx
allow 10.0.0.0/8;
deny all;
```
Directive documentation: [allow](https://nginx.org/en/docs/http/ngx_http_access_module.html#allow), [deny](https://nginx.org/en/docs/http/ngx_http_access_module.html#deny)
- **HTTP Basic authentication** as defined in [RFC 7617](https://tools.ietf.org/html/rfc7617). In the sample configuration file, uncomment the `auth_basic` and `auth_basic_user_file` directives and add user entries to the **/etc/nginx/users** file (for example, by using an **htpasswd** generator). If you have an Apache installation, another option is to reuse an existing **htpasswd** file.
```nginx
auth_basic on;
auth_basic_user_file /etc/nginx/users;
```
Directive documentation: [auth_basic](https://nginx.org/en/docs/http/ngx_http_auth_basic_module.html#auth_basic), [auth_basic_user_file](https://nginx.org/en/docs/http/ngx_http_auth_basic_module.html#auth_basic_user_file)
- **Client certificates**, which are part of a complete configuration of SSL/TLS. For more information, see the [NGINX Plus Admin Guide](../../admin-guide/security-controls/terminating-ssl-http.md) and the reference documentation for the HTTP [SSL/TLS](https://nginx.org/en/docs/http/ngx_http_ssl_module.html) module.
- **Firewall**. Configure your firewall to disallow outside access to the port for the dashboard (8080 in the sample configuration file).
When you reload the NGINX Plus configuration file, for example by running the `nginx -s reload` command, the NGINX Plus dashboard is available immediately at **http://_nginx-plus-server-address_:8080**.
For more information about live activity monitoring, see the [NGINX Plus Admin Guide](/nginx/admin-guide/monitoring/live-activity-monitoring.md).
### Full Configuration for Enhanced Load Balancing
```nginx
user nginx;
worker_processes auto;
error_log /var/log/nginx/error.log info;
pid /var/run/nginx.pid;
events {
worker_connections 1024;
}
# If placing all directives in the main nginx.conf file, copy the following
# 'http' block into it, including the initial and final lines ('http { ... }')
# which open and close the 'http' context.
# If creating a separate conf.d/exchange-http.conf file, either exclude the
# initial and final lines from the copied region, or copy them but comment
# them out in the exchange-http.conf file.
http {
log_format main '$remote_addr - $remote_user [$time_local]
"$request" $status $body_bytes_sent "$http_referer"
"$http_user_agent" $upstream_addr';
access_log /var/log/nginx/access.log main;
keepalive_timeout 3h;
proxy_read_timeout 3h;
tcp_nodelay on;
# If this file serves as the main nginx.conf file (contains your entire
# site configuration), this 'include' directive reads in the
# configuration file for live activity monitoring. If creating a
# separate conf.d/exchange-http.conf file, put this directive in the main
# nginx.conf file instead.
include conf.d/status.conf;
upstream exchange {
zone exchange-general 64k;
ntlm;
server 10.0.0.237:443; # Replace with IP address of a CAS
server 10.0.0.238:443; # Replace with IP address of a CAS
}
upstream exchange-activesync {
zone exchange-activesync 64k;
ntlm;
server 10.0.0.237:443; # Replace with IP address of a CAS
server 10.0.0.238:443; # Replace with IP address of a CAS
}
upstream exchange-ecp {
zone exchange-ecp 64k;
ntlm;
server 10.0.0.237:443; # Replace with IP address of a CAS
server 10.0.0.238:443; # Replace with IP address of a CAS
}
upstream exchange-mapi {
zone exchange-mapi 64k;
ntlm;
server 10.0.0.237:443; # Replace with IP address of a CAS
server 10.0.0.238:443; # Replace with IP address of a CAS
}
upstream exchange-owa {
zone exchange-owa 64k;
ntlm;
server 10.0.0.237:443; # Replace with IP address of a CAS
server 10.0.0.238:443; # Replace with IP address of a CAS
}
upstream exchange-rpc {
zone exchange-rpc 64k;
ntlm;
server 10.0.0.237:443; # Replace with IP address of a CAS
server 10.0.0.238:443; # Replace with IP address of a CAS
sticky learn create=$remote_addr lookup=$remote_addr
zone=client_sessions:10m timeout=3h;
}
match exchange-auth {
status 401;
header WWW-Authenticate ~ Basic;
}
match exchange-health {
status 200;
body ~ "200 OK";
}
server {
listen 80;
location / {
return 301 https://$host$request_uri;
}
}
server {
listen 443 ssl;
http2 on;
client_max_body_size 2G;
ssl_certificate /etc/nginx/ssl/company.com.crt;
ssl_certificate_key /etc/nginx/ssl/company.com.key;
ssl_protocols TLSv1.2 TLSv1.3;
status_zone exchange-combined;
location = / {
return 301 "/owa/";
}
location = /favicon.ico {
empty_gif;
access_log off;
}
location / {
proxy_pass https://exchange;
proxy_http_version 1.1;
proxy_set_header Connection "";
}
location /ecp {
# Grant access to admin users only, by uncommenting the 'allow'
# and 'deny' directives and substituting the IP address and
# prefix of your admin network. Or configure more sophisticated
# access control.
#allow 172.16.0.0/16; # Replace with your admin network
#deny all;
proxy_pass https://exchange-ecp;
proxy_http_version 1.1;
proxy_set_header Connection "";
health_check uri=/ecp/healthcheck.htm interval=3s
match=exchange-health;
}
location /mapi {
proxy_pass https://exchange-mapi;
proxy_http_version 1.1;
proxy_set_header Connection "";
health_check uri=/mapi/healthcheck.htm interval=3s
match=exchange-health;
}
location /Microsoft-Server-ActiveSync {
proxy_pass https://exchange-active-sync;
proxy_http_version 1.1;
proxy_set_header Connection "";
}
location /owa {
proxy_pass https://exchange-owa;
proxy_http_version 1.1;
proxy_set_header Connection "";
health_check uri=/owa/healthcheck.htm interval=3s
match=exchange-health;
}
location /rpc/rpcproxy.dll {
proxy_pass https://exchange-rpc;
proxy_buffering off;
proxy_http_version 1.1;
proxy_request_buffering off;
proxy_set_header Connection "Keep-Alive";
health_check uri=/rpc/rpcproxy.dll interval=3s
match=exchange-auth;
}
}
}
# If placing all directives in the main nginx.conf file, copy the following
# 'stream' block into it, including the initial and final lines
# ('stream { ... }") which open and close the 'stream' context.
# If using a separate conf.d/exchange-stream.conf file, either exclude
# the initial and final lines from the copied region, or copy them but
# comment them out in the exchange-stream.conf file.
stream {
upstream exchange-imaps {
zone exchange-imaps 64k;
server 10.0.0.237:993; # Replace with IP address of a CAS
server 10.0.0.238:993; # Replace with IP address of a CAS
}
upstream exchange-smtp {
zone exchange-smtp 64k;
server 10.0.0.237:25; # Replace with IP address of a CAS
server 10.0.0.238:25; # Replace with IP address of a CAS
}
server {
listen 993;
status_zone exchange-imaps;
proxy_pass exchange-imaps;
}
server {
listen 25; # SMTP port can be changed here (to 587, for example)
status_zone exchange-smtp;
proxy_pass exchange-smtp;
}
}
```
### Revision History
- Version 7 (June 2025) – Update for the `ssl_protocols` directive
- Version 6 (May 2024) – Update about HTTP/2 support (the [http2](https://nginx.org/en/docs/http/ngx_http_v2_module.html#http2) directive)
- Version 5 (April 2018) – Update for NGINX Plus API (NGINX Plus R14)
- Version 4 (May 2017) – Update about HTTP/2 support (NGINX Plus Release 11 and later)
- Version 3 (February 2016) – Conversion to HTML formatting (NGINX Plus Release 8)
- Version 2 (November 2015) – Updates for NGINX Plus Release 7
- Version 1 (May 2015) – Initial version (NGINX Plus Release 6)
For more information about live activity monitoring, see the [NGINX Plus Admin Guide](nginx/admin-guide/monitoring/live-activity-monitoring.md).
The quickest way to configure the module and the built‑in dashboard is to download the sample configuration file from the NGINX website, and modify it as necessary. For more complete instructions, see [Live Activity Monitoring of NGINX Plus in 3 Simple Steps](https://www.nginx.com/blog/live-activity-monitoring-nginx-plus-3-simple-steps/).
1. Download the **status.conf** file to the NGINX Plus server:
```none
# cd /etc/nginx/conf.d
# curl https://www.nginx.com/resource/conf/status.conf > status.conf
```
2. Read in **status.conf** at the top‑level `http` configuration block in the main **nginx.conf** file:
```nginx
# In the 'http' block
include conf.d/status.conf;
```
If you are using the conventional configuration scheme and your existing `include` directives use the wildcard notation discussed in [Creating and Modifying Configuration Files](#config-files), you can either add a separate `include` directive for **status.conf** as shown above, or change the name of **status.conf** so it is captured by the wildcard in an existing `include` directive in the `http` block. For example, changing it to **status-http.conf** means it is captured by the `include` directive for `*-http.conf`.
Directive documentation: [include](https://nginx.org/en/docs/ngx_core_module.html#include)
3. Comments in **status.conf** explain which directives you must customize for your deployment. In particular, the default settings in the sample configuration file allow anyone on any network to access the dashboard. We strongly recommend that you restrict access to the dashboard with one or more of the following methods:
- **IP address‑based access control lists (ACLs)**. In the sample configuration file, uncomment the `allow` and `deny` directives, and substitute the address of your administrative network for 10.0.0.0/8. Only users on the specified network can access the status page.
```nginx
allow 10.0.0.0/8;
deny all;
```
Directive documentation: [allow](https://nginx.org/en/docs/http/ngx_http_access_module.html#allow), [deny](https://nginx.org/en/docs/http/ngx_http_access_module.html#deny)
- **HTTP Basic authentication** as defined in [RFC 7617](https://tools.ietf.org/html/rfc7617). In the sample configuration file, uncomment the `auth_basic` and `auth_basic_user_file` directives and add user entries to the **/etc/nginx/users** file (for example, by using an **htpasswd** generator). If you have an Apache installation, another option is to reuse an existing **htpasswd** file.
```nginx
auth_basic on;
auth_basic_user_file /etc/nginx/users;
```
Directive documentation: [auth_basic](https://nginx.org/en/docs/http/ngx_http_auth_basic_module.html#auth_basic), [auth_basic_user_file](https://nginx.org/en/docs/http/ngx_http_auth_basic_module.html#auth_basic_user_file)
- **Client certificates**, which are part of a complete configuration of SSL/TLS. For more information, see the [NGINX Plus Admin Guide](../../admin-guide/security-controls/terminating-ssl-http.md) and the reference documentation for the HTTP [SSL/TLS](https://nginx.org/en/docs/http/ngx_http_ssl_module.html) module.
- **Firewall**. Configure your firewall to disallow outside access to the port for the dashboard (8080 in the sample configuration file).
When you reload the NGINX Plus configuration file, for example by running the `nginx -s reload` command, the NGINX Plus dashboard is available immediately at **http://_nginx-plus-server-address_:8080**.
For more information about live activity monitoring, see the [NGINX Plus Admin Guide](/nginx/admin-guide/monitoring/live-activity-monitoring.md).
### Full Configuration for Enhanced Load Balancing
```nginx
user nginx;
worker_processes auto;
error_log /var/log/nginx/error.log info;
pid /var/run/nginx.pid;
events {
worker_connections 1024;
}
# If placing all directives in the main nginx.conf file, copy the following
# 'http' block into it, including the initial and final lines ('http { ... }')
# which open and close the 'http' context.
# If creating a separate conf.d/exchange-http.conf file, either exclude the
# initial and final lines from the copied region, or copy them but comment
# them out in the exchange-http.conf file.
http {
log_format main '$remote_addr - $remote_user [$time_local]
"$request" $status $body_bytes_sent "$http_referer"
"$http_user_agent" $upstream_addr';
access_log /var/log/nginx/access.log main;
keepalive_timeout 3h;
proxy_read_timeout 3h;
tcp_nodelay on;
# If this file serves as the main nginx.conf file (contains your entire
# site configuration), this 'include' directive reads in the
# configuration file for live activity monitoring. If creating a
# separate conf.d/exchange-http.conf file, put this directive in the main
# nginx.conf file instead.
include conf.d/status.conf;
upstream exchange {
zone exchange-general 64k;
ntlm;
server 10.0.0.237:443; # Replace with IP address of a CAS
server 10.0.0.238:443; # Replace with IP address of a CAS
}
upstream exchange-activesync {
zone exchange-activesync 64k;
ntlm;
server 10.0.0.237:443; # Replace with IP address of a CAS
server 10.0.0.238:443; # Replace with IP address of a CAS
}
upstream exchange-ecp {
zone exchange-ecp 64k;
ntlm;
server 10.0.0.237:443; # Replace with IP address of a CAS
server 10.0.0.238:443; # Replace with IP address of a CAS
}
upstream exchange-mapi {
zone exchange-mapi 64k;
ntlm;
server 10.0.0.237:443; # Replace with IP address of a CAS
server 10.0.0.238:443; # Replace with IP address of a CAS
}
upstream exchange-owa {
zone exchange-owa 64k;
ntlm;
server 10.0.0.237:443; # Replace with IP address of a CAS
server 10.0.0.238:443; # Replace with IP address of a CAS
}
upstream exchange-rpc {
zone exchange-rpc 64k;
ntlm;
server 10.0.0.237:443; # Replace with IP address of a CAS
server 10.0.0.238:443; # Replace with IP address of a CAS
sticky learn create=$remote_addr lookup=$remote_addr
zone=client_sessions:10m timeout=3h;
}
match exchange-auth {
status 401;
header WWW-Authenticate ~ Basic;
}
match exchange-health {
status 200;
body ~ "200 OK";
}
server {
listen 80;
location / {
return 301 https://$host$request_uri;
}
}
server {
listen 443 ssl;
http2 on;
client_max_body_size 2G;
ssl_certificate /etc/nginx/ssl/company.com.crt;
ssl_certificate_key /etc/nginx/ssl/company.com.key;
ssl_protocols TLSv1.2 TLSv1.3;
status_zone exchange-combined;
location = / {
return 301 "/owa/";
}
location = /favicon.ico {
empty_gif;
access_log off;
}
location / {
proxy_pass https://exchange;
proxy_http_version 1.1;
proxy_set_header Connection "";
}
location /ecp {
# Grant access to admin users only, by uncommenting the 'allow'
# and 'deny' directives and substituting the IP address and
# prefix of your admin network. Or configure more sophisticated
# access control.
#allow 172.16.0.0/16; # Replace with your admin network
#deny all;
proxy_pass https://exchange-ecp;
proxy_http_version 1.1;
proxy_set_header Connection "";
health_check uri=/ecp/healthcheck.htm interval=3s
match=exchange-health;
}
location /mapi {
proxy_pass https://exchange-mapi;
proxy_http_version 1.1;
proxy_set_header Connection "";
health_check uri=/mapi/healthcheck.htm interval=3s
match=exchange-health;
}
location /Microsoft-Server-ActiveSync {
proxy_pass https://exchange-active-sync;
proxy_http_version 1.1;
proxy_set_header Connection "";
}
location /owa {
proxy_pass https://exchange-owa;
proxy_http_version 1.1;
proxy_set_header Connection "";
health_check uri=/owa/healthcheck.htm interval=3s
match=exchange-health;
}
location /rpc/rpcproxy.dll {
proxy_pass https://exchange-rpc;
proxy_buffering off;
proxy_http_version 1.1;
proxy_request_buffering off;
proxy_set_header Connection "Keep-Alive";
health_check uri=/rpc/rpcproxy.dll interval=3s
match=exchange-auth;
}
}
}
# If placing all directives in the main nginx.conf file, copy the following
# 'stream' block into it, including the initial and final lines
# ('stream { ... }") which open and close the 'stream' context.
# If using a separate conf.d/exchange-stream.conf file, either exclude
# the initial and final lines from the copied region, or copy them but
# comment them out in the exchange-stream.conf file.
stream {
upstream exchange-imaps {
zone exchange-imaps 64k;
server 10.0.0.237:993; # Replace with IP address of a CAS
server 10.0.0.238:993; # Replace with IP address of a CAS
}
upstream exchange-smtp {
zone exchange-smtp 64k;
server 10.0.0.237:25; # Replace with IP address of a CAS
server 10.0.0.238:25; # Replace with IP address of a CAS
}
server {
listen 993;
status_zone exchange-imaps;
proxy_pass exchange-imaps;
}
server {
listen 25; # SMTP port can be changed here (to 587, for example)
status_zone exchange-smtp;
proxy_pass exchange-smtp;
}
}
```
### Revision History
- Version 7 (June 2025) – Update for the `ssl_protocols` directive
- Version 6 (May 2024) – Update about HTTP/2 support (the [http2](https://nginx.org/en/docs/http/ngx_http_v2_module.html#http2) directive)
- Version 5 (April 2018) – Update for NGINX Plus API (NGINX Plus R14)
- Version 4 (May 2017) – Update about HTTP/2 support (NGINX Plus Release 11 and later)
- Version 3 (February 2016) – Conversion to HTML formatting (NGINX Plus Release 8)
- Version 2 (November 2015) – Updates for NGINX Plus Release 7
- Version 1 (May 2015) – Initial version (NGINX Plus Release 6)