# Load Balancing Oracle E-Business Suite with NGINX Plus
> Load balance Oracle E-Business Suite applications with the advanced features in F5 NGINX Plus, following our step-by-step setup instructions.
This deployment guide explains how to use F5 NGINX Plus to load balance traffic across a pool of Oracle E-Business Suite (EBS) 12 servers. It provides complete instructions for configuring NGINX Plus as required.
## About NGINX Plus and Oracle EBS
[NGINX Plus](https://www.f5.com/products/nginx/nginx-plus) is the commercially supported version of [NGINX Open Source](https://nginx.org/en/). NGINX Plus is a complete application delivery platform, extending the power of NGINX with a host of enterprise‑ready capabilities that enhance an Oracle EBS deployment and are instrumental to building web applications at scale:
- Full‑featured [HTTP](nginx/admin-guide/load-balancer/http-load-balancer.md), [TCP, and UDP](nginx/admin-guide/load-balancer/tcp-udp-load-balancer.md) load balancing
- [Intelligent session persistence](nginx/admin-guide/load-balancer/http-load-balancer.md#session-persistence)
- [High‑performance reverse proxy](nginx/admin-guide/web-server/reverse-proxy.md)
- [Caching and offload of dynamic and static content](nginx/admin-guide/content-cache/content-caching.md)
- Adaptive streaming to deliver audio and video to any device
- [Application-aware health checks](nginx/admin-guide/load-balancer/http-health-check.md) and [high availability](nginx/admin-guide/high-availability/ha-keepalived.md)
- Advanced activity monitoring available via a [Dashboard](nginx/admin-guide/monitoring/live-activity-monitoring.md#using-the-dashboard) or [REST API](nginx/admin-guide/monitoring/live-activity-monitoring.md#using-the-rest-api)
- [Management and real‑time configuration changes with DevOps‑friendly tools](https://www.nginx.com/products/nginx/load-balancing/#load-balancing-api)
[Oracle E‑Business Suite](https://www.oracle.com/applications/ebusiness/) (EBS) is a comprehensive suite of integrated, global business applications that enable organizations to make better decisions, reduce costs, and increase performance. Its cross‑industry capabilities include enterprise resource planning, customer relationship management, and supply chain planning.
## Prerequisites and System Requirements
The following systems and software are required:
- Oracle EBS 12.2, installed and configured according to Oracle best practices.
- Linux system to host NGINX Plus. To avoid potential conflicts with other applications, we recommend you install NGINX Plus on a fresh physical or virtual system. For the list of operating sytsems supported by NGINX Plus, see [NGINX Plus Technical Specifications](nginx/technical-specs.md).
- NGINX Plus R6 or later.
You can install NGINX Plus on premises, in a private cloud, or in a public cloud such as the Amazon Elastic Compute Cloud (EC2), the Google Cloud Platform, or Microsoft Azure. See the instructions for your installation type:
- On premises or private cloud – [Installing NGINX Plus](nginx/admin-guide/installing-nginx/installing-nginx-plus.md)
- Amazon Elastic Compute Cloud (EC2) – [Installing NGINX Plus AMIs on Amazon EC2](nginx/admin-guide/installing-nginx/installing-nginx-plus-amazon-web-services.md)
- Google Compute Cloud – [Installing NGINX Plus on the Google Cloud Platform](../../admin-guide/installing-nginx/installing-nginx-plus-google-cloud-platform.md)
- Microsoft Azure – [Installing NGINX Plus on Microsoft Azure](nginx/admin-guide/installing-nginx/installing-nginx-plus-microsoft-azure.md)
The instructions assume you have basic Linux system administration skills, including the following. Full instructions are not provided for these tasks.
- Configuring and deploying EBS
- Installing Linux software from vendor‑supplied packages
- Editing configuration files
- Copying files between a central administrative system and Linux servers
- Running basic commands to start and stop services
- Reading log files
Similarly, the instructions assume you have the support of the team that manages your Oracle deployment. Their tasks include the following:
- Modifying Oracle configurations to configure a Web Entry Point
- Verifying the configuration
### About Sample Values and Copying of Text
- `company.com` is used as a sample organization name (in key names and configuration blocks). Replace it with your organization's name.
- Many NGINX Plus configuration blocks in this guide list two sample EBS application servers with IP addresses 172.31.0.146 and 172.31.11.210. Replace these addresses with the IP addresses of your EBS servers. Include a line in the configuration block for each server if you have more or fewer than two.
- For readability reasons, some commands appear on multiple lines. If you want to copy and paste them into a terminal window, we recommend that you first copy them into a text editor, where you can substitute the object names that are appropriate for your deployment and remove any extraneous formatting characters that your browser might insert.
- We recommend that you do not copy text from the configuration snippets in this guide into your configuration files. For the recommended way to create configuration files, see [Creating and Modifying Configuration Files](#config-files).
## Architectural Design
This figure represents a typical load‑balancing architecture:
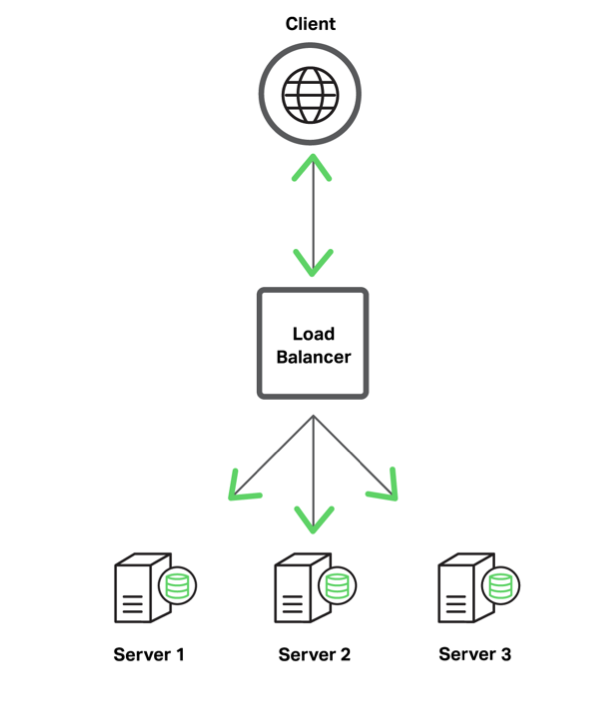 A load balancer performs the following tasks:
- Terminates SSL/TLS connections (encrypts and decrypts SSL/TLS traffic)
- Selects backend servers based on a load‑balancing method and health checks
- Forwards HTTP requests to selected backend servers
- Provides session persistence
- Provides logging and monitoring capabilities
Oracle EBS has application tiers and a database tier. A load balancer is used in front of application tiers in order to provide higher performance, availability, security, and traffic management for the application servers.
A load balancer performs the following tasks:
- Terminates SSL/TLS connections (encrypts and decrypts SSL/TLS traffic)
- Selects backend servers based on a load‑balancing method and health checks
- Forwards HTTP requests to selected backend servers
- Provides session persistence
- Provides logging and monitoring capabilities
Oracle EBS has application tiers and a database tier. A load balancer is used in front of application tiers in order to provide higher performance, availability, security, and traffic management for the application servers.
 ## Configuring Firewalls
For improved security, the NGINX Plus load balancer might be located in a DMZ. This might complicate and delay the installation process because of a required firewall configuration.
Review the network configuration requirements in the table and make appropriate changes to your firewalls before proceeding with the configuration.
|**Purpose** | **Port** | **Source** | **Destination** |
| ---| ---| ---| --- |
|Admin access, file transfer | 22 | Administrative network | NGINX Plus load balancer |
|Installation and update of NGINX Plus software | 443 | NGINX Plus load balancer | Repository: pkgs.nginx.com |
|HTTP to HTTPS redirects | 80 | Any | NGINX Plus |
|Production HTTPS traffic | 443 | Any | NGINX Plus |
|Access to backend application | 8000* | NGINX Plus | Backend application servers |
|Access to load‑balanced application from application servers | 443 | Backend application servers | NGINX Plus load balancer |
**\*** Replace port 8000 with the actual application port as appropriate.
## Configuring an SSL/TLS Certificate for Client Traffic
If you plan to enable SSL/TLS encryption of traffic between NGINX Plus and clients of your EBS application, you need to configure a server certificate for NGINX Plus.
- TLS/SSL support is enabled by default in all [NGINX Plus packages](https://account.f5.com/myf5) and [NGINX binaries](https://nginx.org/en/linux_packages.html) provided by NGINX, Inc.
- If using binaries from other providers, consult the provider documentation to determine if they support TLS/SSL.
There are several ways to obtain a server certificate, including the following. For your convenience, step-by-step instructions are provided for the second, third, and fourth options.
- If you already have an SSL/TLS certificate for NGINX or NGINX Plus installed on another UNIX or Linux system (including systems running Apache HTTP Server), copy it to the **/etc/nginx/ssl** directory on the NGINX Plus server.
- Generate a self‑signed certificate as described in [Generating a Self‑Signed Certificate with the openssl Command](#certificate-self-signed). This is sufficient for testing scenarios, but clients of production deployments generally require a certificate signed by a certificate authority (CA).
- Request a new certificate from a CA or your organization's security group, as described in [Generating a Certificate Request with the openssl Command](#certificate-request).
- If you already have an SSL/TLS certificate on a Windows system, see [Exporting and Converting an SSL/TLS Certificate from an IIS Server](#certificate-iis).
For more details on SSL/TLS termination, see the [NGINX Plus Admin Guide](/nginx/admin-guide/security-controls/terminating-ssl-http).
### Generating a Self-Signed Certificate with the openssl Command
Generate a public‑private key pair and a self‑signed server certificate in PEM format that is based on them.
1. Log in as the root user on a machine that has the `openssl` software installed.
2. Generate the key pair in PEM format (the default). To encrypt the private key, include the `-des3` parameter. (Other encryption algorithms are available, listed on the man page for the [genrsa](https://www.openssl.org/docs/manmaster/man1/openssl-genrsa.html) command.) You are prompted for the passphrase used as the basis for encryption.
```shell
root# openssl genrsa -des3 -out ~/private-key.pem 2048
Generating RSA private key ...
Enter pass phrase for private-key.pem:
```
3. Create a backup of the key file in a secure location. If you lose the key, the certificate becomes unusable.
```shell
root# cp ~/private-key.pem secure-dir/private-key.pem.backup
```
4. Generate the certificate. Include the `-new` and `-x509` parameters to make a new self-signed certificate. Optionally include the `-days` parameter to change the key's validity lifetime from the default of 30 days (10950 days is about 30 years). Respond to the prompts with values appropriate for your testing deployment.
```shell
root# openssl req -new -x509 -key ~/private-key.pem -out ~/self-cert.pem -days 10950
```
5. Copy or move the certificate file and associated key files to the **/etc/nginx/ssl** directory on the NGINX Plus server.
(In the configuration file for a single Web Entry Point that you can download from the NGINX, Inc. website, the filenames for the certificate and private key are **server.crt** and **server.key**. For a discussion of the file and download instructions, see [Creating and Modifying Configuration Files](#config-files).)
### Generating a Certificate Request with the openssl Command
1. Log in as the root user on a machine that has the `openssl` software installed.
2. Create a private key to be packaged in the certificate.
```shell
root# openssl genrsa -out ~/company.com.key 2048
```
3. Create a backup of the key file in a secure location. If you lose the key, the certificate becomes unusable.
```shell
root# cp ~/company.com.key secure-dir/company.com.key.backup
```
4. Create a Certificate Signing Request (CSR) file.
```shell
root# openssl req -new -sha256 -key ~/company.com.key -out ~/company.com.csr
```
5. Request a certificate from a CA or your internal security group, providing the CSR file (**company.com.csr**). As a reminder, never share private keys (**.key** files) directly with third parties.
The certificate needs to be PEM format rather than in the Windows‑compatible PFX format. If you request the certificate from a CA website yourself, choose NGINX or Apache (if available) when asked to select the server platform for which to generate the certificate.
6. Copy or move the certificate file and associated key files to the **/etc/nginx/ssl** directory on the NGINX Plus server.
(In the configuration file for a single Web Entry Point that you can download from the NGINX, Inc. website, the filenames for the certificate and private key are **server.crt** and **server.key**. For a discussion of the file and download instructions, see [Creating and Modifying Configuration Files](#config-files).)
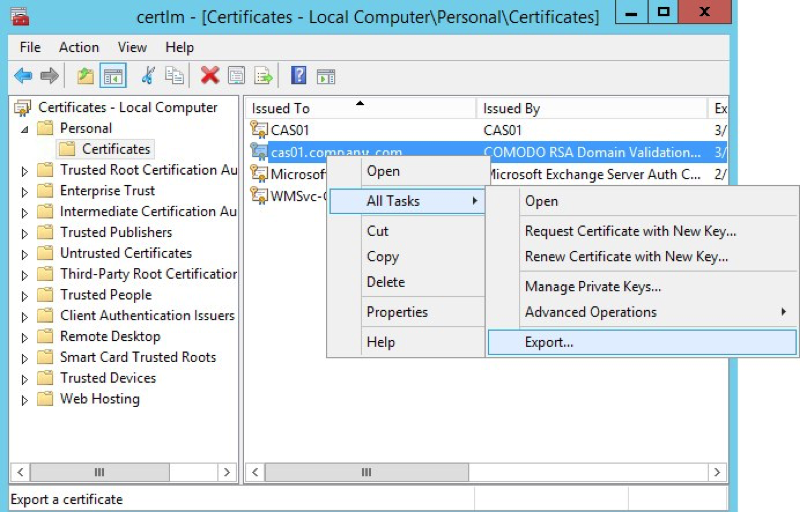
### Exporting and Converting an SSL/TLS Certificate from an IIS Server
On Windows systems, SSL/TLS certificates are packaged in a Public‑Key Cryptography Standards (PKCS) archive file with extension **.pfx**. You need to export the **.pfx** file and convert the contents to the Linux‑compatible PEM format.
Working in the Microsoft Management Console, perform the following steps:
1. Open the **Certificates** snap‑in.
2. In the left‑hand navigation pane, click the **Certificates** folder in the logical store for the certificate you want to export (in the following figure, it is Personal > Certificates).
3. In the main pane, right‑click the certificate to be exported (in the following figure, it is **cas01.company.com**).
4. On the menu that pops up, select **All Tasks**, then click **Export**.
5. In the Certificate Export Wizard window that pops up, click **Yes, export the private key**. (This option appears only if the private key is marked as exportable and you have access to it.)
6. If prompted for a password (used to encrypt the **.pfx** file before export), type it in the **Password** and **Confirm** fields. (Remember the password, as you need to provide it when importing the bundle to NGINX Plus.)
7. Click **Next**.
8. In the **File name** field, type the filename and path to the location for storing the exported file (certificate and private key). Click **Next**, then **Finish**.
9. Copy the **.pfx** file to the NGINX Plus server.
Working on the NGINX Plus server (which must have the `openssl` software installed), perform the following steps:
1. Log in as the root user.
2. Extract the private key file from the **.pfx** file. You are prompted first for the password protecting the **.pfx** file (see Step 6 above), then for a new password used to encrypt the private key file being created (**company.com.key.encrypted** in the following sample command).
```shell
root# openssl pkcs12 -in exported-certs.pfx -nocerts -out company.com.key.encrypted
```
3. Decrypt the key file. At the prompt, type the password you created in the previous step for the private key file.
```shell
root# openssl rsa -in company.com.key.encrypted -out company.com.key
```
4. Extract the certificate file.
```shell
root# openssl pkcs12 -in exported-cert.pfx -clcerts -nokeys -out company.com.crt
```
5. Copy or move the certificate file and associated key files to the **/etc/nginx/ssl** directory on the NGINX Plus server.
(In the configuration file for a single Web Entry Point that you can download from the NGINX, Inc. website, the filenames for the certificate and private key are **server.crt** and **server.key**. For a discussion of the file and download instructions, see [Creating and Modifying Configuration Files](#config-files).)
## Configuring Oracle EBS
For Oracle applications to work with a load balancer, you need to configure a Web Entry Point. For full instructions, refer to the Oracle documentation on configuring Web Entry points,
_Using Load‑Balancers with Oracle E‑Business Suite Release 12.2_ (MOS Doc ID 1375686.1).
Use the AutoConfig Context Editor to set the configuration values in the applications context file on application servers.
Here are examples of appropriate values:
|Load Balancer Entry Point | store.company.com |
|Application Server 1 | apps-tier1.company.com |
|Application Server 2 | apps-tier2.company.com |
|Web Entry Protocol | https |
|Application Tier Web Protocol | http |
|Application Tier Web Port | 8000 |
|Active Web Port | 443 |
## Configuring NGINX Plus for Oracle EBS
The instructions in the following sections are required for NGINX Plus to load balance EBS servers properly.
- [Creating and Modifying Configuration Files](#config-files)
- [Configuring Global Settings](#global-settings)
- [Configuring Virtual Servers for HTTP and HTTPS Traffic](#virtual-servers)
- [Setting the Default MIME Type](#mime-type)
- [Configuring Load Balancing](#load-balancing)
- [Configuring Session Persistence](#session-persistence)
The instructions in these sections are optional, but improve the performance and manageability of your NGINX Plus deployment:
- [Configuring HTTP/2 Support](#http2)
- [Configuring Application Health Checks](#health-checks)
- [Configuring Caching for Application Acceleration](#caching)
- [Configuring Advanced Logging and Monitoring](#logging-monitoring)
- [Configuring Backup Servers for Disaster Recovery](#backup-servers)
- [Configuring NGINX Plus for High Availability](#high-availability)
Finally, if you need multiple Web Entry Points, see [Configuring Multiple Web Entry Points](#multiple-points).
### Creating and Modifying Configuration Files
To reduce errors, this guide has you copy directives from files provided by NGINX into your configuration files, instead of using a text editor to type in the directives yourself. Then you go through the sections in this guide (starting with [Configuring Global Settings](#global-settings)) to learn how to modify the directives as required for your deployment.
As provided, there is one file for a single Web Entry Point and one file for multiple Web Entry Points. If you are installing and configuring NGINX Plus on a fresh Linux system and using it only to load balance EBS traffic, you can use the provided file as your main configuration file, which by convention is called **/etc/nginx/nginx.conf**.
We recommend, however, that instead of a single configuration file you use the scheme that is set up automatically when you install an NGINX Plus package, especially if you already have an existing NGINX or NGINX Plus deployment or plan to expand your use of NGINX Plus to other purposes in future. In the conventional scheme, the main configuration file is still called **/etc/nginx/nginx.conf**, but instead of including all directives in it, you create separate configuration files for different functions and store the files in the **/etc/nginx/conf.d** directory. You then use the `include` directive in the appropriate contexts of the main file to read in the contents of the function‑specific files.
To download the complete configuration file for a single Web Entry Point:
```none
root# cd /etc/nginx/conf.d
root# curl https://www.nginx.com/resource/conf/oracle-single-entry-point.conf > oracle-single-entry-point.conf
```
To download the complete configuration file for multiple Web Entry Points:
```none
root# cd /etc/nginx/conf.d
root# curl https://www.nginx.com/resource/conf/oracle-multiple-entry-point.conf > oracle-multiple-entry-point.conf
```
(You can also access the URL in a browser and download the file that way.)
To set up the conventional configuration scheme, add an `http` configuration block in the main **nginx.conf** file, if it does not already exist. (The standard placement is below any global directives; see [Configuring Global Settings](#global-settings).) Add this `include` directive with the appropriate filename:
```nginx
http {
include conf.d/oracle-(single|multiple)-entry-point.conf;
}
```
Directive documentation: [include](https://nginx.org/en/docs/ngx_core_module.html#include)
You can also use wildcard notation to reference all files that pertain to a certain function or traffic type in the appropriate context block. For example, if you name all HTTP configuration files **_function_-http.conf**, this is an appropriate include directive:
```nginx
http {
include conf.d/*-http.conf;
}
```
For reference purposes, the full configuration files are also provided in this document:
- [Full Configuration for a Single Web Entry Point](#full-configuration-single)
- [Full Configuration for Multiple Entry Points](#full-configuration-multiple)
We recommend, however, that you do not copy text directly from this document. It does not necessarily use the same mechanisms for positioning text (such as line breaks and white space) as text editors do. In text copied into an editor, lines might run together and indenting of child statements in configuration blocks might be missing or inconsistent. The absence of formatting does not present a problem for NGINX Plus, because (like many compilers) it ignores white space during parsing, relying solely on semicolons and curly braces as delimiters. The absence of white space does, however, make it more difficult for humans to interpret the configuration and modify it without making mistakes.
#### About Reloading Updated Configuration
We recommend that each time you complete a set of updates to the configuration, you run the `nginx` `-t` command to test the configuration file for syntactic validity.
```none
root# nginx -t
nginx: the configuration file /etc/nginx/nginx.conf syntax is ok
nginx: configuration file /etc/nginx/nginx.conf test is successful
```
To tell NGINX Plus to start using the new configuration, run one of the following commands:
```none
root# nginx -s reload
```
or
```none
root# service nginx reload
```
### Configuring Global Settings
Verify that the main **nginx.conf** file includes the following global directives, adding them as necessary.
```nginx
user nginx;
worker_processes auto;
error_log /var/log/nginx/error.log info;
pid /var/run/nginx.pid;
events {
worker_connections 1024;
}
# If using the standard configuration scheme, the 'http' block is usually placed here
# and encloses 'include' directives that refer to files in the conf.d directory.
```
Directive documentation: [error_log](https://nginx.org/en/docs/ngx_core_module.html#error_log), [pid](https://nginx.org/en/docs/ngx_core_module.html#pid), [user](https://nginx.org/en/docs/ngx_core_module.html#user), [worker_connections](https://nginx.org/en/docs/ngx_core_module.html#worker_connections), [worker_processes](https://nginx.org/en/docs/ngx_core_module.html#worker_processes)
### Configuring Virtual Servers for HTTP and HTTPS Traffic
These directives define virtual servers for HTTP and HTTPS traffic in separate `server` blocks in the top‑level `http` configuration block. All HTTP requests are redirected to the HTTPS server.
1. Configure a `server` block that listens for requests for **"https://company.com"** received on port 443.
The required `ssl_certificate` and `ssl_certificate_key` directives name the certificate and private key files you created in [Configuring an SSL/TLS Certificate for Client Traffic](#tls-certificate). Here we use the filenames – **server.crt** and **server.key** – specified in the configuration file for a single Web Entry Point that we downloaded from the NGINX website in [Creating and Modifying Configuration Files](#config-files).
```nginx
# In the 'http' block
server {
listen 443 ssl;
server_name company.com;
ssl_certificate /etc/nginx/ssl/server.crt;
ssl_certificate_key /etc/nginx/ssl/server.key;
ssl_protocols TLSv1.2;
}
```
Directive documentation: [listen](https://nginx.org/en/docs/http/ngx_http_core_module.html#listen), [server](https://nginx.org/en/docs/http/ngx_http_core_module.html#server), [server_name](https://nginx.org/en/docs/http/ngx_http_core_module.html#server_name), [ssl_certificate and ssl_certificate_key](https://nginx.org/en/docs/http/ngx_http_ssl_module.html#ssl_certificate), [ssl_protocols](https://nginx.org/en/docs/http/ngx_http_ssl_module.html#ssl_protocols)
This server listens on every IP address. If needed, you can restrict listening to one or more IP addresses (IPv4 or IPv6). For example, with this `listen` directive the server listens on address 10.210.15.20 and port 443:
```nginx
listen 10.210.15.20:443 ssl;
```
2. Configure a `server` block that permanently redirects requests received on port 80 for **"http://company.com"** to the HTTPS server defined in the previous step. Opening port 80 does not decrease security, because the requests to this port don't result in connections to your backend servers.
```nginx
# In the 'http' block
server {
listen 80;
status_zone oracle-http-redirect;
return 301 https://$http_host$request_uri;
}
```
Directive documentation: [listen](https://nginx.org/en/docs/http/ngx_http_core_module.html#listen), [return](https://nginx.org/en/docs/http/ngx_http_rewrite_module.html#return), [server](https://nginx.org/en/docs/http/ngx_http_core_module.html#server), [status_zone](https://nginx.org/en/docs/http/ngx_http_status_module.html#status_zone)
For more information on configuring SSL/TLS, see the [NGINX Plus Admin Guide](../../admin-guide/security-controls/terminating-ssl-http.md) and the reference documentation for the HTTP [SSL/TLS](https://nginx.org/en/docs/http/ngx_http_ssl_module.html) module.
### Setting the Default MIME Type
In case the EBS server does not specify the MIME type of the data it is sending to the client (in the `Content-Type` response header), define the default MIME type as `text/html`. Include these directives in the `http` context:
```nginx
# In the 'http' block
include /etc/nginx/mime.types;
default_type text/html;
```
Directive documentation: [default_type](https://nginx.org/en/docs/http/ngx_http_core_module.html#default_type), [include](https://nginx.org/en/docs/ngx_core_module.html#include)
### Configuring Load Balancing
To configure load balancing, you first create a named _upstream group_, which lists your EBS app servers. You then set up NGINX Plus as a reverse proxy and load balancer by referring to the upstream group in one or more `proxy_pass` directives.
1. Configure an upstream group called **oracle** with two EBS application servers listening on port 8000, one on IP address 172.31.11.210 and the other on 172.33.0.146. Each upstream group name in the configuration must be unique.
```nginx
# In the 'http' block
upstream oracle {
zone oracle 64k;
server 172.31.11.210:8000 max_fails=0;
server 172.31.0.146:8000 max_fails=0;
}
```
Directive documentation: [server](https://nginx.org/en/docs/http/ngx_http_upstream_module.html#server), [upstream](https://nginx.org/en/docs/http/ngx_http_upstream_module.html#upstream), [zone](https://nginx.org/en/docs/http/ngx_http_upstream_module.html#zone)
The `zone` directive creates a 64‑KB shared memory zone, also called **oracle**, for storing configuration and runtime state information about the group that is shared among worker processes.
Add a `server` directive for each of your EBS app servers. You can identify servers by IP address or hostnames. If using hostnames, make sure that the operating system on the NGINX Plus server can resolve them.
NGINX Plus supports two different kinds of application health checks, active and passive. We recommend configuring [application health checks](#health-checks) and disabling passive health checks by including the `max_fails=0` parameter on each `server` directive.
2. In the `server` block for HTTPS traffic created in [Configuring Virtual Servers for HTTP and HTTPS Traffic](#virtual-servers), add a `location` block that proxies all traffic to the upstream group.
```nginx
# In the 'server' block for HTTPS traffic
location / {
proxy_pass http://oracle;
proxy_set_header Host $host;
}
```
Directive documentation: [location](https://nginx.org/en/docs/http/ngx_http_core_module.html#location), [proxy_pass](https://nginx.org/en/docs/http/ngx_http_proxy_module.html#proxy_pass), [proxy_set_header](https://nginx.org/en/docs/http/ngx_http_proxy_module.html#proxy_set_header)
By default, NGINX and NGINX Plus use the Round Robin algorithm for load balancing among servers. The load balancer runs through the list of servers in the upstream group in order, forwarding each new request to the next server. In our example, the first request goes to 172.31.11.210, the second to 192.168.0.146, the third to 172.31.11.210, and so on. For information about the other available load‑balancing algorithms, see the NGINX Plus Admin Guide.
For more information on proxying and load balancing, see [NGINX Reverse Proxy](nginx/admin-guide/web-server/reverse-proxy.md) and [HTTP Load Balancing](../../admin-guide/load-balancer/http-load-balancer.md) in the NGINX Plus Admin Guide, and the documentation for the HTTP [Proxy](https://nginx.org/en/docs/http/ngx_http_proxy_module.html) and [Upstream](https://nginx.org/en/docs/http/ngx_http_upstream_module.html) modules.
### Configuring Session Persistence
EBS applications require session persistence. Without it, you will experience unexpected session logouts almost immediately after logging in. Oracle supports three methods for session persistence: active cookie, passive cookie, and IP address‑based.
For simplicity, configure active‑cookie session persistence with the NGINX Plus "sticky cookie" method. NGINX Plus adds a cookie called **ngxcookie** to every new user session, recording a hash of the backend server that was selected for the first request from the user. The cookie expires when the browser restarts.
Add the `sticky cookie` directive to the `upstream` block created in [Configuring Load Balancing](#load-balancing), so the complete block looks like this:
```nginx
# In the 'http' block
upstream oracle {
zone oracle 64k;
server 172.31.11.210:8000 max_fails=0;
server 172.31.0.146:8000 max_fails=0;
sticky cookie ngxcookie;
}
```
Directive documentation: [server](https://nginx.org/en/docs/http/ngx_http_upstream_module.html#server), [`sticky cookie`](https://nginx.org/en/docs/http/ngx_http_upstream_module.html#sticky), [upstream](https://nginx.org/en/docs/http/ngx_http_upstream_module.html#upstream), [zone](https://nginx.org/en/docs/http/ngx_http_upstream_module.html#zone)
### Configuring HTTP/2 Support
HTTP/2 is fully supported in both NGINX 1.9.5 and later, and NGINX Plus R7 and later. As always, we recommend you run the latest version of software to take advantage of improvements and bug fixes.
- If using open source NGINX, note that in version 1.9.5 and later the SPDY module is completely removed from the NGINX codebase and replaced with the [HTTP/2](https://nginx.org/en/docs/http/ngx_http_v2_module.html) module. After upgrading to version 1.9.5 or later, you can no longer configure NGINX to use SPDY. If you want to keep using SPDY, you need to compile NGINX from the sources in the [NGINX 1.8 branch](https://nginx.org/en/download.html).
- If using NGINX Plus, in R11 and later the **nginx-plus** package supports HTTP/2 by default, and the **nginx-plus-extras** package available in previous releases is deprecated by separate [dynamic modules](/nginx/admin-guide/dynamic-modules/dynamic-modules.md#nginx-authored-and-nginx-certified-dynamic-modules) authored by NGINX.
In NGINX Plus R8 through R10, the **nginx-plus** and **nginx-plus-extras** packages support HTTP/2 by default.
In NGINX Plus R8 and later, NGINX Plus supports HTTP/2 by default, and does not support SPDY.
If using NGINX Plus R7, you must install the **nginx-plus-http2** package instead of the **nginx-plus** or **nginx-plus-extras** package.
To enable HTTP/2 support, add the `http2` directive in the `server` block for HTTPS traffic that we created in [Configuring Virtual Servers for HTTP and HTTPS Traffic](#virtual-servers), so that it looks like this:
```nginx
# In the 'server' block for HTTPS traffic
listen 443 ssl;
http2 on;
```
Directive documentation: [http2](https://nginx.org/en/docs/http/ngx_http_v2_module.html#http2)
To verify that HTTP/2 translation is working, you can use the "HTTP/2 and SPDY indicator" plug‑in available for [Google Chrome](https://chrome.google.com/webstore/detail/http2-and-spdy-indicator/mpbpobfflnpcgagjijhmgnchggcjblin?hl=en) and [Firefox](https://addons.mozilla.org/en-US/firefox/addon/http2-indicator/).
### Configuring Application Health Checks
By default, NGINX Open Source and NGINX Plus perform basic (_passive_) checks on responses from upstream servers, retrying failed requests where possible. NGINX Plus adds out-of-band application health checks (also known as _active health checks_ or _synthetic transactions_). The related slow‑start feature gradually ramps up traffic to servers in the load‑balanced group as they recover from a failure, allowing them to "warm up" without being overwhelmed.
These features enable NGINX Plus to detect and work around a much wider variety of problems and have the potential to significantly improve the availability of your Oracle applications.
We are configuring an active application health check to verify that the Oracle application returns the `X-ORACLE-DMS-ECID` header. If not, the health check fails and NGINX Plus doesn't send requests to the failed server.
1. In the `http` context, include a `match` directive to define the tests that a server must pass to be considered functional. In this example, it must return a status code between `200` and `399` and the `X-ORACLE-DMS-ECID` header must be set.
```nginx
# In the 'http' block
match oracleok {
status 200-399;
header X-ORACLE-DMS-ECID;
}
```
Directive documentation: [match](https://nginx.org/en/docs/http/ngx_http_upstream_hc_module.html#match)
2. In the `server` block for HTTPS traffic created in [Configuring Virtual Servers for HTTP and HTTPS Traffic](#virtual-servers), add a new `location` block for the health check.
```nginx
# In the 'server' block for HTTPS traffic
location @health_check {
internal;
proxy_connect_timeout 3s;
proxy_read_timeout 3s;
proxy_pass http://oracle;
proxy_set_header Host "oracle.company.com";
health_check match=oracleok interval=4s
uri=/OA_HTML/AppsLocalLogin.jsp;
}
```
Directive documentation: [health_check](https://nginx.org/en/docs/http/ngx_http_upstream_hc_module.html#health_check), [internal](https://nginx.org/en/docs/http/ngx_http_core_module.html#internal), [location](https://nginx.org/en/docs/http/ngx_http_core_module.html#location), [proxy_connect_timeout](https://nginx.org/en/docs/http/ngx_http_proxy_module.html#proxy_connect_timeout), [proxy_pass](https://nginx.org/en/docs/http/ngx_http_proxy_module.html#proxy_pass), [proxy_read_timeout](https://nginx.org/en/docs/http/ngx_http_proxy_module.html#proxy_read_timeout), [proxy_set_header](https://nginx.org/en/docs/http/ngx_http_proxy_module.html#proxy_set_header)
Note that the `location` block is in the `server` block for HTTPS traffic, but the `match` block is in the `http` block.
NGINX Plus also has a slow‑start feature that is a useful auxiliary to health checks. When a failed server recovers, or a new server is added to the upstream group, NGINX Plus slowly ramps up the traffic to it over a defined period of time. This gives the server time to "warm up" without being overwhelmed by more connections than it can handle as it starts up. For more information, see the NGINX Plus Admin Guide.
For example, to set a slow‑start period of 30 seconds for your EBS application servers, include the `slow_start` parameter to their `server` directives:
```nginx
# In the 'upstream' block
server 172.31.11.210:8000 slow_start=30s;
server 172.31.0.146:8000 slow_start=30s;
```
Parameter documentation: [slow_start](https://nginx.org/en/docs/http/ngx_http_upstream_module.html#slow_start)
For information about customizing health checks, see the [NGINX Plus Admin Guide](nginx/admin-guide/load-balancer/http-health-check.md).
### Configuring Caching for Application Acceleration
Caching of static objects like the following significantly improves the performance of Oracle EBS:
- Images
- CSS files
- JavaScript files
- Java applets
Before configuring caching, make sure that the NGINX Plus host has adequate free disk space and disk performance. SSDs are preferred for their superior performance, but standard spinning media can be used.
1. Create a directory for cached files:
```shell
root@nginx# mkdir /var/oracle-cache
root@nginx# chown nginx /var/oracle-cache
```
2. In the `http` context, define the path to the cache, the name (**cache_oracle**) and maximum size (50 MB) of the shared memory zone used for storing cache keys, and the maximum size of the cache itself (here, 500 MB). Adjust the size values as appropriate for the amount of free disk space on the NGINX Plus host.
```nginx
# In the 'http' block
proxy_cache_path /var/oracle-cache/ keys_zone=cache_oracle:50m max_size=500m;
```
Directive documentation: [proxy_cache_path](https://nginx.org/en/docs/http/ngx_http_proxy_module.html#proxy_cache_path)
3. In the `server` block for HTTPS traffic created in [Configuring Virtual Servers for HTTP and HTTPS Traffic](#virtual-servers), enable caching by defining the name of the shared memory zone for the cache (**cache_oracle**).
Also add the `proxy_cache_valid` directive to the existing `location` block for `/` (slash). The `any` parameter specifies that all responses are cached, and the `1h` parameter that cached items expire after one hour.
```nginx
# In the 'server' block for HTTPS traffic
proxy_cache cache_oracle;
location / {
proxy_pass http://oracle_one;
proxy_set_header Host $host;
proxy_cache_valid any 1h;
}
```
Directive documentation: [proxy_cache](https://nginx.org/en/docs/http/ngx_http_proxy_module.html#proxy_cache), [proxy_cache_valid](https://nginx.org/en/docs/http/ngx_http_proxy_module.html#proxy_cache_valid), [proxy_pass](https://nginx.org/en/docs/http/ngx_http_proxy_module.html#proxy_pass), [proxy_set_header](https://nginx.org/en/docs/http/ngx_http_proxy_module.html#proxy_set_header)
For more complete information on caching, see the [NGINX Plus Admin Guide](nginx/admin-guide/content-cache/content-caching.md) and the reference documentation for the HTTP [Proxy](https://nginx.org/en/docs/http/ngx_http_proxy_module.html) module.
You can track cache usage using the following methods:
- Statistics from the [NGINX Plus API](https://nginx.org/en/docs/http/ngx_http_api_module.html) module, displayed on the built‑in live activity monitoring dashboard, or fed to a custom or third‑party reporting tool
- The NGINX Plus access log, when the log format includes the `$upstream_cache_status` variable
For detailed configuration instructions, see the next section.
### Configuring Advanced Logging and Monitoring
NGINX Plus provides multiple ways to monitor your Oracle EBS installation, providing data about unavailable servers, failed health checks, response code statistics, and performance. In addition to its built‑in tools, NGINX Plus easily integrates into enterprise monitoring systems through industry‑standard protocols.
- [Configuring Logging with a Custom Message Format](#logging-custom-format)
- [Configuring Logging with syslog](#logging-syslog)
- [Configuring Live Activity Monitoring](#live-activity-monitoring)
- [Monitoring with Third-Party Tools](#monitoring-third-party)
#### Configuring Logging with a Custom Message Format
You can customize the format of messages written to the NGINX Plus access log to include more application‑specific information. Most system variables can be included in log messages. The predefined NGINX Plus **combined** format includes the following variables:
- `$body_bytes_sent` – Number of bytes in the body of the response sent to the client
- `$http_user_agent` – `User-Agent` header in the client request
- `$http_referer` – `Referer` header in the client request
- `$remote_addr` – Client IP address
- `$remote_user` – Username provided for HTTP Basic authentication
- `$request` – Full original request line
- `$status` – Response status code
- `$time_local` – Local time in the Common Log Format
You can access the complete list of NGINX Plus variables [here](https://nginx.org/en/docs/varindex.html).
To make troubleshooting of our load‑balancing deployment easier, let's add the `$upstream_addr` variable (the address of the actual server generating the response) to the variables in the **combined** format.
Add the following `log_format` and `access_log` directives in the `http` context to enable access logging to **/var/log/nginx/access.log** and to define the message format:
```nginx
# In the 'http' block
log_format main '$remote_addr - $remote_user [$time_local]
"$request" $status $body_bytes_sent "$http_referer"
"$http_user_agent" $upstream_addr';
access_log /var/log/nginx/access.log main;
```
Directive documentation: [access_log](https://nginx.org/en/docs/http/ngx_http_log_module.html#access_log), [log_format](https://nginx.org/en/docs/http/ngx_http_log_module.html#log_format)
To disable logging for all HTTP traffic, for a virtual server, or for a location, include the following directive in the `http`, `server`, or `location` block respectively:
```nginx
access_log off;
```
Note that the message format for error logs is predefined and cannot be changed.
#### Configuring Logging with syslog
The `syslog` utility is a widely used standard for message logging. It is used in the backbone of many monitoring and log‑aggregation solutions.
You can configure NGINX Plus to direct both error logs and access logs to `syslog` servers. These examples configure logging to a `syslog` server listening on IP address 192.168.1.1 and the default UDP port, 514.
To configure the error log, add the following `error_log` directive in the main context, the `http` context, or a `server` or `location` block:
```nginx
# In the main, 'http', 'server', or 'location' block
error_log syslog:server=192.168.1.1 info;
```
Directive documentation: [error_log](https://nginx.org/en/docs/ngx_core_module.html#error_log)
To configure the access log using the predefined **combined** format, add the following `access_log` directive in the `http` context (it appears on multiple lines here solely for formatting reasons:
```nginx
access_log syslog:server=192.168.1.1,facility=local7,tag=oracle,severity=info
combined;
```
Directive documentation: [access_log](https://nginx.org/en/docs/http/ngx_http_log_module.html#access_log)
You can include multiple `error_log` and `access_log` directives in the same context. Messages are sent to every `syslog` server and file.
#### Configuring Live Activity Monitoring
NGINX Plus includes a live activity monitoring interface that provides key load and performance metrics in real time, including TCP metrics in NGINX Plus R6 and later. Statistics are reported through a RESTful JSON interface, making it very easy to feed the data to a custom or third‑party monitoring tool. There is also a built‑in dashboard. Follow these instructions to deploy it.
## Configuring Firewalls
For improved security, the NGINX Plus load balancer might be located in a DMZ. This might complicate and delay the installation process because of a required firewall configuration.
Review the network configuration requirements in the table and make appropriate changes to your firewalls before proceeding with the configuration.
|**Purpose** | **Port** | **Source** | **Destination** |
| ---| ---| ---| --- |
|Admin access, file transfer | 22 | Administrative network | NGINX Plus load balancer |
|Installation and update of NGINX Plus software | 443 | NGINX Plus load balancer | Repository: pkgs.nginx.com |
|HTTP to HTTPS redirects | 80 | Any | NGINX Plus |
|Production HTTPS traffic | 443 | Any | NGINX Plus |
|Access to backend application | 8000* | NGINX Plus | Backend application servers |
|Access to load‑balanced application from application servers | 443 | Backend application servers | NGINX Plus load balancer |
**\*** Replace port 8000 with the actual application port as appropriate.
## Configuring an SSL/TLS Certificate for Client Traffic
If you plan to enable SSL/TLS encryption of traffic between NGINX Plus and clients of your EBS application, you need to configure a server certificate for NGINX Plus.
- TLS/SSL support is enabled by default in all [NGINX Plus packages](https://account.f5.com/myf5) and [NGINX binaries](https://nginx.org/en/linux_packages.html) provided by NGINX, Inc.
- If using binaries from other providers, consult the provider documentation to determine if they support TLS/SSL.
There are several ways to obtain a server certificate, including the following. For your convenience, step-by-step instructions are provided for the second, third, and fourth options.
- If you already have an SSL/TLS certificate for NGINX or NGINX Plus installed on another UNIX or Linux system (including systems running Apache HTTP Server), copy it to the **/etc/nginx/ssl** directory on the NGINX Plus server.
- Generate a self‑signed certificate as described in [Generating a Self‑Signed Certificate with the openssl Command](#certificate-self-signed). This is sufficient for testing scenarios, but clients of production deployments generally require a certificate signed by a certificate authority (CA).
- Request a new certificate from a CA or your organization's security group, as described in [Generating a Certificate Request with the openssl Command](#certificate-request).
- If you already have an SSL/TLS certificate on a Windows system, see [Exporting and Converting an SSL/TLS Certificate from an IIS Server](#certificate-iis).
For more details on SSL/TLS termination, see the [NGINX Plus Admin Guide](/nginx/admin-guide/security-controls/terminating-ssl-http).
### Generating a Self-Signed Certificate with the openssl Command
Generate a public‑private key pair and a self‑signed server certificate in PEM format that is based on them.
1. Log in as the root user on a machine that has the `openssl` software installed.
2. Generate the key pair in PEM format (the default). To encrypt the private key, include the `-des3` parameter. (Other encryption algorithms are available, listed on the man page for the [genrsa](https://www.openssl.org/docs/manmaster/man1/openssl-genrsa.html) command.) You are prompted for the passphrase used as the basis for encryption.
```shell
root# openssl genrsa -des3 -out ~/private-key.pem 2048
Generating RSA private key ...
Enter pass phrase for private-key.pem:
```
3. Create a backup of the key file in a secure location. If you lose the key, the certificate becomes unusable.
```shell
root# cp ~/private-key.pem secure-dir/private-key.pem.backup
```
4. Generate the certificate. Include the `-new` and `-x509` parameters to make a new self-signed certificate. Optionally include the `-days` parameter to change the key's validity lifetime from the default of 30 days (10950 days is about 30 years). Respond to the prompts with values appropriate for your testing deployment.
```shell
root# openssl req -new -x509 -key ~/private-key.pem -out ~/self-cert.pem -days 10950
```
5. Copy or move the certificate file and associated key files to the **/etc/nginx/ssl** directory on the NGINX Plus server.
(In the configuration file for a single Web Entry Point that you can download from the NGINX, Inc. website, the filenames for the certificate and private key are **server.crt** and **server.key**. For a discussion of the file and download instructions, see [Creating and Modifying Configuration Files](#config-files).)
### Generating a Certificate Request with the openssl Command
1. Log in as the root user on a machine that has the `openssl` software installed.
2. Create a private key to be packaged in the certificate.
```shell
root# openssl genrsa -out ~/company.com.key 2048
```
3. Create a backup of the key file in a secure location. If you lose the key, the certificate becomes unusable.
```shell
root# cp ~/company.com.key secure-dir/company.com.key.backup
```
4. Create a Certificate Signing Request (CSR) file.
```shell
root# openssl req -new -sha256 -key ~/company.com.key -out ~/company.com.csr
```
5. Request a certificate from a CA or your internal security group, providing the CSR file (**company.com.csr**). As a reminder, never share private keys (**.key** files) directly with third parties.
The certificate needs to be PEM format rather than in the Windows‑compatible PFX format. If you request the certificate from a CA website yourself, choose NGINX or Apache (if available) when asked to select the server platform for which to generate the certificate.
6. Copy or move the certificate file and associated key files to the **/etc/nginx/ssl** directory on the NGINX Plus server.
(In the configuration file for a single Web Entry Point that you can download from the NGINX, Inc. website, the filenames for the certificate and private key are **server.crt** and **server.key**. For a discussion of the file and download instructions, see [Creating and Modifying Configuration Files](#config-files).)
### Exporting and Converting an SSL/TLS Certificate from an IIS Server
On Windows systems, SSL/TLS certificates are packaged in a Public‑Key Cryptography Standards (PKCS) archive file with extension **.pfx**. You need to export the **.pfx** file and convert the contents to the Linux‑compatible PEM format.
Working in the Microsoft Management Console, perform the following steps:
1. Open the **Certificates** snap‑in.
2. In the left‑hand navigation pane, click the **Certificates** folder in the logical store for the certificate you want to export (in the following figure, it is Personal > Certificates).
3. In the main pane, right‑click the certificate to be exported (in the following figure, it is **cas01.company.com**).
4. On the menu that pops up, select **All Tasks**, then click **Export**.

5. In the Certificate Export Wizard window that pops up, click **Yes, export the private key**. (This option appears only if the private key is marked as exportable and you have access to it.)
6. If prompted for a password (used to encrypt the **.pfx** file before export), type it in the **Password** and **Confirm** fields. (Remember the password, as you need to provide it when importing the bundle to NGINX Plus.)
7. Click **Next**.
8. In the **File name** field, type the filename and path to the location for storing the exported file (certificate and private key). Click **Next**, then **Finish**.
9. Copy the **.pfx** file to the NGINX Plus server.
Working on the NGINX Plus server (which must have the `openssl` software installed), perform the following steps:
1. Log in as the root user.
2. Extract the private key file from the **.pfx** file. You are prompted first for the password protecting the **.pfx** file (see Step 6 above), then for a new password used to encrypt the private key file being created (**company.com.key.encrypted** in the following sample command).
```shell
root# openssl pkcs12 -in exported-certs.pfx -nocerts -out company.com.key.encrypted
```
3. Decrypt the key file. At the prompt, type the password you created in the previous step for the private key file.
```shell
root# openssl rsa -in company.com.key.encrypted -out company.com.key
```
4. Extract the certificate file.
```shell
root# openssl pkcs12 -in exported-cert.pfx -clcerts -nokeys -out company.com.crt
```
5. Copy or move the certificate file and associated key files to the **/etc/nginx/ssl** directory on the NGINX Plus server.
(In the configuration file for a single Web Entry Point that you can download from the NGINX, Inc. website, the filenames for the certificate and private key are **server.crt** and **server.key**. For a discussion of the file and download instructions, see [Creating and Modifying Configuration Files](#config-files).)
## Configuring Oracle EBS
For Oracle applications to work with a load balancer, you need to configure a Web Entry Point. For full instructions, refer to the Oracle documentation on configuring Web Entry points,
_Using Load‑Balancers with Oracle E‑Business Suite Release 12.2_ (MOS Doc ID 1375686.1).
Use the AutoConfig Context Editor to set the configuration values in the applications context file on application servers.
Here are examples of appropriate values:
|Load Balancer Entry Point | store.company.com |
|Application Server 1 | apps-tier1.company.com |
|Application Server 2 | apps-tier2.company.com |
|Web Entry Protocol | https |
|Application Tier Web Protocol | http |
|Application Tier Web Port | 8000 |
|Active Web Port | 443 |
## Configuring NGINX Plus for Oracle EBS
The instructions in the following sections are required for NGINX Plus to load balance EBS servers properly.
- [Creating and Modifying Configuration Files](#config-files)
- [Configuring Global Settings](#global-settings)
- [Configuring Virtual Servers for HTTP and HTTPS Traffic](#virtual-servers)
- [Setting the Default MIME Type](#mime-type)
- [Configuring Load Balancing](#load-balancing)
- [Configuring Session Persistence](#session-persistence)
The instructions in these sections are optional, but improve the performance and manageability of your NGINX Plus deployment:
- [Configuring HTTP/2 Support](#http2)
- [Configuring Application Health Checks](#health-checks)
- [Configuring Caching for Application Acceleration](#caching)
- [Configuring Advanced Logging and Monitoring](#logging-monitoring)
- [Configuring Backup Servers for Disaster Recovery](#backup-servers)
- [Configuring NGINX Plus for High Availability](#high-availability)
Finally, if you need multiple Web Entry Points, see [Configuring Multiple Web Entry Points](#multiple-points).
### Creating and Modifying Configuration Files
To reduce errors, this guide has you copy directives from files provided by NGINX into your configuration files, instead of using a text editor to type in the directives yourself. Then you go through the sections in this guide (starting with [Configuring Global Settings](#global-settings)) to learn how to modify the directives as required for your deployment.
As provided, there is one file for a single Web Entry Point and one file for multiple Web Entry Points. If you are installing and configuring NGINX Plus on a fresh Linux system and using it only to load balance EBS traffic, you can use the provided file as your main configuration file, which by convention is called **/etc/nginx/nginx.conf**.
We recommend, however, that instead of a single configuration file you use the scheme that is set up automatically when you install an NGINX Plus package, especially if you already have an existing NGINX or NGINX Plus deployment or plan to expand your use of NGINX Plus to other purposes in future. In the conventional scheme, the main configuration file is still called **/etc/nginx/nginx.conf**, but instead of including all directives in it, you create separate configuration files for different functions and store the files in the **/etc/nginx/conf.d** directory. You then use the `include` directive in the appropriate contexts of the main file to read in the contents of the function‑specific files.
To download the complete configuration file for a single Web Entry Point:
```none
root# cd /etc/nginx/conf.d
root# curl https://www.nginx.com/resource/conf/oracle-single-entry-point.conf > oracle-single-entry-point.conf
```
To download the complete configuration file for multiple Web Entry Points:
```none
root# cd /etc/nginx/conf.d
root# curl https://www.nginx.com/resource/conf/oracle-multiple-entry-point.conf > oracle-multiple-entry-point.conf
```
(You can also access the URL in a browser and download the file that way.)
To set up the conventional configuration scheme, add an `http` configuration block in the main **nginx.conf** file, if it does not already exist. (The standard placement is below any global directives; see [Configuring Global Settings](#global-settings).) Add this `include` directive with the appropriate filename:
```nginx
http {
include conf.d/oracle-(single|multiple)-entry-point.conf;
}
```
Directive documentation: [include](https://nginx.org/en/docs/ngx_core_module.html#include)
You can also use wildcard notation to reference all files that pertain to a certain function or traffic type in the appropriate context block. For example, if you name all HTTP configuration files **_function_-http.conf**, this is an appropriate include directive:
```nginx
http {
include conf.d/*-http.conf;
}
```
For reference purposes, the full configuration files are also provided in this document:
- [Full Configuration for a Single Web Entry Point](#full-configuration-single)
- [Full Configuration for Multiple Entry Points](#full-configuration-multiple)
We recommend, however, that you do not copy text directly from this document. It does not necessarily use the same mechanisms for positioning text (such as line breaks and white space) as text editors do. In text copied into an editor, lines might run together and indenting of child statements in configuration blocks might be missing or inconsistent. The absence of formatting does not present a problem for NGINX Plus, because (like many compilers) it ignores white space during parsing, relying solely on semicolons and curly braces as delimiters. The absence of white space does, however, make it more difficult for humans to interpret the configuration and modify it without making mistakes.
#### About Reloading Updated Configuration
We recommend that each time you complete a set of updates to the configuration, you run the `nginx` `-t` command to test the configuration file for syntactic validity.
```none
root# nginx -t
nginx: the configuration file /etc/nginx/nginx.conf syntax is ok
nginx: configuration file /etc/nginx/nginx.conf test is successful
```
To tell NGINX Plus to start using the new configuration, run one of the following commands:
```none
root# nginx -s reload
```
or
```none
root# service nginx reload
```
### Configuring Global Settings
Verify that the main **nginx.conf** file includes the following global directives, adding them as necessary.
```nginx
user nginx;
worker_processes auto;
error_log /var/log/nginx/error.log info;
pid /var/run/nginx.pid;
events {
worker_connections 1024;
}
# If using the standard configuration scheme, the 'http' block is usually placed here
# and encloses 'include' directives that refer to files in the conf.d directory.
```
Directive documentation: [error_log](https://nginx.org/en/docs/ngx_core_module.html#error_log), [pid](https://nginx.org/en/docs/ngx_core_module.html#pid), [user](https://nginx.org/en/docs/ngx_core_module.html#user), [worker_connections](https://nginx.org/en/docs/ngx_core_module.html#worker_connections), [worker_processes](https://nginx.org/en/docs/ngx_core_module.html#worker_processes)
### Configuring Virtual Servers for HTTP and HTTPS Traffic
These directives define virtual servers for HTTP and HTTPS traffic in separate `server` blocks in the top‑level `http` configuration block. All HTTP requests are redirected to the HTTPS server.
1. Configure a `server` block that listens for requests for **"https://company.com"** received on port 443.
The required `ssl_certificate` and `ssl_certificate_key` directives name the certificate and private key files you created in [Configuring an SSL/TLS Certificate for Client Traffic](#tls-certificate). Here we use the filenames – **server.crt** and **server.key** – specified in the configuration file for a single Web Entry Point that we downloaded from the NGINX website in [Creating and Modifying Configuration Files](#config-files).
```nginx
# In the 'http' block
server {
listen 443 ssl;
server_name company.com;
ssl_certificate /etc/nginx/ssl/server.crt;
ssl_certificate_key /etc/nginx/ssl/server.key;
ssl_protocols TLSv1.2;
}
```
Directive documentation: [listen](https://nginx.org/en/docs/http/ngx_http_core_module.html#listen), [server](https://nginx.org/en/docs/http/ngx_http_core_module.html#server), [server_name](https://nginx.org/en/docs/http/ngx_http_core_module.html#server_name), [ssl_certificate and ssl_certificate_key](https://nginx.org/en/docs/http/ngx_http_ssl_module.html#ssl_certificate), [ssl_protocols](https://nginx.org/en/docs/http/ngx_http_ssl_module.html#ssl_protocols)
This server listens on every IP address. If needed, you can restrict listening to one or more IP addresses (IPv4 or IPv6). For example, with this `listen` directive the server listens on address 10.210.15.20 and port 443:
```nginx
listen 10.210.15.20:443 ssl;
```
2. Configure a `server` block that permanently redirects requests received on port 80 for **"http://company.com"** to the HTTPS server defined in the previous step. Opening port 80 does not decrease security, because the requests to this port don't result in connections to your backend servers.
```nginx
# In the 'http' block
server {
listen 80;
status_zone oracle-http-redirect;
return 301 https://$http_host$request_uri;
}
```
Directive documentation: [listen](https://nginx.org/en/docs/http/ngx_http_core_module.html#listen), [return](https://nginx.org/en/docs/http/ngx_http_rewrite_module.html#return), [server](https://nginx.org/en/docs/http/ngx_http_core_module.html#server), [status_zone](https://nginx.org/en/docs/http/ngx_http_status_module.html#status_zone)
For more information on configuring SSL/TLS, see the [NGINX Plus Admin Guide](../../admin-guide/security-controls/terminating-ssl-http.md) and the reference documentation for the HTTP [SSL/TLS](https://nginx.org/en/docs/http/ngx_http_ssl_module.html) module.
### Setting the Default MIME Type
In case the EBS server does not specify the MIME type of the data it is sending to the client (in the `Content-Type` response header), define the default MIME type as `text/html`. Include these directives in the `http` context:
```nginx
# In the 'http' block
include /etc/nginx/mime.types;
default_type text/html;
```
Directive documentation: [default_type](https://nginx.org/en/docs/http/ngx_http_core_module.html#default_type), [include](https://nginx.org/en/docs/ngx_core_module.html#include)
### Configuring Load Balancing
To configure load balancing, you first create a named _upstream group_, which lists your EBS app servers. You then set up NGINX Plus as a reverse proxy and load balancer by referring to the upstream group in one or more `proxy_pass` directives.
1. Configure an upstream group called **oracle** with two EBS application servers listening on port 8000, one on IP address 172.31.11.210 and the other on 172.33.0.146. Each upstream group name in the configuration must be unique.
```nginx
# In the 'http' block
upstream oracle {
zone oracle 64k;
server 172.31.11.210:8000 max_fails=0;
server 172.31.0.146:8000 max_fails=0;
}
```
Directive documentation: [server](https://nginx.org/en/docs/http/ngx_http_upstream_module.html#server), [upstream](https://nginx.org/en/docs/http/ngx_http_upstream_module.html#upstream), [zone](https://nginx.org/en/docs/http/ngx_http_upstream_module.html#zone)
The `zone` directive creates a 64‑KB shared memory zone, also called **oracle**, for storing configuration and runtime state information about the group that is shared among worker processes.
Add a `server` directive for each of your EBS app servers. You can identify servers by IP address or hostnames. If using hostnames, make sure that the operating system on the NGINX Plus server can resolve them.
NGINX Plus supports two different kinds of application health checks, active and passive. We recommend configuring [application health checks](#health-checks) and disabling passive health checks by including the `max_fails=0` parameter on each `server` directive.
2. In the `server` block for HTTPS traffic created in [Configuring Virtual Servers for HTTP and HTTPS Traffic](#virtual-servers), add a `location` block that proxies all traffic to the upstream group.
```nginx
# In the 'server' block for HTTPS traffic
location / {
proxy_pass http://oracle;
proxy_set_header Host $host;
}
```
Directive documentation: [location](https://nginx.org/en/docs/http/ngx_http_core_module.html#location), [proxy_pass](https://nginx.org/en/docs/http/ngx_http_proxy_module.html#proxy_pass), [proxy_set_header](https://nginx.org/en/docs/http/ngx_http_proxy_module.html#proxy_set_header)
By default, NGINX and NGINX Plus use the Round Robin algorithm for load balancing among servers. The load balancer runs through the list of servers in the upstream group in order, forwarding each new request to the next server. In our example, the first request goes to 172.31.11.210, the second to 192.168.0.146, the third to 172.31.11.210, and so on. For information about the other available load‑balancing algorithms, see the NGINX Plus Admin Guide.
For more information on proxying and load balancing, see [NGINX Reverse Proxy](nginx/admin-guide/web-server/reverse-proxy.md) and [HTTP Load Balancing](../../admin-guide/load-balancer/http-load-balancer.md) in the NGINX Plus Admin Guide, and the documentation for the HTTP [Proxy](https://nginx.org/en/docs/http/ngx_http_proxy_module.html) and [Upstream](https://nginx.org/en/docs/http/ngx_http_upstream_module.html) modules.
### Configuring Session Persistence
EBS applications require session persistence. Without it, you will experience unexpected session logouts almost immediately after logging in. Oracle supports three methods for session persistence: active cookie, passive cookie, and IP address‑based.
For simplicity, configure active‑cookie session persistence with the NGINX Plus "sticky cookie" method. NGINX Plus adds a cookie called **ngxcookie** to every new user session, recording a hash of the backend server that was selected for the first request from the user. The cookie expires when the browser restarts.
Add the `sticky cookie` directive to the `upstream` block created in [Configuring Load Balancing](#load-balancing), so the complete block looks like this:
```nginx
# In the 'http' block
upstream oracle {
zone oracle 64k;
server 172.31.11.210:8000 max_fails=0;
server 172.31.0.146:8000 max_fails=0;
sticky cookie ngxcookie;
}
```
Directive documentation: [server](https://nginx.org/en/docs/http/ngx_http_upstream_module.html#server), [`sticky cookie`](https://nginx.org/en/docs/http/ngx_http_upstream_module.html#sticky), [upstream](https://nginx.org/en/docs/http/ngx_http_upstream_module.html#upstream), [zone](https://nginx.org/en/docs/http/ngx_http_upstream_module.html#zone)
### Configuring HTTP/2 Support
HTTP/2 is fully supported in both NGINX 1.9.5 and later, and NGINX Plus R7 and later. As always, we recommend you run the latest version of software to take advantage of improvements and bug fixes.
- If using open source NGINX, note that in version 1.9.5 and later the SPDY module is completely removed from the NGINX codebase and replaced with the [HTTP/2](https://nginx.org/en/docs/http/ngx_http_v2_module.html) module. After upgrading to version 1.9.5 or later, you can no longer configure NGINX to use SPDY. If you want to keep using SPDY, you need to compile NGINX from the sources in the [NGINX 1.8 branch](https://nginx.org/en/download.html).
- If using NGINX Plus, in R11 and later the **nginx-plus** package supports HTTP/2 by default, and the **nginx-plus-extras** package available in previous releases is deprecated by separate [dynamic modules](/nginx/admin-guide/dynamic-modules/dynamic-modules.md#nginx-authored-and-nginx-certified-dynamic-modules) authored by NGINX.
In NGINX Plus R8 through R10, the **nginx-plus** and **nginx-plus-extras** packages support HTTP/2 by default.
In NGINX Plus R8 and later, NGINX Plus supports HTTP/2 by default, and does not support SPDY.
If using NGINX Plus R7, you must install the **nginx-plus-http2** package instead of the **nginx-plus** or **nginx-plus-extras** package.
To enable HTTP/2 support, add the `http2` directive in the `server` block for HTTPS traffic that we created in [Configuring Virtual Servers for HTTP and HTTPS Traffic](#virtual-servers), so that it looks like this:
```nginx
# In the 'server' block for HTTPS traffic
listen 443 ssl;
http2 on;
```
Directive documentation: [http2](https://nginx.org/en/docs/http/ngx_http_v2_module.html#http2)
To verify that HTTP/2 translation is working, you can use the "HTTP/2 and SPDY indicator" plug‑in available for [Google Chrome](https://chrome.google.com/webstore/detail/http2-and-spdy-indicator/mpbpobfflnpcgagjijhmgnchggcjblin?hl=en) and [Firefox](https://addons.mozilla.org/en-US/firefox/addon/http2-indicator/).
### Configuring Application Health Checks
By default, NGINX Open Source and NGINX Plus perform basic (_passive_) checks on responses from upstream servers, retrying failed requests where possible. NGINX Plus adds out-of-band application health checks (also known as _active health checks_ or _synthetic transactions_). The related slow‑start feature gradually ramps up traffic to servers in the load‑balanced group as they recover from a failure, allowing them to "warm up" without being overwhelmed.
These features enable NGINX Plus to detect and work around a much wider variety of problems and have the potential to significantly improve the availability of your Oracle applications.
We are configuring an active application health check to verify that the Oracle application returns the `X-ORACLE-DMS-ECID` header. If not, the health check fails and NGINX Plus doesn't send requests to the failed server.
1. In the `http` context, include a `match` directive to define the tests that a server must pass to be considered functional. In this example, it must return a status code between `200` and `399` and the `X-ORACLE-DMS-ECID` header must be set.
```nginx
# In the 'http' block
match oracleok {
status 200-399;
header X-ORACLE-DMS-ECID;
}
```
Directive documentation: [match](https://nginx.org/en/docs/http/ngx_http_upstream_hc_module.html#match)
2. In the `server` block for HTTPS traffic created in [Configuring Virtual Servers for HTTP and HTTPS Traffic](#virtual-servers), add a new `location` block for the health check.
```nginx
# In the 'server' block for HTTPS traffic
location @health_check {
internal;
proxy_connect_timeout 3s;
proxy_read_timeout 3s;
proxy_pass http://oracle;
proxy_set_header Host "oracle.company.com";
health_check match=oracleok interval=4s
uri=/OA_HTML/AppsLocalLogin.jsp;
}
```
Directive documentation: [health_check](https://nginx.org/en/docs/http/ngx_http_upstream_hc_module.html#health_check), [internal](https://nginx.org/en/docs/http/ngx_http_core_module.html#internal), [location](https://nginx.org/en/docs/http/ngx_http_core_module.html#location), [proxy_connect_timeout](https://nginx.org/en/docs/http/ngx_http_proxy_module.html#proxy_connect_timeout), [proxy_pass](https://nginx.org/en/docs/http/ngx_http_proxy_module.html#proxy_pass), [proxy_read_timeout](https://nginx.org/en/docs/http/ngx_http_proxy_module.html#proxy_read_timeout), [proxy_set_header](https://nginx.org/en/docs/http/ngx_http_proxy_module.html#proxy_set_header)
Note that the `location` block is in the `server` block for HTTPS traffic, but the `match` block is in the `http` block.
NGINX Plus also has a slow‑start feature that is a useful auxiliary to health checks. When a failed server recovers, or a new server is added to the upstream group, NGINX Plus slowly ramps up the traffic to it over a defined period of time. This gives the server time to "warm up" without being overwhelmed by more connections than it can handle as it starts up. For more information, see the NGINX Plus Admin Guide.
For example, to set a slow‑start period of 30 seconds for your EBS application servers, include the `slow_start` parameter to their `server` directives:
```nginx
# In the 'upstream' block
server 172.31.11.210:8000 slow_start=30s;
server 172.31.0.146:8000 slow_start=30s;
```
Parameter documentation: [slow_start](https://nginx.org/en/docs/http/ngx_http_upstream_module.html#slow_start)
For information about customizing health checks, see the [NGINX Plus Admin Guide](nginx/admin-guide/load-balancer/http-health-check.md).
### Configuring Caching for Application Acceleration
Caching of static objects like the following significantly improves the performance of Oracle EBS:
- Images
- CSS files
- JavaScript files
- Java applets
Before configuring caching, make sure that the NGINX Plus host has adequate free disk space and disk performance. SSDs are preferred for their superior performance, but standard spinning media can be used.
1. Create a directory for cached files:
```shell
root@nginx# mkdir /var/oracle-cache
root@nginx# chown nginx /var/oracle-cache
```
2. In the `http` context, define the path to the cache, the name (**cache_oracle**) and maximum size (50 MB) of the shared memory zone used for storing cache keys, and the maximum size of the cache itself (here, 500 MB). Adjust the size values as appropriate for the amount of free disk space on the NGINX Plus host.
```nginx
# In the 'http' block
proxy_cache_path /var/oracle-cache/ keys_zone=cache_oracle:50m max_size=500m;
```
Directive documentation: [proxy_cache_path](https://nginx.org/en/docs/http/ngx_http_proxy_module.html#proxy_cache_path)
3. In the `server` block for HTTPS traffic created in [Configuring Virtual Servers for HTTP and HTTPS Traffic](#virtual-servers), enable caching by defining the name of the shared memory zone for the cache (**cache_oracle**).
Also add the `proxy_cache_valid` directive to the existing `location` block for `/` (slash). The `any` parameter specifies that all responses are cached, and the `1h` parameter that cached items expire after one hour.
```nginx
# In the 'server' block for HTTPS traffic
proxy_cache cache_oracle;
location / {
proxy_pass http://oracle_one;
proxy_set_header Host $host;
proxy_cache_valid any 1h;
}
```
Directive documentation: [proxy_cache](https://nginx.org/en/docs/http/ngx_http_proxy_module.html#proxy_cache), [proxy_cache_valid](https://nginx.org/en/docs/http/ngx_http_proxy_module.html#proxy_cache_valid), [proxy_pass](https://nginx.org/en/docs/http/ngx_http_proxy_module.html#proxy_pass), [proxy_set_header](https://nginx.org/en/docs/http/ngx_http_proxy_module.html#proxy_set_header)
For more complete information on caching, see the [NGINX Plus Admin Guide](nginx/admin-guide/content-cache/content-caching.md) and the reference documentation for the HTTP [Proxy](https://nginx.org/en/docs/http/ngx_http_proxy_module.html) module.
You can track cache usage using the following methods:
- Statistics from the [NGINX Plus API](https://nginx.org/en/docs/http/ngx_http_api_module.html) module, displayed on the built‑in live activity monitoring dashboard, or fed to a custom or third‑party reporting tool
- The NGINX Plus access log, when the log format includes the `$upstream_cache_status` variable
For detailed configuration instructions, see the next section.
### Configuring Advanced Logging and Monitoring
NGINX Plus provides multiple ways to monitor your Oracle EBS installation, providing data about unavailable servers, failed health checks, response code statistics, and performance. In addition to its built‑in tools, NGINX Plus easily integrates into enterprise monitoring systems through industry‑standard protocols.
- [Configuring Logging with a Custom Message Format](#logging-custom-format)
- [Configuring Logging with syslog](#logging-syslog)
- [Configuring Live Activity Monitoring](#live-activity-monitoring)
- [Monitoring with Third-Party Tools](#monitoring-third-party)
#### Configuring Logging with a Custom Message Format
You can customize the format of messages written to the NGINX Plus access log to include more application‑specific information. Most system variables can be included in log messages. The predefined NGINX Plus **combined** format includes the following variables:
- `$body_bytes_sent` – Number of bytes in the body of the response sent to the client
- `$http_user_agent` – `User-Agent` header in the client request
- `$http_referer` – `Referer` header in the client request
- `$remote_addr` – Client IP address
- `$remote_user` – Username provided for HTTP Basic authentication
- `$request` – Full original request line
- `$status` – Response status code
- `$time_local` – Local time in the Common Log Format
You can access the complete list of NGINX Plus variables [here](https://nginx.org/en/docs/varindex.html).
To make troubleshooting of our load‑balancing deployment easier, let's add the `$upstream_addr` variable (the address of the actual server generating the response) to the variables in the **combined** format.
Add the following `log_format` and `access_log` directives in the `http` context to enable access logging to **/var/log/nginx/access.log** and to define the message format:
```nginx
# In the 'http' block
log_format main '$remote_addr - $remote_user [$time_local]
"$request" $status $body_bytes_sent "$http_referer"
"$http_user_agent" $upstream_addr';
access_log /var/log/nginx/access.log main;
```
Directive documentation: [access_log](https://nginx.org/en/docs/http/ngx_http_log_module.html#access_log), [log_format](https://nginx.org/en/docs/http/ngx_http_log_module.html#log_format)
To disable logging for all HTTP traffic, for a virtual server, or for a location, include the following directive in the `http`, `server`, or `location` block respectively:
```nginx
access_log off;
```
Note that the message format for error logs is predefined and cannot be changed.
#### Configuring Logging with syslog
The `syslog` utility is a widely used standard for message logging. It is used in the backbone of many monitoring and log‑aggregation solutions.
You can configure NGINX Plus to direct both error logs and access logs to `syslog` servers. These examples configure logging to a `syslog` server listening on IP address 192.168.1.1 and the default UDP port, 514.
To configure the error log, add the following `error_log` directive in the main context, the `http` context, or a `server` or `location` block:
```nginx
# In the main, 'http', 'server', or 'location' block
error_log syslog:server=192.168.1.1 info;
```
Directive documentation: [error_log](https://nginx.org/en/docs/ngx_core_module.html#error_log)
To configure the access log using the predefined **combined** format, add the following `access_log` directive in the `http` context (it appears on multiple lines here solely for formatting reasons:
```nginx
access_log syslog:server=192.168.1.1,facility=local7,tag=oracle,severity=info
combined;
```
Directive documentation: [access_log](https://nginx.org/en/docs/http/ngx_http_log_module.html#access_log)
You can include multiple `error_log` and `access_log` directives in the same context. Messages are sent to every `syslog` server and file.
#### Configuring Live Activity Monitoring
NGINX Plus includes a live activity monitoring interface that provides key load and performance metrics in real time, including TCP metrics in NGINX Plus R6 and later. Statistics are reported through a RESTful JSON interface, making it very easy to feed the data to a custom or third‑party monitoring tool. There is also a built‑in dashboard. Follow these instructions to deploy it.
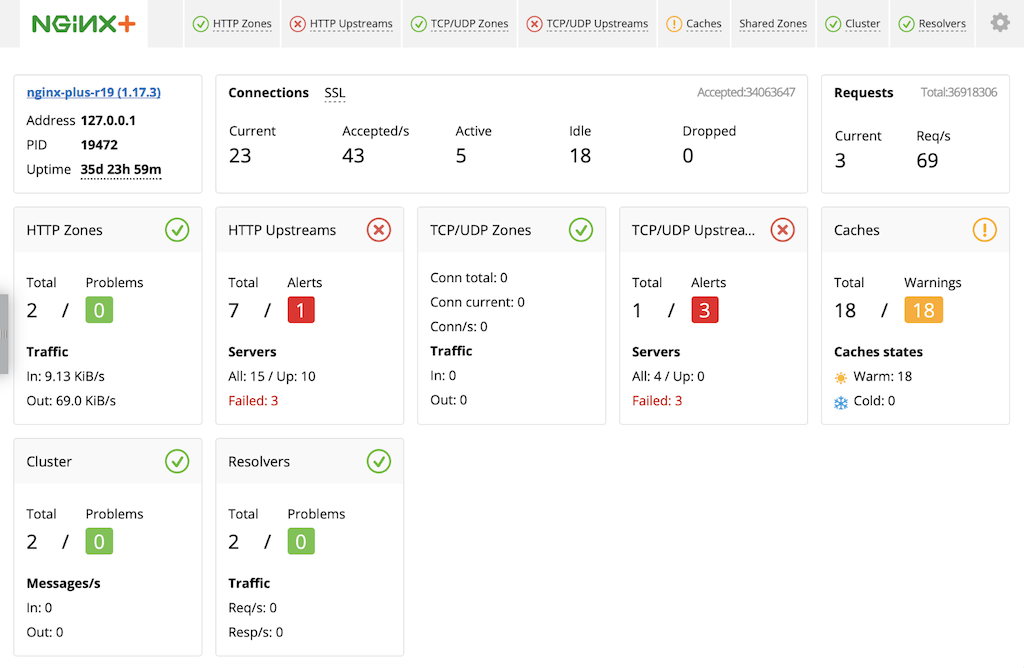 The quickest way to configure live activity monitoring and the built‑in dashboard is to download the sample configuration file from the NGINX website and modify it as necessary. For more complete instructions, see [Live Activity Monitoring of NGINX Plus in 3 Simple Steps](https://www.nginx.com/blog/live-activity-monitoring-nginx-plus-3-simple-steps/) on our blog.
1. Download the **status.conf** file to the NGINX Plus server:
```none
# cd /etc/nginx/conf.d
# curl https://www.nginx.com/resource/conf/status.conf > status.conf
```
2. Verify that the main configuration file (**/etc/nginx/nginx.conf**) has an `include` directive that reads the file into the `http` context. The following is specific to **status.conf**, but a wildcard version also works:
```nginx
# In the 'http' block in nginx.conf
include conf.d/status.conf;
```
Directive documentation: [include](https://nginx.org/en/docs/ngx_core_module.html#include)
3. Customize the file for your deployment as specified by comments in the file. In particular, the default settings in the file allow anyone on any network to access the dashboard. We strongly recommend that you restrict access to the dashboard with one or more of the following methods:
- **IP address‑based access control lists (ACLs)**. In the sample configuration file, uncomment the `allow` and `deny` directives, and substitute the address of your administrative network for 10.0.0.0/8. Only users on the specified network can access the status page.
```nginx
allow 10.0.0.0/8;
deny all;
```
Directive documentation: [allow and deny](https://nginx.org/en/docs/http/ngx_http_access_module.html)
- **HTTP Basic authentication**. In the sample configuration file, uncomment the `auth_basic` and `auth_basic_user_file` directives and add user entries to the **/etc/nginx/users** file (for example, by using an [htpasswd generator](https://httpd.apache.org/docs/2.4/programs/htpasswd.html)). If you have an Apache installation, another option is to reuse an existing **htpasswd** file.
```nginx
auth_basic on;
auth_basic_user_file /etc/nginx/users;
```
Directive documentation: [auth_basic and auth_basic_user_file](https://nginx.org/en/docs/http/ngx_http_auth_basic_module.html)
- **Client certificates**, which are part of a complete configuration of SSL/TLS. For more information, see the [NGINX Plus Admin Guide](../../admin-guide/security-controls/terminating-ssl-http.md) and the documentation for the HTTP [SSL/TLS](https://nginx.org/en/docs/http/ngx_http_ssl_module.html) module.
- **Firewall**. Configure your firewall to disallow outside access to the port for the dashboard (8080 in the sample configuration file).
4. In the `server` block for HTTPS traffic (created in [Configuring Virtual Servers for HTTP and HTTPS Traffic](#virtual-servers)), add this `status_zone` directive:
```nginx
# In the 'server' block for HTTPS traffic
status_zone oracle-ssl;
```
Directive documentation: [status_zone](https://nginx.org/en/docs/http/ngx_http_status_module.html#status_zone)
When you reload the NGINX Plus configuration file, for example by running the `nginx -s reload` command, the NGINX Plus dashboard is available immediately at http://_nginx-server-address_:8080.
For more information about live activity monitoring, see the [NGINX Plus Admin Guide](nginx/admin-guide/monitoring/live-activity-monitoring.md).
#### Monitoring with Third-Party Tools
The NGINX Plus API exports metrics in JSON format, so you can feed them to many monitoring systems. In addition, the [Prometheus-njs](../../admin-guide/dynamic-modules/prometheus-njs.md) module converts the JSON output to a Prometheus‑compliant format.
Several NGINX partners offer integrations for displaying and analyzing NGINX Open Source and NGINX Plus metrics. See our [Technology Partners](https://www.f5.com/go/partner/technology-partners) page.
### Configuring Backup Servers for Disaster Recovery
If you have backup EBS servers, either at the same physical location as your regular servers or at a disaster recovery site, you can include them in the configuration so that EBS continues to work even if all the primary EBS servers go down.
To configure backup servers, add `server` directives to the `upstream` block created in [Configuring Load Balancing](#load-balancing) and include the `backup` parameter. NGINX Plus does not forward traffic to them unless the primary servers all go down.
```nginx
# In the 'upstream' block
server 172.33.111.210:8000 max_fails=0 backup;
server 172.33.100.146:8000 max_fails=0 backup;
```
Parameter documentation: [backup](https://nginx.org/en/docs/http/ngx_http_upstream_module.html#backup)
You can then use a DNS‑based global load‑balancing solution to secure against site‑level failures.
### Configuring NGINX Plus for High Availability
To increase the reliability of your EBS deployment even more, configure a higly available (HA) deployment of NGINX Plus.
For configuration instructions for on‑premises deployments of NGINX Plus, see the [NGINX Plus Admin Guide](/nginx/admin-guide/high-availability/).
For configuration instructions for cloud‑based deployments of NGINX Plus, see our deployment guides:
- [Active-Active HA for NGINX Plus on AWS Using AWS Network Load Balancer](../amazon-web-services/high-availability-network-load-balancer.md)
- [Active-Passive HA for NGINX Plus on AWS Using Elastic IP Addresses](../amazon-web-services/high-availability-keepalived.md)
- [All-Active HA for NGINX Plus on the Google Cloud Platform](../google-cloud-platform/high-availability-all-active.md)
For other cloud environments, refer to the documentation provided by your cloud vendor.
We recommend that you use the integrated cloud tools as simple high‑availability solutions and let NGINX Plus perform more sophisticated operations:
- Security
- SSL/TLS termination
- Advanced request routing
- Health checks
- Session persistence
- Monitoring
- Caching
### Configuring Multiple Web Entry Points
The preceding sections of this document, starting with [Configuring Virtual Servers for HTTP and HTTPS Traffic](#virtual-servers), describe how to configure NGINX Plus load balancing for a single Web Entry Point.
You might need to configure multiple Web Entry Points through the same load balancer, for reasons like the following:
- Access from your internal network vs. externally available servers
- Access by different groups of users (employees, partners, customers)
- Access with different networking requirements (for example, a multihop DMZ configuration)
If you need multiple Web Entry Points, then for each one you must:
- Add a separate [upstream](https://nginx.org/en/docs/http/ngx_http_upstream_module.html#upstream) block for each set of app servers
- Add a separate [server](https://nginx.org/en/docs/http/ngx_http_core_module.html#server) block for each load balancer entry point
- Ensure that each [shared memory zone](https://nginx.org/en/docs/http/ngx_http_upstream_module.html#zone) has a unique name
- Include the [server_name](https://nginx.org/en/docs/http/ngx_http_core_module.html#server_name) directive in every `server` block
- Change the IP addresses in [listen](https://nginx.org/en/docs/http/ngx_http_core_module.html#listen) directives from wildcard values to specific addresses, if needed
- Provide additional SSL/TLS certificate files if not using UCC or wildcard certificates
For a sample configuration, see [Full Configuration for Multiple Web Entry Points](#full-configuration-multiple).
## Full Configuration Files
For your convenience, the configuration files in this section include all directives discussed in this guide. It is intended for reference. As explained in [About Sample Values and Copying of Text](#sample-values), we recommend that you do not copy text from this document into configuration files, because it might include unwanted link text and not include whitespace and other formatting that makes the configuration easy to read. Instead, download the appropriate file from the NGINX, Inc. website as described in [Creating and Modifying Configuration Files](#config-files).
Note that these configuration files contain sample values that you need to change for your deployment.
### Full Configuration for a Single Web Entry Point
```nginx
user nginx;
worker_processes auto;
error_log /var/log/nginx/error.log info;
pid /var/run/nginx.pid;
events {
worker_connections 1024;
}
http {
include /etc/nginx/mime.types;
default_type text/html;
proxy_cache_path /var/oracle-cache keys_zone=cache_oracle:50m max_size=500m;
# Custom logging configuration
log_format main '$remote_addr - $remote_user [$time_local]
"$request" $status $body_bytes_sent "$http_referer"
"$http_user_agent" $upstream_addr';
access_log /var/log/nginx/access.log main;
upstream oracle {
zone oracle 64k;
# Production servers
server 172.31.11.210:8000 max_fails=0;
server 172.31.0.146:8000 max_fails=0;
# Disaster recovery servers
server 172.33.111.210:8000 max_fails=0 backup;
server 172.33.100.146:8000 max_fails=0 backup;
# Session persistence
sticky cookie ngxcookie;
}
server {
listen 80;
status_zone oracle-http-redirect;
return 302 https://$http_host$request_uri;
}
server {
listen 443 ssl;
http2 on;
server_name company.com;
ssl_certificate /etc/nginx/ssl/certificate-name.crt;
ssl_certificate_key /etc/nginx/ssl/private-key.key;
ssl_protocols TLSv1.2;
status_zone oracle-ssl;
proxy_cache cache_oracle;
location / {
proxy_pass http://oracle;
proxy_set_header Host $host;
proxy_cache_valid any 1h;
}
location @health_check {
internal;
proxy_connect_timeout 3s;
proxy_read_timeout 3s;
proxy_pass http://oracle;
proxy_set_header Host "oracle.company.com";
health_check match=oracleok interval=4s
uri=/OA_HTML/AppsLocalLogin.jsp;
}
}
match oracleok {
status 200-399;
header X-ORACLE-DMS-ECID;
}
# Live activity monitoring configuration
server {
# Status zone required for live activity monitoring. Enable it for
# every 'server' block in other configuration files.
status_zone status-page;
# If NGINX Plus is listening on multiple IP addresses, uncomment this
# directive to restrict access to the live activity monitoring
# dashboard to a single IP address (substitute the appropriate
# address).
# listen 10.2.3.4:8080;
# Live activity monitoring is enabled on port 8080 by default.
listen 8080;
# HTTP Basic authentication is enabled by default. Use an htpasswd
# generator to add users, or command-line and other management tools are
# readily available online. If you have Apache HTTP Server installed, you
# can reuse its htpasswd file.
#auth_basic on;
#auth_basic_user_file /etc/nginx/users;
# Limit access to the dashboard to users on admin networks only.
# Uncomment the "allow" directive and change the IP address.
#allow 10.0.0.0/8;
deny all;
# Enable the NGINX Plus API for metrics collection.
location /api {
api write=on;
access_log off;
}
# NGINX Plus includes a built-in dashboard.
location = /dashboard.html {
root /usr/share/nginx/html;
}
# Redirect requests made to the pre-R14 dashboard.
location = /status.html {
return 301 /dashboard.html;
}
# Standard HTTP features are fully supported with the dashboard.
# Redirect request for '/' to '/dashboard.html'.
location = / {
return 301 /dashboard.html;
}
}
}
```
### Full Configuration for Multiple Web Entry Points
This configuration is for two Web Entry Points with the following settings:
| | **Web Entry Point 1** | **Web Entry Point 2** |
| ---| ---| --- |
|Domain name | **oracle-one.company.com** | **oracle-two.company.com** |
|SSL/TLS certificate and key | **server_one.crt** & **server_one.key** | **server_two.crt** & **server_two.key** |
|Status zone | **oracle-ssl-one** | **oracle-ssl-two** |
|Cache zone | **cache_oracle_one** | **cache_oracle_two** |
|Upstream name | **oracle_one** | **oracle_two** |
|EBS servers | 172.31.11.210 & 172.31.0.146 | 172.31.11.211 & 172.31.0.147 |
|Backup (DR) EBS servers | 172.33.111.210 & 172.33.100.146 | 172.33.111.211 & 172.33.100.147 |
```nginx
user nginx;
worker_processes auto;
error_log /var/log/nginx/error.log info;
pid /var/run/nginx.pid;
events {
worker_connections 1024;
}
http {
include /etc/nginx/mime.types;
default_type text/html;
proxy_cache_path /var/oracle-cache-one
keys_zone=cache_oracle_one:50m max_size=500m;
proxy_cache_path /var/oracle-cache-two
keys_zone=cache_oracle_two:50m max_size=500m;
# Custom logging configuration
log_format main '$remote_addr - $remote_user [$time_local]
"$request" $status $body_bytes_sent "$http_referer"
"$http_user_agent" $upstream_addr';
access_log /var/log/nginx/access.log main;
upstream oracle_one {
zone oracle_one 64k;
# Production servers
server 172.31.11.210:8000 max_fails=0;
server 172.31.0.146:8000 max_fails=0;
# Disaster recovery servers
server 172.33.111.210:8000 max_fails=0 backup;
server 172.33.100.146:8000 max_fails=0 backup;
# Session persistence
sticky cookie ngxcookie;
}
upstream oracle_two {
zone oracle_two 64k;
# Production servers
server 172.31.11.211:8000 max_fails=0;
server 172.31.0.147:8000 max_fails=0;
# Disaster recovery servers
server 172.33.111.211:8000 max_fails=0 backup;
server 172.33.100.147:8000 max_fails=0 backup;
# Session persistence
sticky cookie ngxcookie;
}
server {
listen 80;
status_zone oracle-http-redirect;
return 302 https://$http_host$request_uri;
}
server {
listen 192.168.210.10:443 ssl;
http2 on;
server_name oracle-one.company.com;
ssl_certificate /etc/nginx/ssl/server_one.crt;
ssl_certificate_key /etc/nginx/ssl/server_one.key;
ssl_protocols TLSv1.2;
status_zone oracle-ssl-one;
proxy_cache cache_oracle_one;
location / {
proxy_pass http://oracle_one;
proxy_set_header Host $host;
proxy_cache_valid any 1h;
}
location @health_check {
internal;
proxy_connect_timeout 3s;
proxy_read_timeout 3s;
proxy_pass http://oracle_one;
proxy_set_header Host "oracle-one.company.com";
health_check match=oracleok interval=4s
uri=/OA_HTML/AppsLocalLogin.jsp;
}
}
server {
listen 192.168.210.11:443 ssl;
http2 on;
server_name oracle-two.company.com;
ssl_certificate /etc/nginx/ssl/server_two.crt;
ssl_certificate_key /etc/nginx/ssl/server_two.key;
ssl_protocols TLSv1.2;
status_zone oracle-ssl-two;
proxy_cache cache_oracle_two;
location / {
proxy_pass http://oracle_two;
proxy_set_header Host $host;
proxy_cache_valid any 1h;
}
location @health_check {
internal;
proxy_connect_timeout 3s;
proxy_read_timeout 3s;
proxy_pass http://oracle_two;
proxy_set_header Host "oracle-two.company.com";
health_check match=oracleok interval=4s
uri=/OA_HTML/AppsLocalLogin.jsp;
}
}
match oracleok {
status 200-399;
header X-ORACLE-DMS-ECID;
}
# Live activity monitoring configuration
server {
# Status zone required for live activity monitoring. Enable it for
# every 'server' block in other configuration files.
status_zone status-page;
# If NGINX Plus is listening on multiple IP addresses, uncomment this
# directive to restrict access to the live activity monitoring
# dashboard to a single IP address (substitute the appropriate
# address).
# listen 10.2.3.4:8080;
# Live activity monitoring is enabled on port 8080 by default.
listen 8080;
# HTTP Basic authentication is enabled by default. Use an htpasswd
# generator to add users, or command-line and other management tools are
# readily available online. If you have Apache HTTP Server installed, you
# can reuse its htpasswd file.
#auth_basic on;
#auth_basic_user_file /etc/nginx/users;
# Limit access to the dashboard to users on admin networks only.
# Uncomment the "allow" directive and change the IP address.
#allow 10.0.0.0/8;
deny all;
# Enable the NGINX Plus API for metrics collection.
location /api {
api write=on;
access_log off;
}
# NGINX Plus includes a built-in dashboard.
location = /dashboard.html {
root /usr/share/nginx/html;
}
# Redirect requests made to the pre-R14 dashboard.
location = /status.html {
return 301 /dashboard.html;
}
# Standard HTTP features are fully supported with the dashboard.
# Redirect request for '/' to '/dashboard.html'.
location = / {
return 301 /dashboard.html;
}
}
}
```
## Resources
- [NGINX Plus Overview](https://www.f5.com/products/nginx/nginx-plus)
- [NGINX Plus Admin Guide](/nginx/admin-guide/_index.md)
- [NGINX Wiki](https://www.nginx.com/resources/wiki/)
### Revision History
- Version 5 (May 2024) – Update about HTTP/2 support (the [http2](https://nginx.org/en/docs/http/ngx_http_v2_module.html#http2) directive)
- Version 4 (October 2019) – Update information about third-party monitoring tools (NGINX Plus R19)
- Version 3 (April 2018) – Updated information about high availability and the NGINX Plus API (NGINX Plus R13, NGINX Open Source 1.13.4)
- Version 2 (July 2017) – Update about HTTP/2 support (NGINX Plus R11 and later)
- Version 1 (November 2015) – Initial version (NGINX Plus R7, NGINX ß1.9.5)
The quickest way to configure live activity monitoring and the built‑in dashboard is to download the sample configuration file from the NGINX website and modify it as necessary. For more complete instructions, see [Live Activity Monitoring of NGINX Plus in 3 Simple Steps](https://www.nginx.com/blog/live-activity-monitoring-nginx-plus-3-simple-steps/) on our blog.
1. Download the **status.conf** file to the NGINX Plus server:
```none
# cd /etc/nginx/conf.d
# curl https://www.nginx.com/resource/conf/status.conf > status.conf
```
2. Verify that the main configuration file (**/etc/nginx/nginx.conf**) has an `include` directive that reads the file into the `http` context. The following is specific to **status.conf**, but a wildcard version also works:
```nginx
# In the 'http' block in nginx.conf
include conf.d/status.conf;
```
Directive documentation: [include](https://nginx.org/en/docs/ngx_core_module.html#include)
3. Customize the file for your deployment as specified by comments in the file. In particular, the default settings in the file allow anyone on any network to access the dashboard. We strongly recommend that you restrict access to the dashboard with one or more of the following methods:
- **IP address‑based access control lists (ACLs)**. In the sample configuration file, uncomment the `allow` and `deny` directives, and substitute the address of your administrative network for 10.0.0.0/8. Only users on the specified network can access the status page.
```nginx
allow 10.0.0.0/8;
deny all;
```
Directive documentation: [allow and deny](https://nginx.org/en/docs/http/ngx_http_access_module.html)
- **HTTP Basic authentication**. In the sample configuration file, uncomment the `auth_basic` and `auth_basic_user_file` directives and add user entries to the **/etc/nginx/users** file (for example, by using an [htpasswd generator](https://httpd.apache.org/docs/2.4/programs/htpasswd.html)). If you have an Apache installation, another option is to reuse an existing **htpasswd** file.
```nginx
auth_basic on;
auth_basic_user_file /etc/nginx/users;
```
Directive documentation: [auth_basic and auth_basic_user_file](https://nginx.org/en/docs/http/ngx_http_auth_basic_module.html)
- **Client certificates**, which are part of a complete configuration of SSL/TLS. For more information, see the [NGINX Plus Admin Guide](../../admin-guide/security-controls/terminating-ssl-http.md) and the documentation for the HTTP [SSL/TLS](https://nginx.org/en/docs/http/ngx_http_ssl_module.html) module.
- **Firewall**. Configure your firewall to disallow outside access to the port for the dashboard (8080 in the sample configuration file).
4. In the `server` block for HTTPS traffic (created in [Configuring Virtual Servers for HTTP and HTTPS Traffic](#virtual-servers)), add this `status_zone` directive:
```nginx
# In the 'server' block for HTTPS traffic
status_zone oracle-ssl;
```
Directive documentation: [status_zone](https://nginx.org/en/docs/http/ngx_http_status_module.html#status_zone)
When you reload the NGINX Plus configuration file, for example by running the `nginx -s reload` command, the NGINX Plus dashboard is available immediately at http://_nginx-server-address_:8080.
For more information about live activity monitoring, see the [NGINX Plus Admin Guide](nginx/admin-guide/monitoring/live-activity-monitoring.md).
#### Monitoring with Third-Party Tools
The NGINX Plus API exports metrics in JSON format, so you can feed them to many monitoring systems. In addition, the [Prometheus-njs](../../admin-guide/dynamic-modules/prometheus-njs.md) module converts the JSON output to a Prometheus‑compliant format.
Several NGINX partners offer integrations for displaying and analyzing NGINX Open Source and NGINX Plus metrics. See our [Technology Partners](https://www.f5.com/go/partner/technology-partners) page.
### Configuring Backup Servers for Disaster Recovery
If you have backup EBS servers, either at the same physical location as your regular servers or at a disaster recovery site, you can include them in the configuration so that EBS continues to work even if all the primary EBS servers go down.
To configure backup servers, add `server` directives to the `upstream` block created in [Configuring Load Balancing](#load-balancing) and include the `backup` parameter. NGINX Plus does not forward traffic to them unless the primary servers all go down.
```nginx
# In the 'upstream' block
server 172.33.111.210:8000 max_fails=0 backup;
server 172.33.100.146:8000 max_fails=0 backup;
```
Parameter documentation: [backup](https://nginx.org/en/docs/http/ngx_http_upstream_module.html#backup)
You can then use a DNS‑based global load‑balancing solution to secure against site‑level failures.
### Configuring NGINX Plus for High Availability
To increase the reliability of your EBS deployment even more, configure a higly available (HA) deployment of NGINX Plus.
For configuration instructions for on‑premises deployments of NGINX Plus, see the [NGINX Plus Admin Guide](/nginx/admin-guide/high-availability/).
For configuration instructions for cloud‑based deployments of NGINX Plus, see our deployment guides:
- [Active-Active HA for NGINX Plus on AWS Using AWS Network Load Balancer](../amazon-web-services/high-availability-network-load-balancer.md)
- [Active-Passive HA for NGINX Plus on AWS Using Elastic IP Addresses](../amazon-web-services/high-availability-keepalived.md)
- [All-Active HA for NGINX Plus on the Google Cloud Platform](../google-cloud-platform/high-availability-all-active.md)
For other cloud environments, refer to the documentation provided by your cloud vendor.
We recommend that you use the integrated cloud tools as simple high‑availability solutions and let NGINX Plus perform more sophisticated operations:
- Security
- SSL/TLS termination
- Advanced request routing
- Health checks
- Session persistence
- Monitoring
- Caching
### Configuring Multiple Web Entry Points
The preceding sections of this document, starting with [Configuring Virtual Servers for HTTP and HTTPS Traffic](#virtual-servers), describe how to configure NGINX Plus load balancing for a single Web Entry Point.
You might need to configure multiple Web Entry Points through the same load balancer, for reasons like the following:
- Access from your internal network vs. externally available servers
- Access by different groups of users (employees, partners, customers)
- Access with different networking requirements (for example, a multihop DMZ configuration)
If you need multiple Web Entry Points, then for each one you must:
- Add a separate [upstream](https://nginx.org/en/docs/http/ngx_http_upstream_module.html#upstream) block for each set of app servers
- Add a separate [server](https://nginx.org/en/docs/http/ngx_http_core_module.html#server) block for each load balancer entry point
- Ensure that each [shared memory zone](https://nginx.org/en/docs/http/ngx_http_upstream_module.html#zone) has a unique name
- Include the [server_name](https://nginx.org/en/docs/http/ngx_http_core_module.html#server_name) directive in every `server` block
- Change the IP addresses in [listen](https://nginx.org/en/docs/http/ngx_http_core_module.html#listen) directives from wildcard values to specific addresses, if needed
- Provide additional SSL/TLS certificate files if not using UCC or wildcard certificates
For a sample configuration, see [Full Configuration for Multiple Web Entry Points](#full-configuration-multiple).
## Full Configuration Files
For your convenience, the configuration files in this section include all directives discussed in this guide. It is intended for reference. As explained in [About Sample Values and Copying of Text](#sample-values), we recommend that you do not copy text from this document into configuration files, because it might include unwanted link text and not include whitespace and other formatting that makes the configuration easy to read. Instead, download the appropriate file from the NGINX, Inc. website as described in [Creating and Modifying Configuration Files](#config-files).
Note that these configuration files contain sample values that you need to change for your deployment.
### Full Configuration for a Single Web Entry Point
```nginx
user nginx;
worker_processes auto;
error_log /var/log/nginx/error.log info;
pid /var/run/nginx.pid;
events {
worker_connections 1024;
}
http {
include /etc/nginx/mime.types;
default_type text/html;
proxy_cache_path /var/oracle-cache keys_zone=cache_oracle:50m max_size=500m;
# Custom logging configuration
log_format main '$remote_addr - $remote_user [$time_local]
"$request" $status $body_bytes_sent "$http_referer"
"$http_user_agent" $upstream_addr';
access_log /var/log/nginx/access.log main;
upstream oracle {
zone oracle 64k;
# Production servers
server 172.31.11.210:8000 max_fails=0;
server 172.31.0.146:8000 max_fails=0;
# Disaster recovery servers
server 172.33.111.210:8000 max_fails=0 backup;
server 172.33.100.146:8000 max_fails=0 backup;
# Session persistence
sticky cookie ngxcookie;
}
server {
listen 80;
status_zone oracle-http-redirect;
return 302 https://$http_host$request_uri;
}
server {
listen 443 ssl;
http2 on;
server_name company.com;
ssl_certificate /etc/nginx/ssl/certificate-name.crt;
ssl_certificate_key /etc/nginx/ssl/private-key.key;
ssl_protocols TLSv1.2;
status_zone oracle-ssl;
proxy_cache cache_oracle;
location / {
proxy_pass http://oracle;
proxy_set_header Host $host;
proxy_cache_valid any 1h;
}
location @health_check {
internal;
proxy_connect_timeout 3s;
proxy_read_timeout 3s;
proxy_pass http://oracle;
proxy_set_header Host "oracle.company.com";
health_check match=oracleok interval=4s
uri=/OA_HTML/AppsLocalLogin.jsp;
}
}
match oracleok {
status 200-399;
header X-ORACLE-DMS-ECID;
}
# Live activity monitoring configuration
server {
# Status zone required for live activity monitoring. Enable it for
# every 'server' block in other configuration files.
status_zone status-page;
# If NGINX Plus is listening on multiple IP addresses, uncomment this
# directive to restrict access to the live activity monitoring
# dashboard to a single IP address (substitute the appropriate
# address).
# listen 10.2.3.4:8080;
# Live activity monitoring is enabled on port 8080 by default.
listen 8080;
# HTTP Basic authentication is enabled by default. Use an htpasswd
# generator to add users, or command-line and other management tools are
# readily available online. If you have Apache HTTP Server installed, you
# can reuse its htpasswd file.
#auth_basic on;
#auth_basic_user_file /etc/nginx/users;
# Limit access to the dashboard to users on admin networks only.
# Uncomment the "allow" directive and change the IP address.
#allow 10.0.0.0/8;
deny all;
# Enable the NGINX Plus API for metrics collection.
location /api {
api write=on;
access_log off;
}
# NGINX Plus includes a built-in dashboard.
location = /dashboard.html {
root /usr/share/nginx/html;
}
# Redirect requests made to the pre-R14 dashboard.
location = /status.html {
return 301 /dashboard.html;
}
# Standard HTTP features are fully supported with the dashboard.
# Redirect request for '/' to '/dashboard.html'.
location = / {
return 301 /dashboard.html;
}
}
}
```
### Full Configuration for Multiple Web Entry Points
This configuration is for two Web Entry Points with the following settings:
| | **Web Entry Point 1** | **Web Entry Point 2** |
| ---| ---| --- |
|Domain name | **oracle-one.company.com** | **oracle-two.company.com** |
|SSL/TLS certificate and key | **server_one.crt** & **server_one.key** | **server_two.crt** & **server_two.key** |
|Status zone | **oracle-ssl-one** | **oracle-ssl-two** |
|Cache zone | **cache_oracle_one** | **cache_oracle_two** |
|Upstream name | **oracle_one** | **oracle_two** |
|EBS servers | 172.31.11.210 & 172.31.0.146 | 172.31.11.211 & 172.31.0.147 |
|Backup (DR) EBS servers | 172.33.111.210 & 172.33.100.146 | 172.33.111.211 & 172.33.100.147 |
```nginx
user nginx;
worker_processes auto;
error_log /var/log/nginx/error.log info;
pid /var/run/nginx.pid;
events {
worker_connections 1024;
}
http {
include /etc/nginx/mime.types;
default_type text/html;
proxy_cache_path /var/oracle-cache-one
keys_zone=cache_oracle_one:50m max_size=500m;
proxy_cache_path /var/oracle-cache-two
keys_zone=cache_oracle_two:50m max_size=500m;
# Custom logging configuration
log_format main '$remote_addr - $remote_user [$time_local]
"$request" $status $body_bytes_sent "$http_referer"
"$http_user_agent" $upstream_addr';
access_log /var/log/nginx/access.log main;
upstream oracle_one {
zone oracle_one 64k;
# Production servers
server 172.31.11.210:8000 max_fails=0;
server 172.31.0.146:8000 max_fails=0;
# Disaster recovery servers
server 172.33.111.210:8000 max_fails=0 backup;
server 172.33.100.146:8000 max_fails=0 backup;
# Session persistence
sticky cookie ngxcookie;
}
upstream oracle_two {
zone oracle_two 64k;
# Production servers
server 172.31.11.211:8000 max_fails=0;
server 172.31.0.147:8000 max_fails=0;
# Disaster recovery servers
server 172.33.111.211:8000 max_fails=0 backup;
server 172.33.100.147:8000 max_fails=0 backup;
# Session persistence
sticky cookie ngxcookie;
}
server {
listen 80;
status_zone oracle-http-redirect;
return 302 https://$http_host$request_uri;
}
server {
listen 192.168.210.10:443 ssl;
http2 on;
server_name oracle-one.company.com;
ssl_certificate /etc/nginx/ssl/server_one.crt;
ssl_certificate_key /etc/nginx/ssl/server_one.key;
ssl_protocols TLSv1.2;
status_zone oracle-ssl-one;
proxy_cache cache_oracle_one;
location / {
proxy_pass http://oracle_one;
proxy_set_header Host $host;
proxy_cache_valid any 1h;
}
location @health_check {
internal;
proxy_connect_timeout 3s;
proxy_read_timeout 3s;
proxy_pass http://oracle_one;
proxy_set_header Host "oracle-one.company.com";
health_check match=oracleok interval=4s
uri=/OA_HTML/AppsLocalLogin.jsp;
}
}
server {
listen 192.168.210.11:443 ssl;
http2 on;
server_name oracle-two.company.com;
ssl_certificate /etc/nginx/ssl/server_two.crt;
ssl_certificate_key /etc/nginx/ssl/server_two.key;
ssl_protocols TLSv1.2;
status_zone oracle-ssl-two;
proxy_cache cache_oracle_two;
location / {
proxy_pass http://oracle_two;
proxy_set_header Host $host;
proxy_cache_valid any 1h;
}
location @health_check {
internal;
proxy_connect_timeout 3s;
proxy_read_timeout 3s;
proxy_pass http://oracle_two;
proxy_set_header Host "oracle-two.company.com";
health_check match=oracleok interval=4s
uri=/OA_HTML/AppsLocalLogin.jsp;
}
}
match oracleok {
status 200-399;
header X-ORACLE-DMS-ECID;
}
# Live activity monitoring configuration
server {
# Status zone required for live activity monitoring. Enable it for
# every 'server' block in other configuration files.
status_zone status-page;
# If NGINX Plus is listening on multiple IP addresses, uncomment this
# directive to restrict access to the live activity monitoring
# dashboard to a single IP address (substitute the appropriate
# address).
# listen 10.2.3.4:8080;
# Live activity monitoring is enabled on port 8080 by default.
listen 8080;
# HTTP Basic authentication is enabled by default. Use an htpasswd
# generator to add users, or command-line and other management tools are
# readily available online. If you have Apache HTTP Server installed, you
# can reuse its htpasswd file.
#auth_basic on;
#auth_basic_user_file /etc/nginx/users;
# Limit access to the dashboard to users on admin networks only.
# Uncomment the "allow" directive and change the IP address.
#allow 10.0.0.0/8;
deny all;
# Enable the NGINX Plus API for metrics collection.
location /api {
api write=on;
access_log off;
}
# NGINX Plus includes a built-in dashboard.
location = /dashboard.html {
root /usr/share/nginx/html;
}
# Redirect requests made to the pre-R14 dashboard.
location = /status.html {
return 301 /dashboard.html;
}
# Standard HTTP features are fully supported with the dashboard.
# Redirect request for '/' to '/dashboard.html'.
location = / {
return 301 /dashboard.html;
}
}
}
```
## Resources
- [NGINX Plus Overview](https://www.f5.com/products/nginx/nginx-plus)
- [NGINX Plus Admin Guide](/nginx/admin-guide/_index.md)
- [NGINX Wiki](https://www.nginx.com/resources/wiki/)
### Revision History
- Version 5 (May 2024) – Update about HTTP/2 support (the [http2](https://nginx.org/en/docs/http/ngx_http_v2_module.html#http2) directive)
- Version 4 (October 2019) – Update information about third-party monitoring tools (NGINX Plus R19)
- Version 3 (April 2018) – Updated information about high availability and the NGINX Plus API (NGINX Plus R13, NGINX Open Source 1.13.4)
- Version 2 (July 2017) – Update about HTTP/2 support (NGINX Plus R11 and later)
- Version 1 (November 2015) – Initial version (NGINX Plus R7, NGINX ß1.9.5)