# Single Sign-On with Okta and njs
> Learn how to enable single sign-on (SSO) with Okta for applications proxied by F5 NGINX Plus.
**Note:** This guide applies to NGINX Plus [Release 15](nginx/releases.md#r15) and later, based on the [`nginx-openid-connect`](https://github.com/nginxinc/nginx-openid-connect) GitHub repo. Starting with NGINX Plus [Release 34](nginx/releases.md#r34), use the simpler solution with the [native OpenID connect module](https://nginx.org/en/docs/http/ngx_http_oidc_module.html).
See [Single Sign-On With Okta](nginx/deployment-guides/single-sign-on/okta.md) for details.
You can use NGINX Plus with Okta and OpenID Connect to enable single sign-on (SSO) for your proxied applications. By following the steps in this guide, you will learn how to set up SSO using OpenID Connect as the authentication mechanism, with Okta as the identity provider (IdP), and NGINX Plus as the relying party.
**Note:** You can find more information about the NGINX Plus OpenID Connect integration in the project's [GitHub repo](https://github.com/nginxinc/nginx-openid-connect#nginx-openid-connect).
## Prerequisites
To complete the steps in this guide, you need the following:
- An Okta administrator account.
- [NGINX Plus](https://www.f5.com/products/nginx/nginx-plus) with a valid subscription.
- The [NGINX JavaScript module](https://nginx.org/en/docs/njs/index.html) (`njs`) -- the `njs` module handles the interaction between NGINX Plus and Okta.
- Install `jq` on the host machine where you installed NGINX Plus.
## Install NGINX Plus and the njs Module
1. If you do not already have NGINX Plus installed, follow the steps in the [NGINX Plus Admin Guide](https://docs.nginx.com/nginx/admin-guide/installing-nginx/installing-nginx-plus/) to do so.
2. Install the NGINX JavaScript module by following the steps in the [`njs` installation guide](https://nginx.org/en/docs/njs/install.html).
3. Add the following directive to the top-level ("main") configuration context in the NGINX Plus configuration (`/etc/nginx/nginx.conf`) to load the `njs` module:
```Nginx configuration file
load_module modules/ngx_http_js_module.so;
```
## Configure Okta {#okta}
Take the steps in this section to create a new application for NGINX Plus.
**Note:** This section contains images that reflect the state of the Okta web interface at the time of publication. The actual Okta GUI may differ from the examples shown here. Use this guide as a reference and adapt the instructions to suit the current Okta GUI as necessary.
This section describes the Okta Workforce Identity SSO product. You will need administrator access to your organization in Okta to complete this task. Your experience may differ somewhat if you're using the Okta Customer Identity product.
### Create a New Okta Web Application
1. Log in to Okta at [okta.com](https:///www.okta.com).
1. Select the **Admin** button next to your username to access the Admin console.
1. On your Admin dashboard, select **Applications** in the left-hand navigation menu.
1. On the **Applications** page, select the **Create App Integration** button.
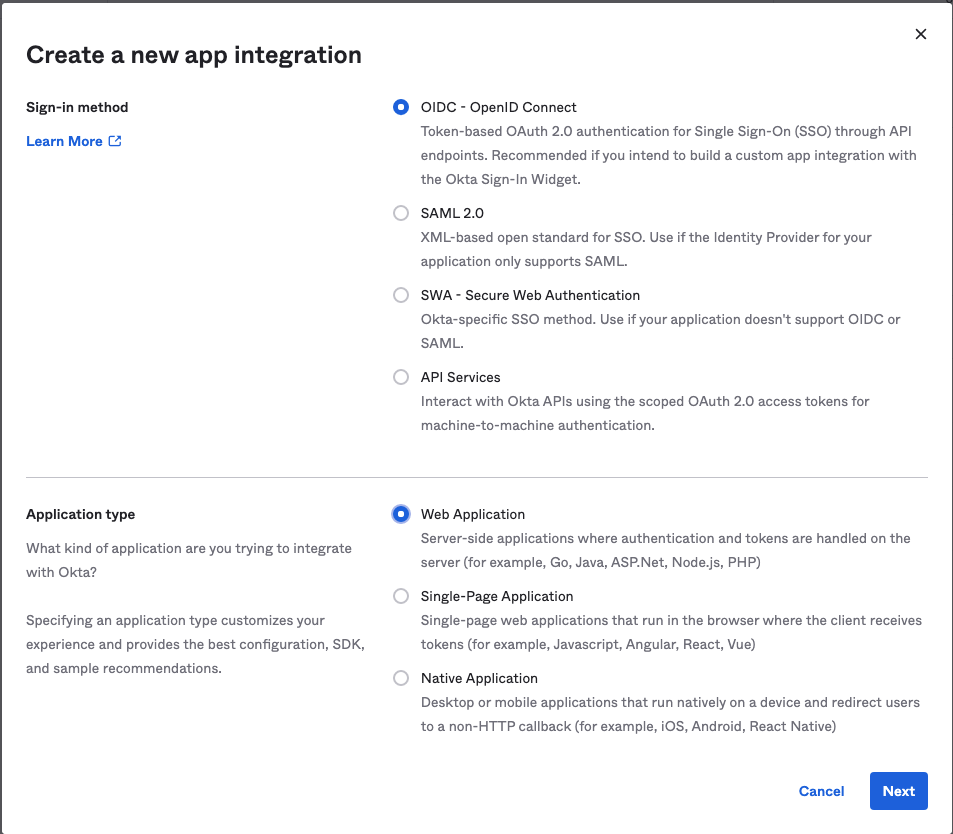
1. In the **Create a new app integration** window, define the following values, then select **Next**:
- **Sign-in method**: OIDC - OpenID Connect
- **Application type**: Web Application
### Set up the Web App Integration {#okta-integration}
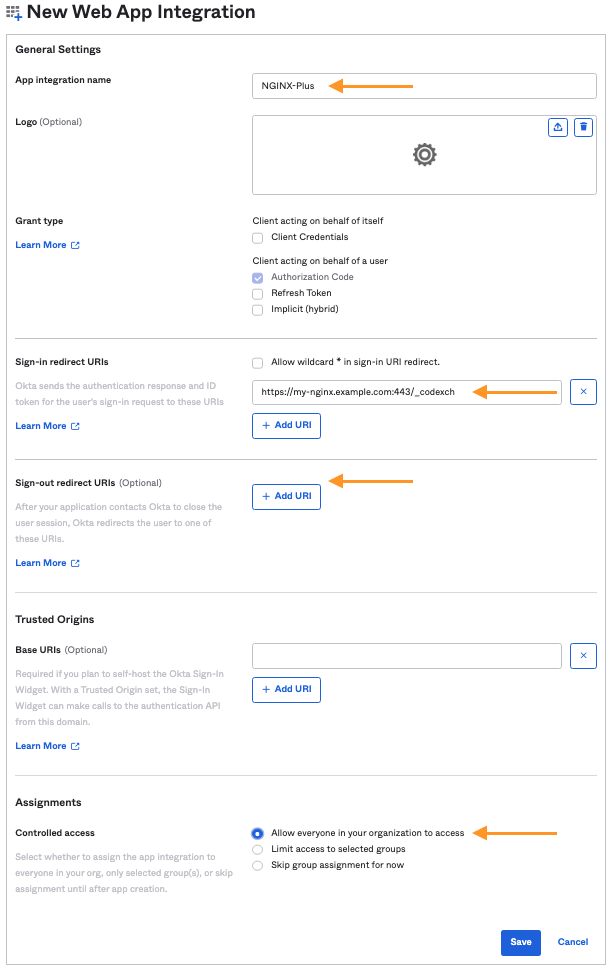
On the **New Web App Integration** page in the Okta web interface, fill in the following information, then select **Save**.
| Field | Desciption | Example Value |
|-------------|---------|----------|
| **App integration name** | The name of the OpenID Connect relying party. Okta refers to this as the "application". | **NGINX-Plus** |
| **Sign-in redirect URIs** | The URI of the NGINX Plus instance -- including the port number -- ending in **`/_codexch`**.
- The port is always required, even if you use the default port for HTTP (`80`) or HTTPS (`443`).
- The use of SSL/TLS (`443`) is strongly recommended for production environments.
| `https://my-nginx.example.com:443/_codexch` |
| **Sign-out redirect URIs** | The URI to redirect users to after logging out.
This is an optional field with a default value of `http://localhost:8080`. | We removed the default value in our example. |
| **Controlled access** | Controls who can access the application. | "Allow everyone in your organization to access"
**You should select the appropriate value for your use case.**|
### Get the Okta App Client Credentials {#okta-client-id-secret}
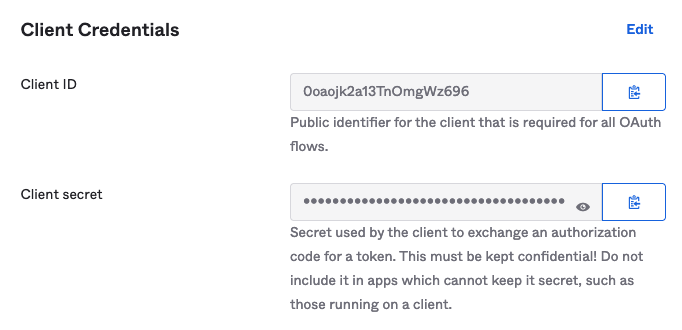
After you finish creating your application, the Okta Application page should display. You can find the Client Credentials for your Okta Application here.
**Note:** If you need to find this information later, log in to your Okta admin account as [described above](#okta-login), select **Applications** in the left-hand menu, then select your application.
Make note of the **Client ID** and **Client secret** values for your application. You will need these when you [configure NGINX Plus](#nginx-plus).
### Manage Access to your Okta Application {#okta-assign-applications}
To change the users and groups that have access to your Okta Application:
1. Log in to Okta as an Admin as [described above](#okta-login).
1. Select **Applications** in the left-hand menu, then select your application.
1. Select the **Assignments** tab for the Application.
Here, you can manage which users in your organization are granted access to this application.
## Set up NGINX Plus {#nginx-plus}
Take the steps in this section to set up NGINX Plus as the OpenID Connect relying party.
### Configure NGINX OpenID Connect {#nginx-plus-oidc-config}
1. Clone the [nginx-openid-connect](https://github.com/nginxinc/nginx-openid-connect) GitHub repository, or download the repo files.
```shell
git clone https://github.com/nginxinc/nginx-openid-connect.git
```
1. Copy the following files to the `/etc/nginx/conf.d` directory on the host machine where NGINX Plus is installed:
- `frontend.conf`
- `openid_connect.js`
- `openid_connect.server_conf`
- `openid_connect_configuration.conf`
1. Get the URLs for the authorization endpoint, token endpoint, and JSON Web Key (JWK) file from the Okta configuration.
Run the following `curl` command in a terminal.
**Note:** We recommend piping the output to `jq` to output the entire configuration in an easily readable format.
The output in the example below is abridged to show only the relevant fields.
```shell
curl https://-admin.okta.com/.well-known/openid-configuration | jq
...
{
"authorization_endpoint": "https://.okta.com/oauth2/v1/authorize",
...
"jwks_uri": "https://.okta.com/oauth2/v1/keys",
...
"token_endpoint": "https://.okta.com/oauth2/v1/token",
...
}
```
1. Add the correct values for your IdP to the OpenID Connect configuration file (`/etc/nginx/conf.d/openid_connect_configuration.conf`).
This file contains the primary configuration for one or more IdPs in `map{}` blocks. You should modify the `map…$oidc_` blocks as appropriate to match your IdP configuration.
- Define the `$oidc_authz_endpoint`, `$oidc_token_endpoint`, and `$oidc_jwt_keyfile` values using the information returned in the previous step.
- Change the URI defined in `map…$oidc_logout_redirect` to the URI of a resource (for example, your home page) that should be displayed after a client requests the `/logout` location.
- Set a unique, long, and secure phrase for `$oidc_hmac_key` to ensure nonce values are unpredictable.
### Set up JSON Web Key Authorization {#nginx-plus-jwk-config}
NGINX Plus can read the JWK file directly from the URL reported as `jwks_uri` in the output of the `curl` command you ran in the [previous section](#nginx-plus-oidc-config).
**Note:**
If you are using NGINX Plus R16 or earlier, refer to [Set up JWK Authorization using a local file](#nginx-plus-jwk-auth-local).
Take the following steps to set up NGINX Plus to access the JWK file by using a URI.
1. In the `/etc/nginx/conf.d/frontend.conf` file, remove (or comment out) the [auth_jwt_key_file](http://nginx.org/en/docs/http/ngx_http_auth_jwt_module.html#auth_jwt_key_file) directive.
1. Uncomment the [auth_jwt_key_request](http://nginx.org/en/docs/http/ngx_http_auth_jwt_module.html#auth_jwt_key_request) directive.
The parameter `/_jwks_uri` refers to the value of the `$oidc_jwt_keyfile` variable, which you already set in the OpenID Connect configuration file (`/etc/nginx/conf.d/openid_connect_configuration.conf`).
#### Set up JWK Authorization using a Local File {#nginx-plus-jwk-auth-local}
In NGINX Plus R16 and earlier, NGINX Plus cannot access the JWK file via the URI. Instead, the JWK file must be on the local disk.
Take the steps below to set up JWK authorization using a local file:
1. Copy the JSON contents from the JWK file named in the `jwks_uri` field to a local file. For example, `/etc/nginx/my_okta_jwk.json`
1. In `/etc/nginx/conf.d/frontend.conf`, change the second parameter of the `set $oidc_jwt_keyfile` directive to the local file path of the JWK file.
1. Confirm that the user named by the [user](http://nginx.org/en/docs/ngx_core_module.html#user) directive in the NGINX Plus configuration -- usually found in `/etc/nginx/nginx.conf` -- has read permission on the JWK file.
## Test Your Setup
1. In a browser, enter the address of your NGINX Plus instance. You should be directed to the okta login page, as shown in the example below.

1. Try to log in using the credentials of a user who is part of your organization.
**Note:** If you restricted access to a group of users, be sure to select a user who has access to the application.
## Troubleshooting
Refer to the [Troubleshooting](https://github.com/nginxinc/nginx-openid-connect#troubleshooting) section in the `nginx-openid-connect` repository on GitHub.
### Revision History
- Version 3 (March 2022) – Full edit incorporating updates to _Configuring Okta_ and _Configuring NGINX Plus_
- Version 2 (March 2020) – Updates to _Configuring NGINX Plus_ section
- Version 1 (April 2019) – Initial version (NGINX Plus Release 17)