# Restricting Access with HTTP Basic Authentication
Type of document: How-to guide
Product: NGINX Plus
> Control access using HTTP Basic authentication, and optionally in combination with IP address-based access control.
---
## Introduction
You can restrict access to your website or some parts of it by implementing a username/password authentication. Usernames and passwords are taken from a file created and populated by a password file creation tool, for example, `apache2-utils`.
HTTP Basic authentication can also be combined with other access restriction methods, for example restricting access by [IP address](denylisting-ip-addresses.md) or [geographical location](controlling-access-by-geoip.md).
## Prerequisites
- F5 NGINX Plus or NGINX Open Source
- Password file creation utility such as `apache2-utils` (Debian, Ubuntu) or `httpd-tools` (RHEL/CentOS/Oracle Linux).
## Creating a Password File
To create username-password pairs, use a password file creation utility, for example, `apache2-utils` or `httpd-tools`
1. Verify that `apache2-utils` (Debian, Ubuntu) or `httpd-tools` (RHEL/CentOS/Oracle Linux) is installed.
2. Create a password file and a first user. Run the `htpasswd` utility with the `-c` flag (to create a new file), the file pathname as the first argument, and the username as the second argument:
```shell
sudo htpasswd -c /etc/apache2/.htpasswd user1
```
Press Enter and type the password for **user1** at the prompts.
3. Create additional user-password pairs. Omit the `-c` flag because the file already exists:
```shell
sudo htpasswd /etc/apache2/.htpasswd user2
```
4. You can confirm that the file contains paired usernames and hashed passwords:
```shell
$ cat /etc/apache2/.htpasswd
user1:
user2:
user3:
```
## Configuring NGINX and NGINX Plus for HTTP Basic Authentication
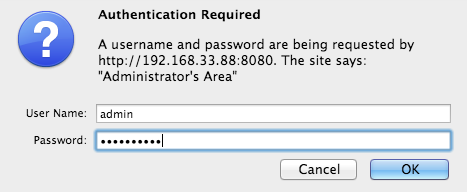
1. Inside a location that you are going to protect, specify the [auth_basic](https://nginx.org/en/docs/http/ngx_http_auth_basic_module.html#auth_basic) directive and give a name to the password-protected area. The name of the area will be shown in the username/password dialog window when asking for credentials:
```nginx
location /api {
auth_basic "Administrator’s Area";
#...
}
```
2. Specify the [auth_basic_user_file](https://nginx.org/en/docs/http/ngx_http_auth_basic_module.html#auth_basic_user_file) directive with a path to the _.htpasswd_ file that contain user/password pairs:
```nginx
location /api {
auth_basic "Administrator’s Area";
auth_basic_user_file /etc/apache2/.htpasswd;
}
```
Alternatively, you you can limit access to the whole website with basic authentication but still make some website areas public. In this case, specify the `off` parameter of the [auth_basic](https://nginx.org/en/docs/http/ngx_http_auth_basic_module.html#auth_basic) directive that cancels inheritance from upper configuration levels:
```nginx
server {
...
auth_basic "Administrator’s Area";
auth_basic_user_file conf/htpasswd;
location /public/ {
auth_basic off;
}
}
```
## Combining Basic Authentication with Access Restriction by IP Address
HTTP basic authentication can be effectively combined with access restriction by IP address. You can implement at least two scenarios:
- a user must be both authenticated and have a valid IP address
- a user must be either authenticated, or have a valid IP address
1. Allow or deny access from particular IP addresses with the [allow](https://nginx.org/en/docs/http/ngx_http_access_module.html#allow) and [deny](https://nginx.org/en/docs/http/ngx_http_access_module.html#deny) directives:
```nginx
location /api {
#...
deny 192.168.1.2;
allow 192.168.1.1/24;
allow 127.0.0.1;
deny all;
}
```
Access will be granted only for the `192.168.1.1/24` network excluding the `192.168.1.2` address. Note that the `allow` and `deny` directives will be applied in the order they are defined.
2. Combine restriction by IP and HTTP authentication with the [satisfy](https://nginx.org/en/docs/http/ngx_http_core_module.html#satisfy) directive.
If you set the directive to to `all`, access is granted if a client satisfies both conditions. If you set the directive to `any`, access is granted if if a client satisfies at least one condition:
```nginx
location /api {
#...
satisfy all;
deny 192.168.1.2;
allow 192.168.1.1/24;
allow 127.0.0.1;
deny all;
auth_basic "Administrator’s Area";
auth_basic_user_file conf/htpasswd;
}
```
## Complete Example
The example shows how to protect your status area with simple authentication combined with access restriction by IP address:
```nginx
http {
server {
listen 192.168.1.23:8080;
root /usr/share/nginx/html;
location /api {
api;
satisfy all;
deny 192.168.1.2;
allow 192.168.1.1/24;
allow 127.0.0.1;
deny all;
auth_basic "Administrator’s Area";
auth_basic_user_file /etc/apache2/.htpasswd;
}
}
}
```
When you access your status page, you are prompted to log in:
If the provided name and password do not match the password file, you get the `401 (Authorization Required)` error.