# All-Active HA for NGINX Plus on the Google Cloud Platform
Type of document: How-to guide
Product: NGINX Plus
> Configure highly available F5 NGINX Plus load balancing of application instances, in an all-active deployment on the Google Cloud Platform.
---
This guide explains how to deploy F5 NGINX Plus in a high-availability configuration on Google Compute Engine (GCE). GCE is the Google Cloud Platform (GCP) service for running workloads on virtual machines. In this setup, multiple NGINX Plus instances work together, in active pairs. They load balance incoming connections across your app environments.
**Notes:**
- The GCE environment changes constantly. This could include names and arrangements of GUI elements. This guide was accurate when published. But, some GCE GUI elements might have changed over time. Use this guide as a reference and adapt to the current GCE working environment.
- The configuration described in this guide allows anyone from a public IP address to access the NGINX Plus instances. While this works in common scenarios in a test environment, we do not recommend it in production. Block external HTTP/HTTPS access to **app-1** and **app-2** instances to external IP address before production deployment. Alternatively, remove the external IP addresses for all application instances, so they're accessible only on the internal GCE network.
## Design and Topology
The deployment combines the following technologies:
- [NGINX Plus](https://www.f5.com/products/nginx/nginx-plus) – Load balances HTTP connections across multiple instances of two applications. We provide instructions for manual installation on a GCE VM image and setting up the prebuilt NGINX Plus VM image. Both are available in the Google Marketplace.
- PHP-FPM – Supports the two sample applications.
- [GCE network load balancer](https://cloud.google.com/compute/docs/load-balancing/network) – Enables TCP connectivity between clients and NGINX Plus load-balancing (LB) instances in a GCP region. It also maintains session persistence for each NGINX Plus instance.
- [GCE instance groups](https://cloud.google.com/compute/docs/instance-groups) – Provide a mechanism for managing a group of VM instances as a unit.
- [GCE health checks](https://cloud.google.com/compute/docs/load-balancing/health-checks) – Maintain high availability of the NGINX Plus LB instances by controlling when GCE creates a new LB instance in the instance group.
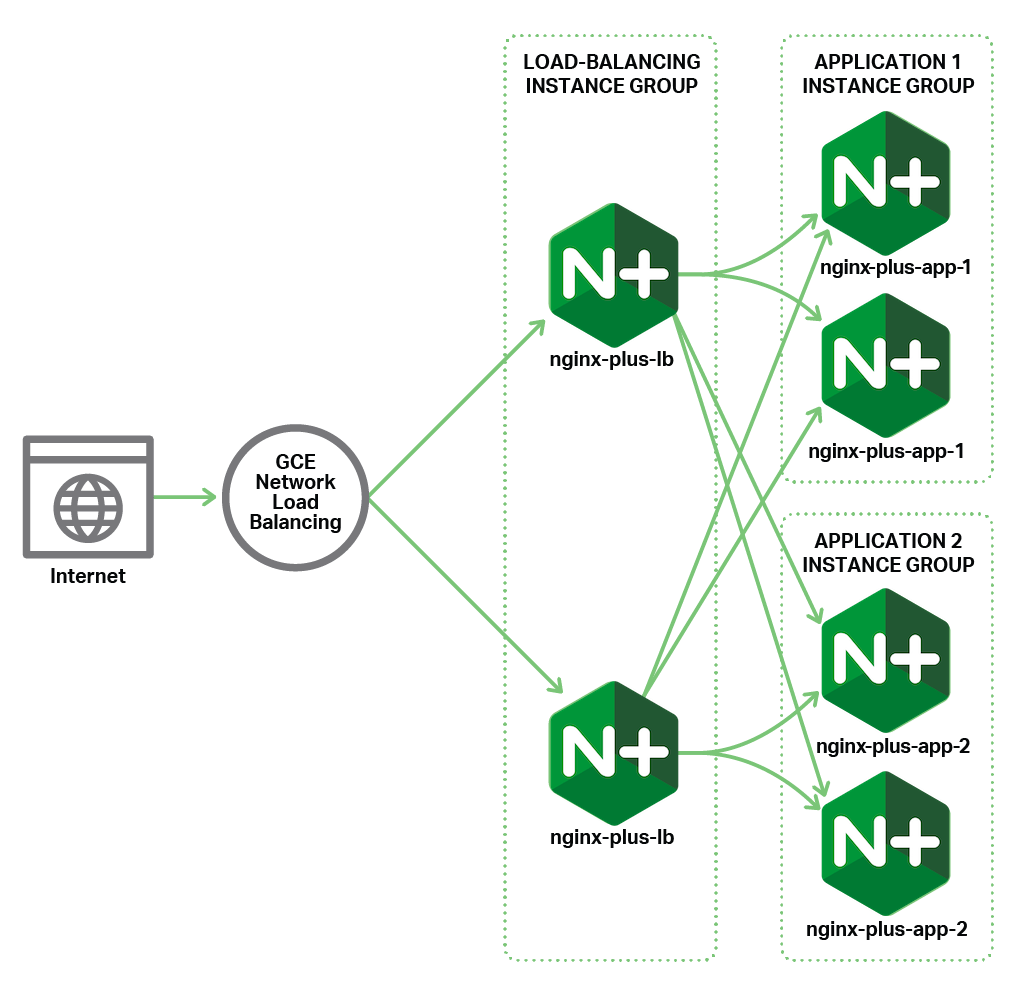 [Session persistence](https://www.nginx.com/products/nginx/load-balancing/#session-persistence) is managed at the network layer by the GCE network load balancer (based on client IP address). The NGINX Plus LB instance also manages it at the application layer (with a session cookie).
The GCE network LB assigns each new client to a specific NGINX Plus LB. This association persists as long as the LB instance is up and functional.
NGINX Plus LB uses the round-robin algorithm to forward requests to specific app instances. It also adds a session cookie. It keeps future requests from the same client on the same app instance as long as it's running.
This deployment guide uses two groups of app instances: – **app-1** and **app-2**. It demonstrates [load balancing](https://www.nginx.com/products/nginx/load-balancing/) between different app types. But both groups have the same app configurations.
You can adapt the deployment to distribute unique connections to different groups of app instances. This can be done by creating discrete upstream blocks and routing content based on the URI.
Please see the reference docs for details on configuring multiple [upstream server groups](https://nginx.org/en/docs/http/ngx_http_upstream_module.html).
## Prerequisites
This guide assumes that you:
- Have a [Google account](https://accounts.google.com/SignUp) (a separate GCP or GCE account is unnecessary).
- Have enrolled in a [free trial](https://cloud.google.com/free-trial) available credit or have a GCP payment account.
- Have a basic working knowledge of GCE and its GUI control panel:
- Navigation
- Creating instances
- Managing IAM policies
- Understand basic networking.
- Have an NGINX Plus subscription. You can start a [free 30‑day trial](https://www.nginx.com/free-trial-request/) if you don't already have a paid subscription.
- Know how to install NGINX Plus. Have a basic understanding of performance in load balancing and application delivery modes. Be familiar with its configuration syntax.
- Are familiar with GitHub and know how to [clone a repository](https://help.github.com/en/articles/cloning-a-repository/).
All component names, like projects and instances, are examples only. You can change them to suit your needs.
## Task 1: Creating a Project and Firewall Rules
Create a new GCE project to host the all‑active NGINX Plus deployment.
1. Log into the [GCP Console](http://console.cloud.google.com) at **console.cloud.google.com**.
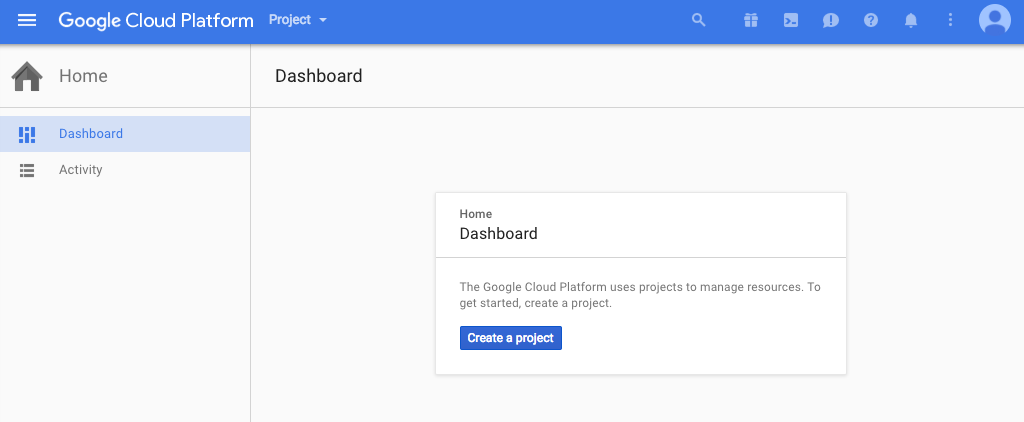
2. The GCP **Home > Dashboard** tab opens. Its contents depend on whether you have any existing projects.
- If there are no existing projects, click the Create a project button.
[Session persistence](https://www.nginx.com/products/nginx/load-balancing/#session-persistence) is managed at the network layer by the GCE network load balancer (based on client IP address). The NGINX Plus LB instance also manages it at the application layer (with a session cookie).
The GCE network LB assigns each new client to a specific NGINX Plus LB. This association persists as long as the LB instance is up and functional.
NGINX Plus LB uses the round-robin algorithm to forward requests to specific app instances. It also adds a session cookie. It keeps future requests from the same client on the same app instance as long as it's running.
This deployment guide uses two groups of app instances: – **app-1** and **app-2**. It demonstrates [load balancing](https://www.nginx.com/products/nginx/load-balancing/) between different app types. But both groups have the same app configurations.
You can adapt the deployment to distribute unique connections to different groups of app instances. This can be done by creating discrete upstream blocks and routing content based on the URI.
Please see the reference docs for details on configuring multiple [upstream server groups](https://nginx.org/en/docs/http/ngx_http_upstream_module.html).
## Prerequisites
This guide assumes that you:
- Have a [Google account](https://accounts.google.com/SignUp) (a separate GCP or GCE account is unnecessary).
- Have enrolled in a [free trial](https://cloud.google.com/free-trial) available credit or have a GCP payment account.
- Have a basic working knowledge of GCE and its GUI control panel:
- Navigation
- Creating instances
- Managing IAM policies
- Understand basic networking.
- Have an NGINX Plus subscription. You can start a [free 30‑day trial](https://www.nginx.com/free-trial-request/) if you don't already have a paid subscription.
- Know how to install NGINX Plus. Have a basic understanding of performance in load balancing and application delivery modes. Be familiar with its configuration syntax.
- Are familiar with GitHub and know how to [clone a repository](https://help.github.com/en/articles/cloning-a-repository/).
All component names, like projects and instances, are examples only. You can change them to suit your needs.
## Task 1: Creating a Project and Firewall Rules
Create a new GCE project to host the all‑active NGINX Plus deployment.
1. Log into the [GCP Console](http://console.cloud.google.com) at **console.cloud.google.com**.
2. The GCP **Home > Dashboard** tab opens. Its contents depend on whether you have any existing projects.
- If there are no existing projects, click the Create a project button.
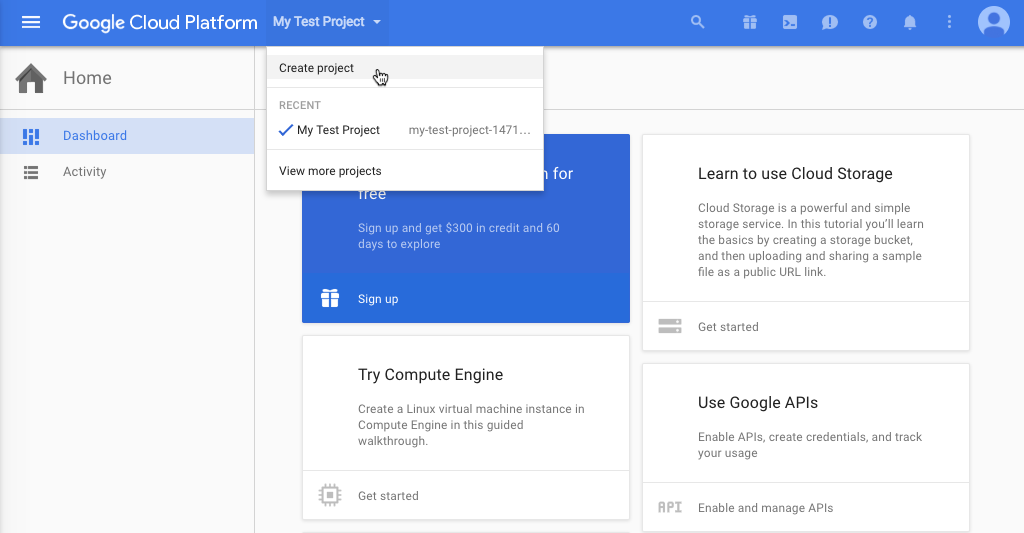
 - If there are existing projects, the name of one of them appears in the upper left of the blue header bar (in the screenshot, it's My Test Project ). Click the project name and select **Create project** from the menu that opens.
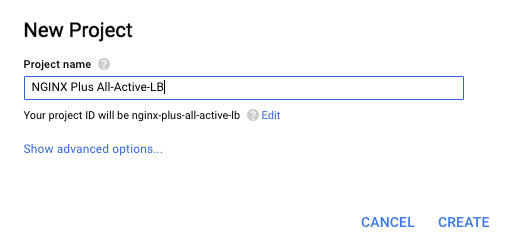
 3. Type your project name in the **New Project** window that pops up, then click CREATE. We're naming the project **NGINX Plus All-Active-LB**.
 ### Creating Firewall Rules
Create firewall rules that allow access to the HTTP and HTTPS ports on your GCE instances. You'll attach the rules to all the instances you create for the deployment.
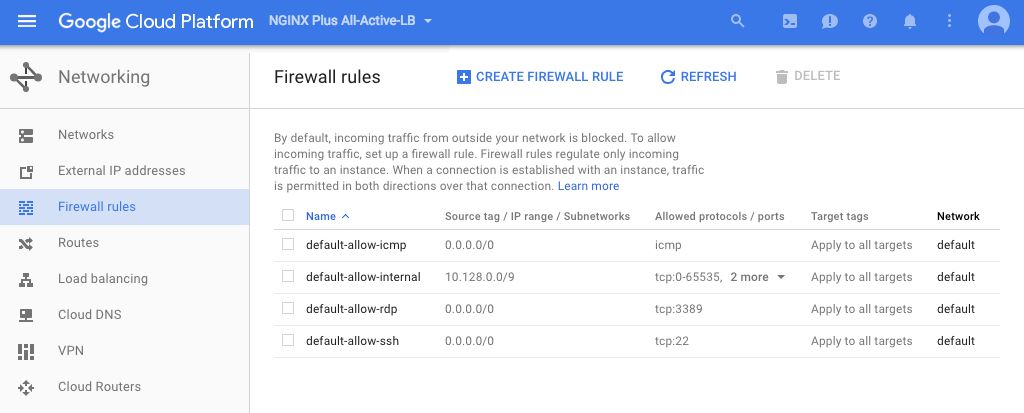
1. Navigate to the **Networking > Firewall rules** tab and click + CREATE FIREWALL RULE. (The screenshot shows the default rules provided by GCE.)
### Creating Firewall Rules
Create firewall rules that allow access to the HTTP and HTTPS ports on your GCE instances. You'll attach the rules to all the instances you create for the deployment.
1. Navigate to the **Networking > Firewall rules** tab and click + CREATE FIREWALL RULE. (The screenshot shows the default rules provided by GCE.)
 2. Fill in the fields on the **Create a firewall rule** screen that opens:
- **Name** – **nginx-plus-http-fw-rule**
- **Description** – **Allow access to ports 80, 8080, and 443 on all NGINX Plus instances**
- **Source filter** – On the drop-down menu, select either **Allow from any source (0.0.0.0/0)**, or **IP range** if you want to restrict access to users on your private network. In the second case, fill in the **Source IP ranges** field that opens. In the screenshot, we are allowing unrestricted access.
- **Allowed protocols and ports** – **tcp:80; tcp:8080; tcp:443**
**Note:** As noted in the introduction, allowing access from any public IP address is appropriate only in a test environment. Before deploying the architecture in production, create a firewall rule. Use this rule to block access to the external IP address for your application instances. Alternatively, you can disable external IP addresses for the instances. This limits access only to the internal GCE network.
- **Target tags** – **nginx-plus-http-fw-rule**
2. Fill in the fields on the **Create a firewall rule** screen that opens:
- **Name** – **nginx-plus-http-fw-rule**
- **Description** – **Allow access to ports 80, 8080, and 443 on all NGINX Plus instances**
- **Source filter** – On the drop-down menu, select either **Allow from any source (0.0.0.0/0)**, or **IP range** if you want to restrict access to users on your private network. In the second case, fill in the **Source IP ranges** field that opens. In the screenshot, we are allowing unrestricted access.
- **Allowed protocols and ports** – **tcp:80; tcp:8080; tcp:443**
**Note:** As noted in the introduction, allowing access from any public IP address is appropriate only in a test environment. Before deploying the architecture in production, create a firewall rule. Use this rule to block access to the external IP address for your application instances. Alternatively, you can disable external IP addresses for the instances. This limits access only to the internal GCE network.
- **Target tags** – **nginx-plus-http-fw-rule**
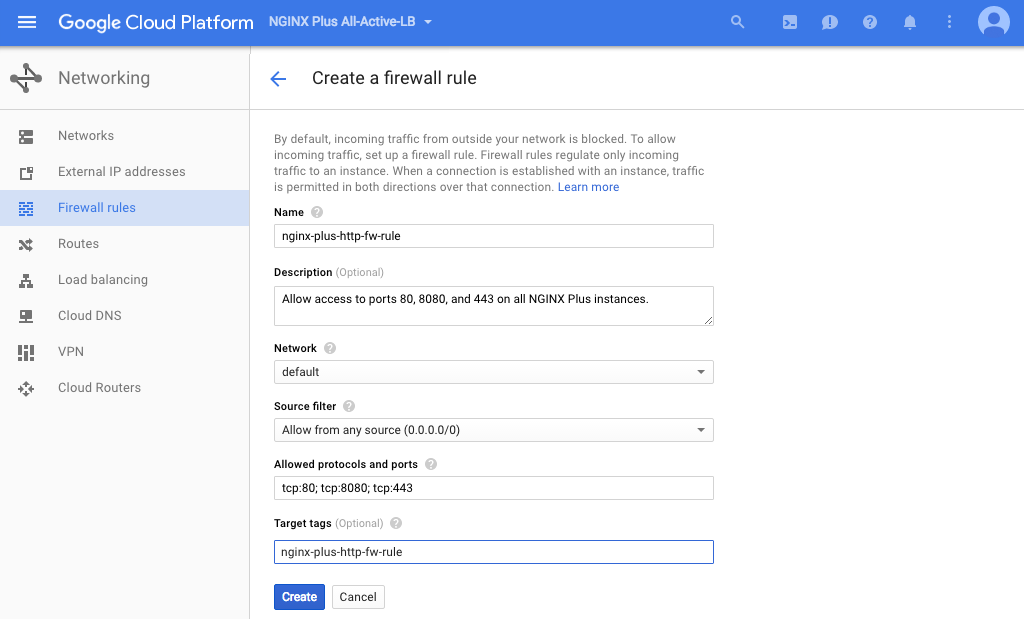 3. Click the Create button. The new rule is added to the table on the **Firewall rules** tab.
## Task 2: Creating Source Instances
Create three GCE source instances. Use them as templates for later instance groups. One for the NGINX Plus load balancer and two for NGINX Plus PHP app servers.
You can create source instances in either of two ways:
- [Based on a standard GCE VM image](#source-vm), you install NGINX Plus manually. This guide uses the latest Ubuntu LTS image at publication (Ubuntu 24.04 LTS). You can use any Unix or Linux OS that [NGINX Plus supports](nginx/technical-specs.md).
- [Based on the prebuilt NGINX Plus image](#source-prebuilt) in the Google Marketplace, which at the time of publication runs on Ubuntu 14.04 LTS.
The methods to create a source instance are different. Once you've created the source instances, all later instructions are the same.
### Creating Source Instances from VM Images
Create three source VM instances based on a GCE VM image. We're basing our instances on the Ubuntu 16.04 LTS image.
1. Verify that the **NGINX Plus All-Active-LB** project is still selected in the Google Cloud Platform header bar.
2. Navigate to the **Compute Engine > VM instances** tab.
3. Click the Create instance button. The **Create an instance** page opens.
#### Creating the First Application Instance from a VM Image
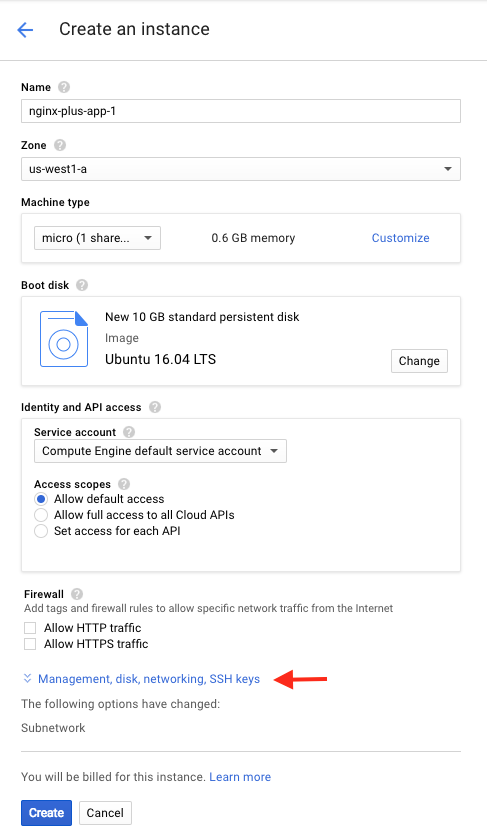
1. On the **Create an instance** page, modify or verify the fields and checkboxes as indicated (a screenshot of the completed page appears in the next step):
- **Name** – **nginx-plus-app-1**
- **Zone** – The GCP zone that makes sense for your location. We're using **us-west1-a**.
- **Machine type** – The appropriate size for the level of traffic you anticipate. We're selecting **micro**, which is ideal for testing purposes.
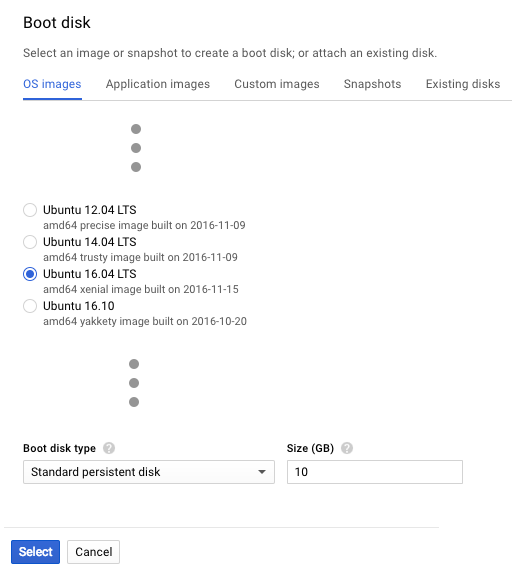
- **Boot disk** – Click **Change**. The **Boot disk** page opens to the OS images subtab. Perform the following steps:
- Click the radio button for the Unix or Linux image of your choice (here, **Ubuntu 16.04 LTS**).
- Accept the default values in the **Boot disk type** and **Size (GB)** fields (**Standard persistent disk** and **10** respectively).
- Click the Select button.
3. Click the Create button. The new rule is added to the table on the **Firewall rules** tab.
## Task 2: Creating Source Instances
Create three GCE source instances. Use them as templates for later instance groups. One for the NGINX Plus load balancer and two for NGINX Plus PHP app servers.
You can create source instances in either of two ways:
- [Based on a standard GCE VM image](#source-vm), you install NGINX Plus manually. This guide uses the latest Ubuntu LTS image at publication (Ubuntu 24.04 LTS). You can use any Unix or Linux OS that [NGINX Plus supports](nginx/technical-specs.md).
- [Based on the prebuilt NGINX Plus image](#source-prebuilt) in the Google Marketplace, which at the time of publication runs on Ubuntu 14.04 LTS.
The methods to create a source instance are different. Once you've created the source instances, all later instructions are the same.
### Creating Source Instances from VM Images
Create three source VM instances based on a GCE VM image. We're basing our instances on the Ubuntu 16.04 LTS image.
1. Verify that the **NGINX Plus All-Active-LB** project is still selected in the Google Cloud Platform header bar.
2. Navigate to the **Compute Engine > VM instances** tab.
3. Click the Create instance button. The **Create an instance** page opens.
#### Creating the First Application Instance from a VM Image
1. On the **Create an instance** page, modify or verify the fields and checkboxes as indicated (a screenshot of the completed page appears in the next step):
- **Name** – **nginx-plus-app-1**
- **Zone** – The GCP zone that makes sense for your location. We're using **us-west1-a**.
- **Machine type** – The appropriate size for the level of traffic you anticipate. We're selecting **micro**, which is ideal for testing purposes.
- **Boot disk** – Click **Change**. The **Boot disk** page opens to the OS images subtab. Perform the following steps:
- Click the radio button for the Unix or Linux image of your choice (here, **Ubuntu 16.04 LTS**).
- Accept the default values in the **Boot disk type** and **Size (GB)** fields (**Standard persistent disk** and **10** respectively).
- Click the Select button.
 - **Identity and API access** – Keep the defaults for the **Service account ** field and **Access scopes** radio button. Unless you need more granular control.
- **Firewall** – Verify that neither check box is checked (the default). The firewall rule invoked in the **Tags** field on the **Management** subtab (see Step 3 below) controls this type of access.
2. Click Management, disk, networking, SSH keys to open that set of subtabs. (The screenshot shows the values entered in the previous step.)
- **Identity and API access** – Keep the defaults for the **Service account ** field and **Access scopes** radio button. Unless you need more granular control.
- **Firewall** – Verify that neither check box is checked (the default). The firewall rule invoked in the **Tags** field on the **Management** subtab (see Step 3 below) controls this type of access.
2. Click Management, disk, networking, SSH keys to open that set of subtabs. (The screenshot shows the values entered in the previous step.)
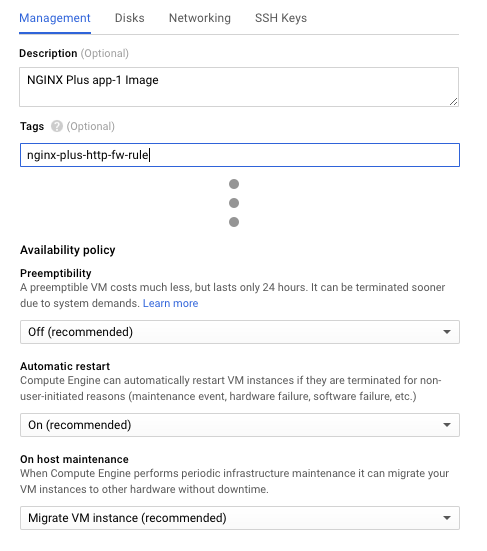
 3. On the **Management** subtab, modify or verify the fields as indicated:
- **Description** – **NGINX Plus app-1 Image**
- **Tags** – **nginx-plus-http-fw-rule**
- **Preemptibility** – **Off (recommended)** (the default)
- **Automatic restart** – **On (recommended)** (the default)
- **On host maintenance** – **Migrate VM instance (recommended)** (the default)
3. On the **Management** subtab, modify or verify the fields as indicated:
- **Description** – **NGINX Plus app-1 Image**
- **Tags** – **nginx-plus-http-fw-rule**
- **Preemptibility** – **Off (recommended)** (the default)
- **Automatic restart** – **On (recommended)** (the default)
- **On host maintenance** – **Migrate VM instance (recommended)** (the default)
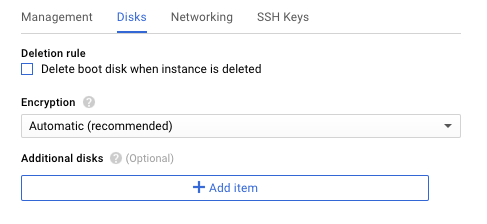
 4. On the **Disks** subtab, uncheck the checkbox labeled **Delete boot disk when instance is deleted**.
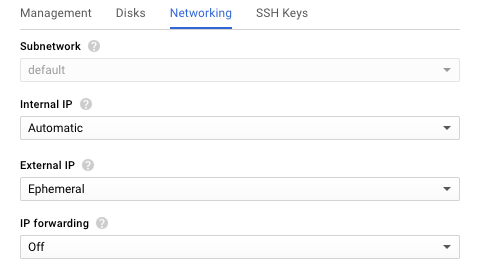
 5. On the **Networking** subtab, verify the default settings, in particular **Ephemeral** for **External IP** and **Off** for **IP Forwarding**.
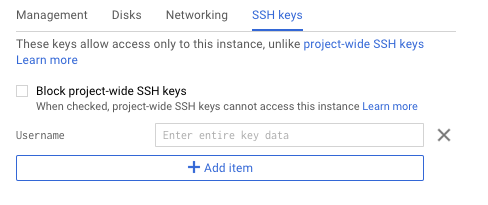
 6. If you're using your own SSH public key instead of your default GCE keys, paste the hexadecimal key string on the **SSH Keys** subtab. Right into the box that reads **Enter entire key data**.
 7. Click the Create button at the bottom of the **Create an instance** page.
The **VM instances** summary page opens. It can take several minutes for the instance to be created. Wait to continue until the green check mark appears.
7. Click the Create button at the bottom of the **Create an instance** page.
The **VM instances** summary page opens. It can take several minutes for the instance to be created. Wait to continue until the green check mark appears.
 #### Creating the Second Application Instance from a VM Image
1. On the **VM instances** summary page, click CREATE INSTANCE.
2. Repeat the steps in Creating the First Application Instance to create the second application instance. Specify the same values as for the first application instance, except:
- In Step 1, **Name** – **nginx-plus-app-2**
- In Step 3, **Description** – **NGINX Plus app-2 Image**
#### Creating the Load-Balancing Instance from a VM Image
1. On the **VM instances** summary page, click CREATE INSTANCE.
2. Repeat the steps in Creating the First Application Instance to create the load‑balancing instance. Specify the same values as for the first application instance, except:
- In Step 1, **Name** – **nginx-plus-lb**
- In Step 3, **Description** – **NGINX Plus Load Balancing Image**
#### Configuring PHP and FastCGI on the VM-Based Instances
Install and configure PHP and FastCGI on the instances.
Repeat these instructions for all three source instances (**nginx-plus-app-1**, **nginx-plus-app-2**, and **nginx-plus-lb**).
**Note:** Some commands require `root` privilege. If appropriate for your environment, prefix commands with the `sudo` command.
1. Connect to the instance over SSH using the method of your choice. GCE provides a built-in mechanism:
- Navigate to the **Compute Engine > VM instances** tab.
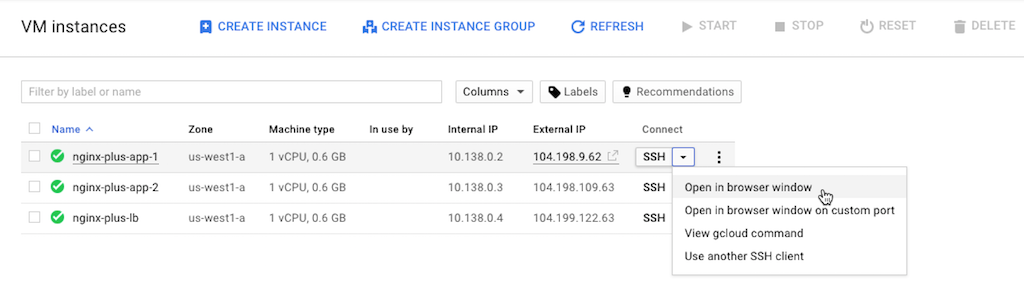
- In the instance's row in the table, click the triangle icon in the **Connect** column at the far right and select a method (for example, **Open in browser window**).
#### Creating the Second Application Instance from a VM Image
1. On the **VM instances** summary page, click CREATE INSTANCE.
2. Repeat the steps in Creating the First Application Instance to create the second application instance. Specify the same values as for the first application instance, except:
- In Step 1, **Name** – **nginx-plus-app-2**
- In Step 3, **Description** – **NGINX Plus app-2 Image**
#### Creating the Load-Balancing Instance from a VM Image
1. On the **VM instances** summary page, click CREATE INSTANCE.
2. Repeat the steps in Creating the First Application Instance to create the load‑balancing instance. Specify the same values as for the first application instance, except:
- In Step 1, **Name** – **nginx-plus-lb**
- In Step 3, **Description** – **NGINX Plus Load Balancing Image**
#### Configuring PHP and FastCGI on the VM-Based Instances
Install and configure PHP and FastCGI on the instances.
Repeat these instructions for all three source instances (**nginx-plus-app-1**, **nginx-plus-app-2**, and **nginx-plus-lb**).
**Note:** Some commands require `root` privilege. If appropriate for your environment, prefix commands with the `sudo` command.
1. Connect to the instance over SSH using the method of your choice. GCE provides a built-in mechanism:
- Navigate to the **Compute Engine > VM instances** tab.
- In the instance's row in the table, click the triangle icon in the **Connect** column at the far right and select a method (for example, **Open in browser window**).
 2. Working in the SSH terminal, install PHP 7 (the default PHP version for Ubuntu 16.04 LTS) and FastCGI.
```shell
apt-get install php7.0-fpm
```
3. Edit the PHP 7 configuration to bind to a local network port instead of a Unix socket. Using your preferred text editor, remove the following line from **/etc/php/7.0/fpm/pool.d**:
```none
listen = /run/php/php7.0-fpm.sock
```
and replace it with these two lines:
```none
listen = 127.0.0.1:9000
listen.allowed_clients = 127.0.0.1
```
4. Restart PHP:
```shell
service php7.0-fpm restart
```
5. Leave the SSH connection open for reuse in the next section.
#### Installing and Configuring NGINX Plus on the VM-Based Instances
Now install NGINX Plus and download files that are specific to the all‑active deployment:
- An NGINX Plus configuration file customized for the function performed by the instance
- A set of content files (HTML, images, and so on) served by the application servers in the deployment
Both the configuration and content files are available at the [NGINX GitHub repository](https://github.com/nginxinc/NGINX-Demos/tree/master/gce-nginx-plus-deployment-guide-files).
Repeat these instructions for all three source instances (**nginx-plus-app-1**, **nginx-plus-app-2**, and **nginx-plus-lb**).
**Note:** Some commands require `root` privilege. If appropriate for your environment, prefix commands with the `sudo` command.
1. Install NGINX Plus. For instructions, see the [NGINX Plus Admin Guide](nginx/admin-guide/installing-nginx/installing-nginx-plus.md).
2. Clone the GitHub repository for the [all‑active load balancing deployment](https://github.com/nginxinc/NGINX-Demos/tree/master/gce-nginx-plus-deployment-guide-files). (Instructions for downloading the files directly from the GitHub repository are provided below, in case you prefer not to clone it.)
3. Copy the contents of the **usr\_share\_nginx** subdirectory from the cloned repository to the local **/usr/share/nginx** directory. Create the local directory if needed. (If you choose not to clone the repository, you need to download each file from the GitHub repository individually.)
4. Copy the right configuration file from the **etc\_nginx\_conf.d** subdirectory of the cloned repository to **/etc/nginx/conf.d**:
- On both **nginx-plus-app-1** and **nginx-plus-app-2**, copy **gce-all-active-app.conf**.
You can also run the following commands to download the configuration file directly from the GitHub repository:
```none
cd /etc/nginx/conf.d/
curl -o gce-all-active-app.conf https://github.com/nginxinc/NGINX-Demos/blob/master/gce-nginx-plus-deployment-guide-files/etc_nginx_conf.d/gce-all-active-app.conf
```
or
```none
cd /etc/nginx/conf.d/
wget https://github.com/nginxinc/NGINX-Demos/blob/master/gce-nginx-plus-deployment-guide-files/etc_nginx_conf.d/gce-all-active-app.conf
```
- On **nginx-plus-lb**, copy **gce-all-active-lb.conf**.
You can also run the following commands to download the configuration file directly from the GitHub repository:
```none
$ cd /etc/nginx/conf.d/
�$ curl -o gce-all-active-lb.conf https://github.com/nginxinc/NGINX-Demos/blob/master/gce-nginx-plus-deployment-guide-files/etc_nginx_conf.d/gce-all-active-lb.conf
```
or
```none
cd /etc/nginx/conf.d/
wget https://github.com/nginxinc/NGINX-Demos/blob/master/gce-nginx-plus-deployment-guide-files/etc_nginx_conf.d/gce-all-active-lb.conf
```
5. On the LB instance (**nginx-plus-lb**), use a text editor to open **gce-all-active-lb.conf**. Change the `server` directives in the `upstream` block to reference the internal IP addresses of the **nginx-plus-app-1** and **nginx-plus-app-2** instances (substitute the address for the expression in angle brackets). You do not need to modify the two application instances.
You can look up internal IP addresses in the **Internal IP** column of the table on the **Compute Engine > VM instances** summary page.
```nginx
upstream upstream_app_pool {
server ;
server ;
zone upstream-apps 64k;
sticky cookie GCPPersist expires=300;
}
```
Directive documentation: [server](https://nginx.org/en/docs/http/ngx_http_upstream_module.html#server), [`sticky cookie`](https://nginx.org/en/docs/http/ngx_http_upstream_module.html#sticky), [upstream](https://nginx.org/en/docs/http/ngx_http_upstream_module.html#upstream), [zone](https://nginx.org/en/docs/http/ngx_http_upstream_module.html#zone)
6. Rename **default.conf** to **default.conf.bak** so that NGINX Plus does not load it. The configuration files provided for the all‑active deployment include equivalent instructions plus additional function‑specific directives.
```shell
mv default.conf default.conf.bak
```
7. Enable the NGINX Plus [live activity monitoring](https://www.nginx.com/products/nginx/live-activity-monitoring/) dashboard for the instance. Copy **status.html** from the **etc\_nginx\_conf.d** subdirectory of the cloned repository to **/etc/nginx/conf.d**.
You can also run the following commands to download the configuration file directly from the GitHub repository:
```shell
cd /etc/nginx/conf.d/
curl -o status.conf https://github.com/nginxinc/NGINX-Demos/blob/master/gce-nginx-plus-deployment-guide-files/etc_nginx_conf.d/status.conf
```
or
```shell
cd /etc/nginx/conf.d/
wget https://github.com/nginxinc/NGINX-Demos/blob/master/gce-nginx-plus-deployment-guide-files/etc_nginx_conf.d/status.conf
```
8. Validate the NGINX Plus configuration and restart NGINX Plus:
```shell
nginx -t
nginx -s reload
```
9. Verify the instance is working by accessing it at its external IP address. (As previously noted, we recommend blocking access to the external IP addresses of the application instances in a production environment.) The external IP address for the instance appears on the **Compute Engine > VM instances** summary page, in the **External IP** column of the table.
- Access the **index.html** page either in a browser or by running this `curl` command.
```shell
curl http://
```
- Access its NGINX Plus live activity monitoring dashboard in a browser, at:
**https://_external-IP-address_:8080/status.html**
10. Proceed to [Task 3: Creating "Gold" Images](#gold).
### Creating Source Instances from Prebuilt NGINX Plus Images
Create three source instances based on a prebuilt NGINX Plus image running on Ubuntu 14.04 LTS, available in the Google Marketplace. Google requires that you provision the first instance in the GCP Marketplace. Then you can clone the additional two instances from the first one.
#### Creating the First Application Instance from a Prebuilt Image
1. Verify that the **NGINX Plus All-Active-LB** project is still selected in the Google Cloud Platform header bar.
2. Navigate to the GCP Marketplace and search for **nginx plus**.
3. Click the **NGINX Plus** box in the results area.
2. Working in the SSH terminal, install PHP 7 (the default PHP version for Ubuntu 16.04 LTS) and FastCGI.
```shell
apt-get install php7.0-fpm
```
3. Edit the PHP 7 configuration to bind to a local network port instead of a Unix socket. Using your preferred text editor, remove the following line from **/etc/php/7.0/fpm/pool.d**:
```none
listen = /run/php/php7.0-fpm.sock
```
and replace it with these two lines:
```none
listen = 127.0.0.1:9000
listen.allowed_clients = 127.0.0.1
```
4. Restart PHP:
```shell
service php7.0-fpm restart
```
5. Leave the SSH connection open for reuse in the next section.
#### Installing and Configuring NGINX Plus on the VM-Based Instances
Now install NGINX Plus and download files that are specific to the all‑active deployment:
- An NGINX Plus configuration file customized for the function performed by the instance
- A set of content files (HTML, images, and so on) served by the application servers in the deployment
Both the configuration and content files are available at the [NGINX GitHub repository](https://github.com/nginxinc/NGINX-Demos/tree/master/gce-nginx-plus-deployment-guide-files).
Repeat these instructions for all three source instances (**nginx-plus-app-1**, **nginx-plus-app-2**, and **nginx-plus-lb**).
**Note:** Some commands require `root` privilege. If appropriate for your environment, prefix commands with the `sudo` command.
1. Install NGINX Plus. For instructions, see the [NGINX Plus Admin Guide](nginx/admin-guide/installing-nginx/installing-nginx-plus.md).
2. Clone the GitHub repository for the [all‑active load balancing deployment](https://github.com/nginxinc/NGINX-Demos/tree/master/gce-nginx-plus-deployment-guide-files). (Instructions for downloading the files directly from the GitHub repository are provided below, in case you prefer not to clone it.)
3. Copy the contents of the **usr\_share\_nginx** subdirectory from the cloned repository to the local **/usr/share/nginx** directory. Create the local directory if needed. (If you choose not to clone the repository, you need to download each file from the GitHub repository individually.)
4. Copy the right configuration file from the **etc\_nginx\_conf.d** subdirectory of the cloned repository to **/etc/nginx/conf.d**:
- On both **nginx-plus-app-1** and **nginx-plus-app-2**, copy **gce-all-active-app.conf**.
You can also run the following commands to download the configuration file directly from the GitHub repository:
```none
cd /etc/nginx/conf.d/
curl -o gce-all-active-app.conf https://github.com/nginxinc/NGINX-Demos/blob/master/gce-nginx-plus-deployment-guide-files/etc_nginx_conf.d/gce-all-active-app.conf
```
or
```none
cd /etc/nginx/conf.d/
wget https://github.com/nginxinc/NGINX-Demos/blob/master/gce-nginx-plus-deployment-guide-files/etc_nginx_conf.d/gce-all-active-app.conf
```
- On **nginx-plus-lb**, copy **gce-all-active-lb.conf**.
You can also run the following commands to download the configuration file directly from the GitHub repository:
```none
$ cd /etc/nginx/conf.d/
�$ curl -o gce-all-active-lb.conf https://github.com/nginxinc/NGINX-Demos/blob/master/gce-nginx-plus-deployment-guide-files/etc_nginx_conf.d/gce-all-active-lb.conf
```
or
```none
cd /etc/nginx/conf.d/
wget https://github.com/nginxinc/NGINX-Demos/blob/master/gce-nginx-plus-deployment-guide-files/etc_nginx_conf.d/gce-all-active-lb.conf
```
5. On the LB instance (**nginx-plus-lb**), use a text editor to open **gce-all-active-lb.conf**. Change the `server` directives in the `upstream` block to reference the internal IP addresses of the **nginx-plus-app-1** and **nginx-plus-app-2** instances (substitute the address for the expression in angle brackets). You do not need to modify the two application instances.
You can look up internal IP addresses in the **Internal IP** column of the table on the **Compute Engine > VM instances** summary page.
```nginx
upstream upstream_app_pool {
server ;
server ;
zone upstream-apps 64k;
sticky cookie GCPPersist expires=300;
}
```
Directive documentation: [server](https://nginx.org/en/docs/http/ngx_http_upstream_module.html#server), [`sticky cookie`](https://nginx.org/en/docs/http/ngx_http_upstream_module.html#sticky), [upstream](https://nginx.org/en/docs/http/ngx_http_upstream_module.html#upstream), [zone](https://nginx.org/en/docs/http/ngx_http_upstream_module.html#zone)
6. Rename **default.conf** to **default.conf.bak** so that NGINX Plus does not load it. The configuration files provided for the all‑active deployment include equivalent instructions plus additional function‑specific directives.
```shell
mv default.conf default.conf.bak
```
7. Enable the NGINX Plus [live activity monitoring](https://www.nginx.com/products/nginx/live-activity-monitoring/) dashboard for the instance. Copy **status.html** from the **etc\_nginx\_conf.d** subdirectory of the cloned repository to **/etc/nginx/conf.d**.
You can also run the following commands to download the configuration file directly from the GitHub repository:
```shell
cd /etc/nginx/conf.d/
curl -o status.conf https://github.com/nginxinc/NGINX-Demos/blob/master/gce-nginx-plus-deployment-guide-files/etc_nginx_conf.d/status.conf
```
or
```shell
cd /etc/nginx/conf.d/
wget https://github.com/nginxinc/NGINX-Demos/blob/master/gce-nginx-plus-deployment-guide-files/etc_nginx_conf.d/status.conf
```
8. Validate the NGINX Plus configuration and restart NGINX Plus:
```shell
nginx -t
nginx -s reload
```
9. Verify the instance is working by accessing it at its external IP address. (As previously noted, we recommend blocking access to the external IP addresses of the application instances in a production environment.) The external IP address for the instance appears on the **Compute Engine > VM instances** summary page, in the **External IP** column of the table.
- Access the **index.html** page either in a browser or by running this `curl` command.
```shell
curl http://
```
- Access its NGINX Plus live activity monitoring dashboard in a browser, at:
**https://_external-IP-address_:8080/status.html**
10. Proceed to [Task 3: Creating "Gold" Images](#gold).
### Creating Source Instances from Prebuilt NGINX Plus Images
Create three source instances based on a prebuilt NGINX Plus image running on Ubuntu 14.04 LTS, available in the Google Marketplace. Google requires that you provision the first instance in the GCP Marketplace. Then you can clone the additional two instances from the first one.
#### Creating the First Application Instance from a Prebuilt Image
1. Verify that the **NGINX Plus All-Active-LB** project is still selected in the Google Cloud Platform header bar.
2. Navigate to the GCP Marketplace and search for **nginx plus**.
3. Click the **NGINX Plus** box in the results area.
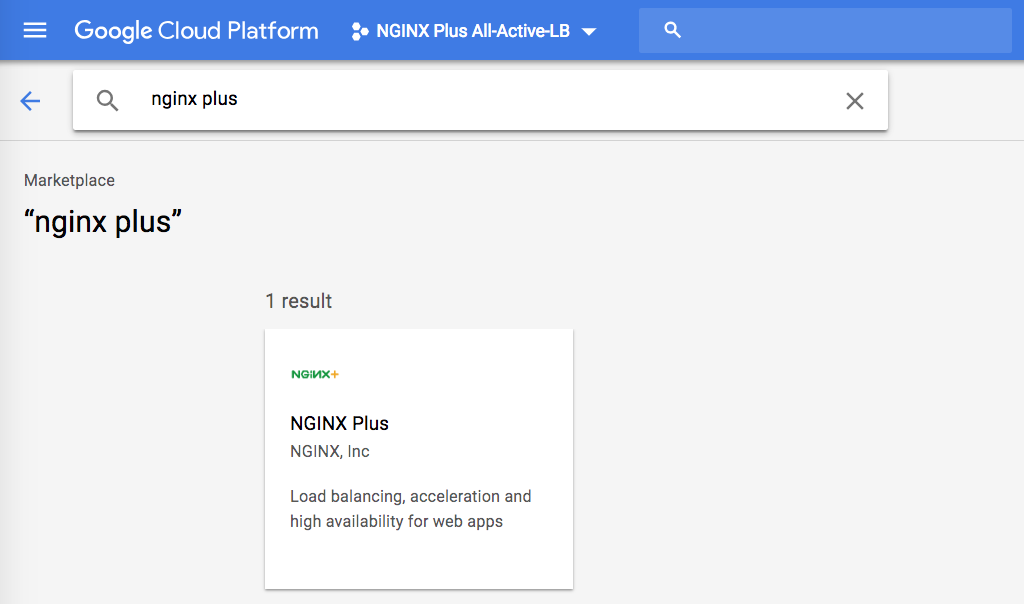 4. On the **NGINX Plus** page that opens, click the Launch on Compute Engine button.
5. Fill in the fields on the **New NGINX Plus deployment** page as indicated.
- **Deployment name** – **nginx-plus-app-1**
- **Zone** – The GCP zone that makes sense for your location. We're using **us-west1-a**.
- **Machine type** – The appropriate size for the level of traffic you anticipate. We're selecting **micro**, which is ideal for testing purposes.
- **Disk type** – **Standard Persistent Disk** (the default)
- **Disk size in GB** – **10** (the default and minimum allowed)
- **Network name** – **default**
- **Subnetwork name** – **default**
- **Firewall** – Verify that the **Allow HTTP traffic** checkbox is checked.
4. On the **NGINX Plus** page that opens, click the Launch on Compute Engine button.
5. Fill in the fields on the **New NGINX Plus deployment** page as indicated.
- **Deployment name** – **nginx-plus-app-1**
- **Zone** – The GCP zone that makes sense for your location. We're using **us-west1-a**.
- **Machine type** – The appropriate size for the level of traffic you anticipate. We're selecting **micro**, which is ideal for testing purposes.
- **Disk type** – **Standard Persistent Disk** (the default)
- **Disk size in GB** – **10** (the default and minimum allowed)
- **Network name** – **default**
- **Subnetwork name** – **default**
- **Firewall** – Verify that the **Allow HTTP traffic** checkbox is checked.
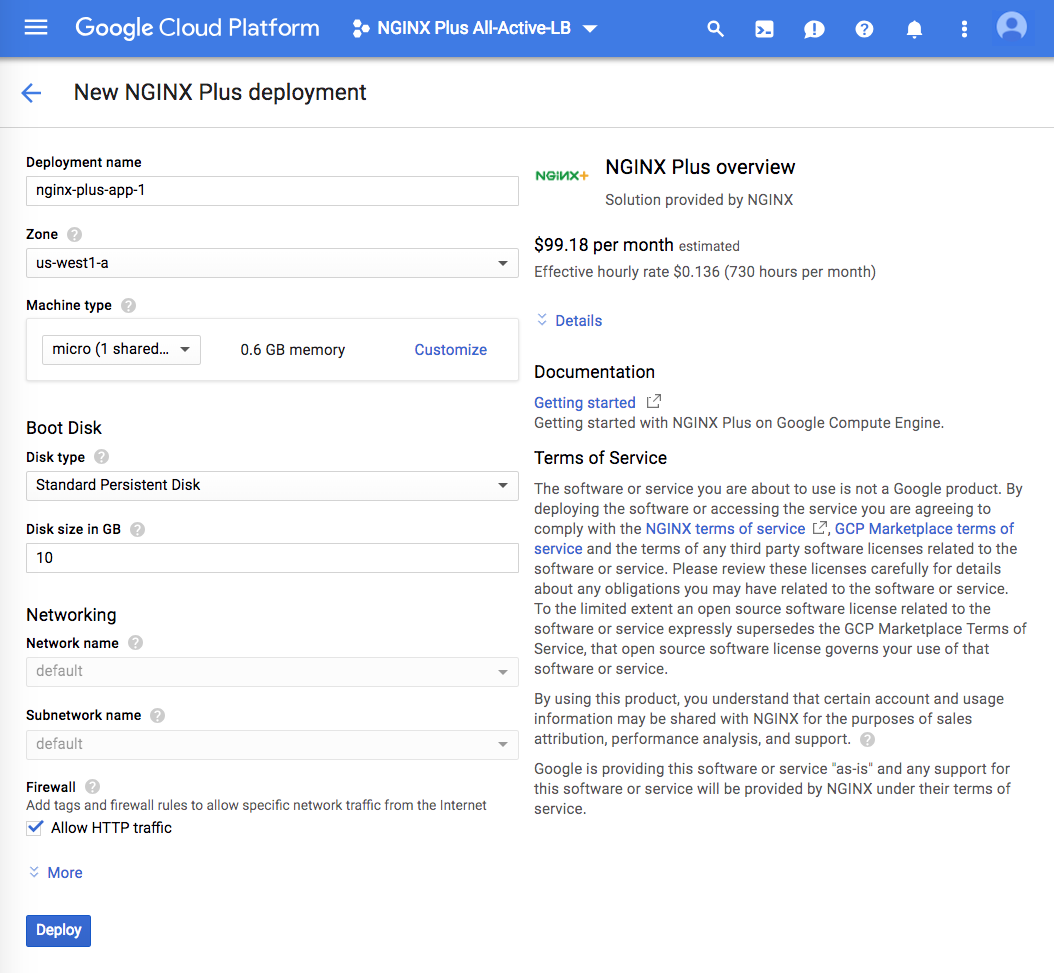 6. Click the Deploy button.
It can take several minutes for the instance to deploy. Wait until the green check mark and confirmation message appear before continuing.
6. Click the Deploy button.
It can take several minutes for the instance to deploy. Wait until the green check mark and confirmation message appear before continuing.
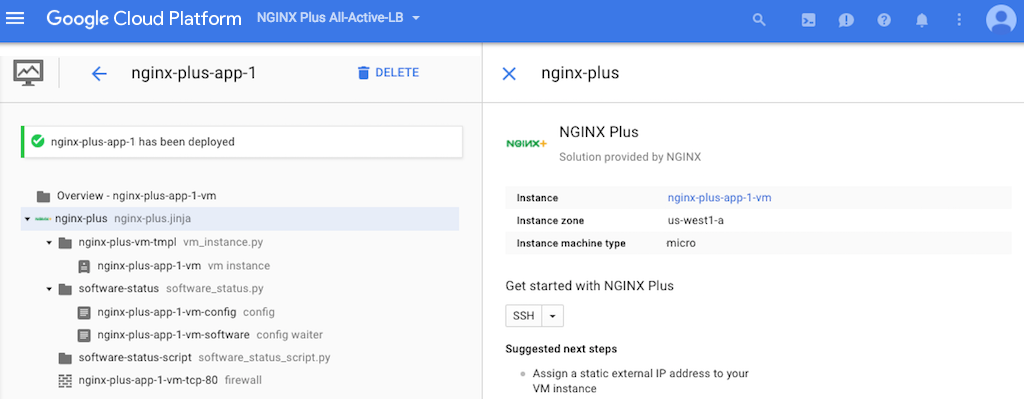 7. Navigate to the **Compute Engine > VM instances** tab and click **nginx-plus-app-1-vm** in the Name column in the table. (The **-vm** suffix is added automatically to the name of the newly created instance.)
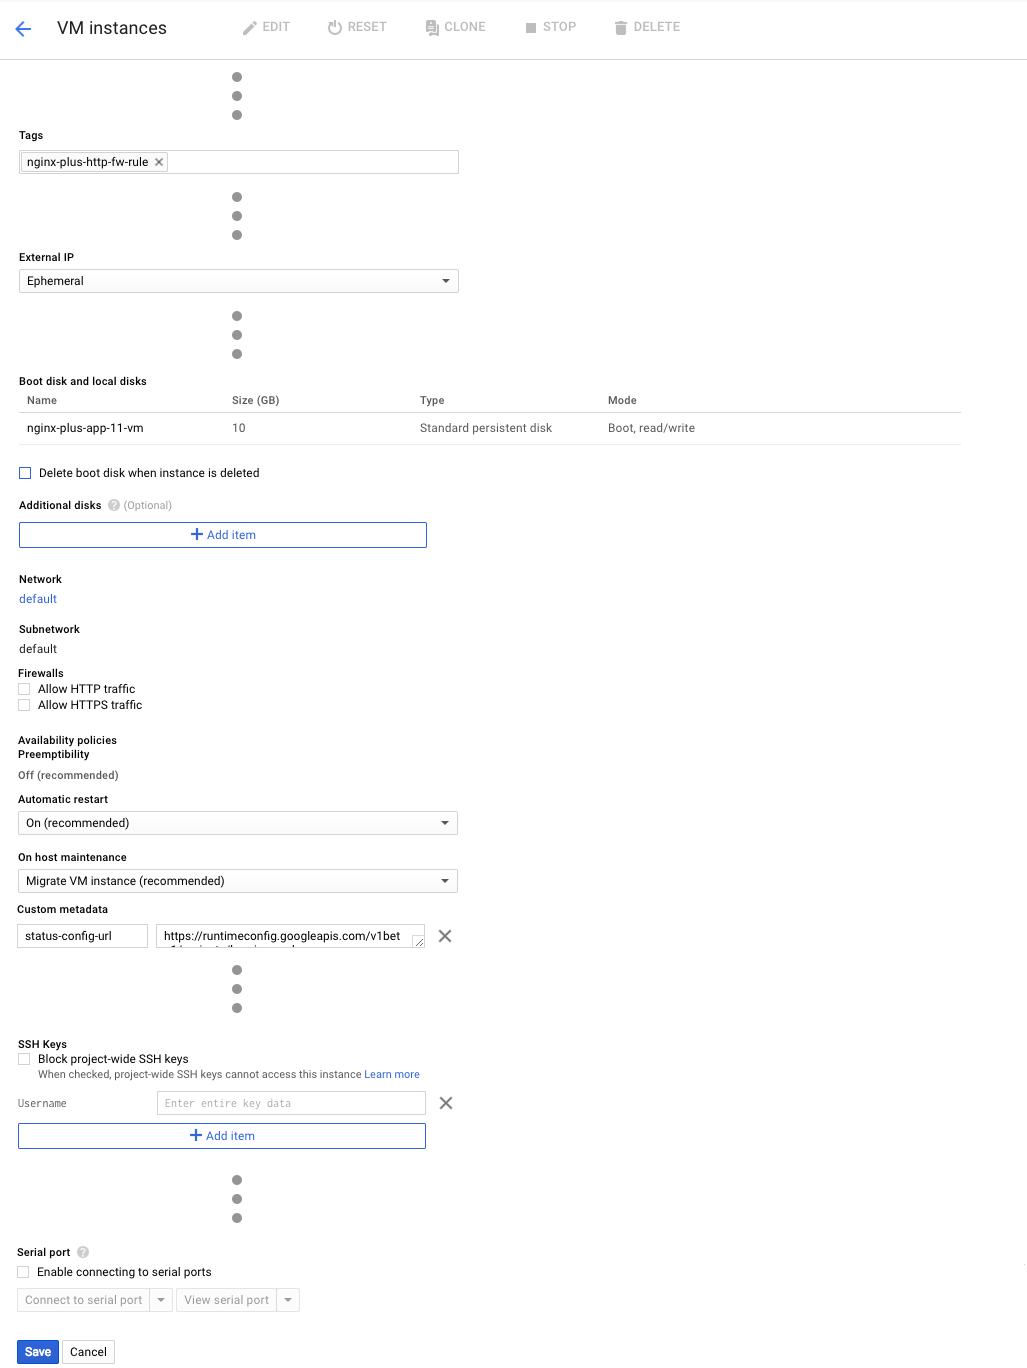
 8. On the **VM instances** page that opens, click EDIT at the top of the page. In fields that can be edited, the value changes from static text to text boxes, drop‑down menus, and checkboxes.
9. Modify or verify the indicated editable fields (non‑editable fields are not listed):
- **Tags** – If a default tag appears (for example, **nginx-plus-app-1-tcp-80**), click the **X** after its name to remove it. Then, type in **nginx-plus-http-fw-rule**.
- **External IP** – **Ephemeral** (the default)
- **Boot disk and local disks** – Uncheck the checkbox labeled **Delete boot disk when instance is deleted**.
- **Additional disks** – No changes
- **Network** – If you must change the defaults, for example, when configuring a production environment, select default Then, select EDIT on the opened **Network details** page. After making your changes select the Save button.
- **Firewall** – Verify that neither check box is checked (the default). The firewall rule named in the **Tags** field that's above on the current page (see the first bullet in this list) controls this type of access.
- **Automatic restart** – **On (recommended)** (the default)
- **On host maintenance** – **Migrate VM instance (recommended)** (the default)
- **Custom metadata** – No changes
- **SSH Keys** – If you're using your own SSH public key instead of your default GCE keys, paste the hexadecimal key string into the box labeled **Enter entire key data**.
- **Serial port** – Verify that the check box labeled **Enable connecting to serial ports** is not checked (the default).
The screenshot shows the results of your changes. It omits some fields that can't be edited or for which we recommend keeping the defaults.
8. On the **VM instances** page that opens, click EDIT at the top of the page. In fields that can be edited, the value changes from static text to text boxes, drop‑down menus, and checkboxes.
9. Modify or verify the indicated editable fields (non‑editable fields are not listed):
- **Tags** – If a default tag appears (for example, **nginx-plus-app-1-tcp-80**), click the **X** after its name to remove it. Then, type in **nginx-plus-http-fw-rule**.
- **External IP** – **Ephemeral** (the default)
- **Boot disk and local disks** – Uncheck the checkbox labeled **Delete boot disk when instance is deleted**.
- **Additional disks** – No changes
- **Network** – If you must change the defaults, for example, when configuring a production environment, select default Then, select EDIT on the opened **Network details** page. After making your changes select the Save button.
- **Firewall** – Verify that neither check box is checked (the default). The firewall rule named in the **Tags** field that's above on the current page (see the first bullet in this list) controls this type of access.
- **Automatic restart** – **On (recommended)** (the default)
- **On host maintenance** – **Migrate VM instance (recommended)** (the default)
- **Custom metadata** – No changes
- **SSH Keys** – If you're using your own SSH public key instead of your default GCE keys, paste the hexadecimal key string into the box labeled **Enter entire key data**.
- **Serial port** – Verify that the check box labeled **Enable connecting to serial ports** is not checked (the default).
The screenshot shows the results of your changes. It omits some fields that can't be edited or for which we recommend keeping the defaults.
 10. Click the Save button.
#### Creating the Second Application Instance from a Prebuilt Image
Create the second application instance by cloning the first one.
1. Navigate back to the summary page on the **Compute Engine > VM instances** tab (click the arrow that is circled in the following figure).
10. Click the Save button.
#### Creating the Second Application Instance from a Prebuilt Image
Create the second application instance by cloning the first one.
1. Navigate back to the summary page on the **Compute Engine > VM instances** tab (click the arrow that is circled in the following figure).
 2. Click **nginx-plus-app-1-vm** in the Name column of the table (shown in the screenshot in Step 7 of Creating the First Application Instance).
3. On the **VM instances** page that opens, click CLONE at the top of the page.
4. On the **Create an instance** page that opens, modify or verify the fields and checkboxes as indicated:
- **Name** – **nginx-plus-app-2-vm**. Here we're adding the **-vm** suffix to make the name consistent with the first instance; GCE does not add it automatically when you clone an instance.
- **Zone** – The GCP zone that makes sense for your location. We're using **us-west1-a**.
- **Machine type** – The appropriate size for the level of traffic you anticipate. We're selecting **f1-micro**, which is ideal for testing purposes.
- **Boot disk type** – **New 10 GB standard persistent disk** (the value inherited from **nginx-plus-app-1-vm**)
- **Identity and API access** – Set the **Access scopes** radio button to **Allow default access** and accept the default values in all other fields. If you want more granular control over access than is provided by these settings, modify the fields in this section as appropriate.
- **Firewall** – Verify that neither check box is checked (the default).
5. Click Management, disk, networking, SSH keys to open that set of subtabs.
6. Verify the following settings on the subtabs, modifying them as necessary:
- **Management** – In the **Tags** field: **nginx-plus-http-fw-rule**
- **Disks** – The **Deletion rule** checkbox (labeled **Delete boot disk when instance is deleted**) is not checked
7. Select the Create button.
#### Creating the Load-Balancing Instance from a Prebuilt Image
Create the source load‑balancing instance by cloning the first instance again.
Repeat Steps 2 through 7 of Creating the Second Application Instance. In Step 4, specify **nginx-plus-lb-vm** as the name.
#### Configuring PHP and FastCGI on the Prebuilt-Based Instances
Install and configure PHP and FastCGI on the instances.
Repeat these instructions for all three source instances (**nginx-plus-app-1-vm**, **nginx-plus-app-2-vm**, and **nginx-plus-lb-vm**).
**Note:** Some commands require `root` privilege. If appropriate for your environment, prefix commands with the `sudo` command.
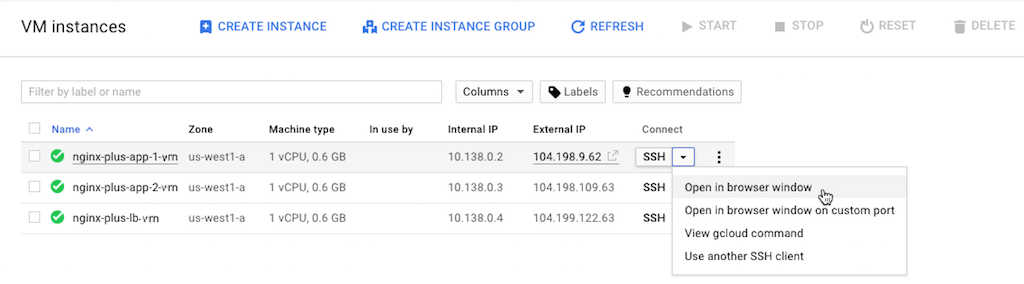
1. Connect to the instance over SSH using the method of your choice. GCE provides a built‑in mechanism:
- Navigate to the **Compute Engine > VM instances** tab.
- In the table, find the row for the instance. Select the triangle icon in the **Connect** column at the far right. Then, select a method (for example, **Open in browser window**).
The screenshot shows instances based on the prebuilt NGINX Plus images.
2. Click **nginx-plus-app-1-vm** in the Name column of the table (shown in the screenshot in Step 7 of Creating the First Application Instance).
3. On the **VM instances** page that opens, click CLONE at the top of the page.
4. On the **Create an instance** page that opens, modify or verify the fields and checkboxes as indicated:
- **Name** – **nginx-plus-app-2-vm**. Here we're adding the **-vm** suffix to make the name consistent with the first instance; GCE does not add it automatically when you clone an instance.
- **Zone** – The GCP zone that makes sense for your location. We're using **us-west1-a**.
- **Machine type** – The appropriate size for the level of traffic you anticipate. We're selecting **f1-micro**, which is ideal for testing purposes.
- **Boot disk type** – **New 10 GB standard persistent disk** (the value inherited from **nginx-plus-app-1-vm**)
- **Identity and API access** – Set the **Access scopes** radio button to **Allow default access** and accept the default values in all other fields. If you want more granular control over access than is provided by these settings, modify the fields in this section as appropriate.
- **Firewall** – Verify that neither check box is checked (the default).
5. Click Management, disk, networking, SSH keys to open that set of subtabs.
6. Verify the following settings on the subtabs, modifying them as necessary:
- **Management** – In the **Tags** field: **nginx-plus-http-fw-rule**
- **Disks** – The **Deletion rule** checkbox (labeled **Delete boot disk when instance is deleted**) is not checked
7. Select the Create button.
#### Creating the Load-Balancing Instance from a Prebuilt Image
Create the source load‑balancing instance by cloning the first instance again.
Repeat Steps 2 through 7 of Creating the Second Application Instance. In Step 4, specify **nginx-plus-lb-vm** as the name.
#### Configuring PHP and FastCGI on the Prebuilt-Based Instances
Install and configure PHP and FastCGI on the instances.
Repeat these instructions for all three source instances (**nginx-plus-app-1-vm**, **nginx-plus-app-2-vm**, and **nginx-plus-lb-vm**).
**Note:** Some commands require `root` privilege. If appropriate for your environment, prefix commands with the `sudo` command.
1. Connect to the instance over SSH using the method of your choice. GCE provides a built‑in mechanism:
- Navigate to the **Compute Engine > VM instances** tab.
- In the table, find the row for the instance. Select the triangle icon in the **Connect** column at the far right. Then, select a method (for example, **Open in browser window**).
The screenshot shows instances based on the prebuilt NGINX Plus images.
 2. Working in the SSH terminal, install PHP 5 (the default PHP version for Ubuntu 14.04 LTS) and FastCGI.
```shell
apt-get install php5-fpm
```
3. Edit the PHP 5 configuration to bind to a local network port instead of a Unix socket. Using your preferred text editor, remove the following line from **/etc/php5/fpm/pool.d**:
```none
Listen = /run/php/php5-fpm.sock
```
and replace it with these two lines:
```none
Listen = 127.0.0.1:9000
Listen.allowed_clients = 127.0.0.1
```
4. Restart PHP:
```shell
service php5-fpm restart
```
5. Leave the SSH connection open for reuse in the next section.
#### Configuring NGINX Plus on the Prebuilt-Based Instances
Now download files that are specific to the all‑active deployment:
- An NGINX Plus configuration file customized for the function the instance performs (application server or load balancer)
- A set of content files (HTML, images, and so on) served by the application servers in the deployment
Both the configuration and content files are available at the [NGINX GitHub repository](https://github.com/nginxinc/NGINX-Demos/tree/master/gce-nginx-plus-deployment-guide-files).
Repeat these instructions for all three source instances (**nginx-plus-app-1-vm**, **nginx-plus-app-2-vm**, and **nginx-plus-lb-vm**).
**Note:** Some commands require `root` privilege. If appropriate for your environment, prefix commands with the `sudo` command.
1. Clone the GitHub repository for the [all‑active load balancing deployment](https://github.com/nginxinc/NGINX-Demos/tree/master/gce-nginx-plus-deployment-guide-files). (See the instructions below for downloading the files from GitHub if you choose not to clone it.)
2. Copy the contents of the **usr\_share\_nginx** subdirectory from the cloned repo to the local **/usr/share/nginx** directory. Create the local directory if necessary. (If you choose not to clone the repository, you need to download each file from the GitHub repository one at a time.)
3. Copy the right configuration file from the **etc\_nginx\_conf.d** subdirectory of the cloned repository to **/etc/nginx/conf.d**:
- On both **nginx-plus-app-1-vm** and **nginx-plus-app-2-vm**, copy **gce-all-active-app.conf**.
You can also run these commands to download the configuration file from GitHub:
```shell
cd /etc/nginx/conf.d/
curl -o gce-all-active-app.conf https://github.com/nginxinc/NGINX-Demos/blob/master/gce-nginx-plus-deployment-guide-files/etc_nginx_conf.d/gce-all-active-app.conf
```
or
```none
cd /etc/nginx/conf.d/
wget https://github.com/nginxinc/NGINX-Demos/blob/master/gce-nginx-plus-deployment-guide-files/etc_nginx_conf.d/gce-all-active-app.conf
```
- On **nginx-plus-lb-vm**, copy **gce-all-active-lb.conf**.
You can also run the following commands to download the configuration file directly from the GitHub repository:
```none
cd /etc/nginx/conf.d/
curl -o gce-all-active-lb.conf https://github.com/nginxinc/NGINX-Demos/blob/master/gce-nginx-plus-deployment-guide-files/etc_nginx_conf.d/gce-all-active-lb.conf
```
or
```none
cd /etc/nginx/conf.d/
wget https://github.com/nginxinc/NGINX-Demos/blob/master/gce-nginx-plus-deployment-guide-files/etc_nginx_conf.d/gce-all-active-lb.conf
```
4. On the LB instance (**nginx-plus-lb-vm**), use a text editor to open **gce-all-active-lb.conf**. Change the `server` directives in the `upstream` block to reference the internal IP addresses of the **nginx-plus-app-1-vm** and **nginx-plus-app-2-vm** instances. (No action is required on the two application instances themselves.)
You can look up internal IP addresses in the **Internal IP** column of the table on the **Compute Engine > VM instances** summary page.
```nginx
upstream upstream_app_pool {
server ;
server ;
zone upstream-apps 64k;
sticky cookie GCPPersist expires=300;
}
```
Directive documentation: [server](https://nginx.org/en/docs/http/ngx_http_upstream_module.html#server), [`sticky cookie`](https://nginx.org/en/docs/http/ngx_http_upstream_module.html#sticky), [upstream](https://nginx.org/en/docs/http/ngx_http_upstream_module.html#upstream), [zone](https://nginx.org/en/docs/http/ngx_http_upstream_module.html#zone)
5. Rename **default.conf** to **default.conf.bak** so that NGINX Plus does not load it. The configuration files for the all-active deployment include equivalent instructions. They also have extra, function-specific directives.
```shell
mv default.conf default.conf.bak
```
6. Enable the NGINX Plus [live activity monitoring](https://www.nginx.com/products/nginx/live-activity-monitoring/) dashboard for the instance. To do this, copy **status.html** from the **etc\_nginx\_conf.d** subdirectory of the cloned repository to **/etc/nginx/conf.d**.
You can also run the following commands to download the configuration file directly from the GitHub repository:
```shell
cd /etc/nginx/conf.d/
curl -o status.conf https://github.com/nginxinc/NGINX-Demos/blob/master/gce-nginx-plus-deployment-guide-files/etc_nginx_conf.d/status.conf
```
or
```shell
cd /etc/nginx/conf.d/
wget https://github.com/nginxinc/NGINX-Demos/blob/master/gce-nginx-plus-deployment-guide-files/etc_nginx_conf.d/status.conf
```
7. Validate the NGINX Plus configuration and restart NGINX Plus:
```shell
nginx -t
nginx -s reload
```
8. Verify the instance is working by accessing it at its external IP address. (As noted, we recommend blocking access, in production, to the external IPs of the app.) The external IP address for the instance appears on the **Compute Engine > VM instances** summary page, in the **External IP** column of the table.
- Access the **index.html** page either in a browser or by running this `curl` command.
```shell
curl http://
```
- Access the NGINX Plus live activity monitoring dashboard in a browser, at:
**https://_external-IP-address-of-NGINX-Plus-server_:8080/dashboard.html**
9. Proceed to [Task 3: Creating "Gold" Images](#gold).
## Task 3: Creating "Gold" Images
Create _gold images_, which are base images that GCE clones automatically when it needs to scale up the number of instances. They are derived from the instances you created in [Creating Source Instances](#source). Before creating the images, delete the source instances. This breaks the attachment between them and the disk. (you can't create an image from a disk attached to a VM instance).
1. Verify that the **NGINX Plus All-Active-LB** project is still selected in the Google Cloud Platform header bar.
2. Navigate to the **Compute Engine > VM instances** tab.
3. In the table, select all three instances:
- If you created source instances from [VM (Ubuntu) images](#source-vm): **nginx-plus-app-1**, **nginx-plus-app-2**, and **nginx-plus-lb**
- If you created source instances from [prebuilt NGINX Plus images](#source-prebuilt): **nginx-plus-app-1-vm**, **nginx-plus-app-2-vm**, and **nginx-plus-lb-vm**
4. Click STOP in the top toolbar to stop the instances.
2. Working in the SSH terminal, install PHP 5 (the default PHP version for Ubuntu 14.04 LTS) and FastCGI.
```shell
apt-get install php5-fpm
```
3. Edit the PHP 5 configuration to bind to a local network port instead of a Unix socket. Using your preferred text editor, remove the following line from **/etc/php5/fpm/pool.d**:
```none
Listen = /run/php/php5-fpm.sock
```
and replace it with these two lines:
```none
Listen = 127.0.0.1:9000
Listen.allowed_clients = 127.0.0.1
```
4. Restart PHP:
```shell
service php5-fpm restart
```
5. Leave the SSH connection open for reuse in the next section.
#### Configuring NGINX Plus on the Prebuilt-Based Instances
Now download files that are specific to the all‑active deployment:
- An NGINX Plus configuration file customized for the function the instance performs (application server or load balancer)
- A set of content files (HTML, images, and so on) served by the application servers in the deployment
Both the configuration and content files are available at the [NGINX GitHub repository](https://github.com/nginxinc/NGINX-Demos/tree/master/gce-nginx-plus-deployment-guide-files).
Repeat these instructions for all three source instances (**nginx-plus-app-1-vm**, **nginx-plus-app-2-vm**, and **nginx-plus-lb-vm**).
**Note:** Some commands require `root` privilege. If appropriate for your environment, prefix commands with the `sudo` command.
1. Clone the GitHub repository for the [all‑active load balancing deployment](https://github.com/nginxinc/NGINX-Demos/tree/master/gce-nginx-plus-deployment-guide-files). (See the instructions below for downloading the files from GitHub if you choose not to clone it.)
2. Copy the contents of the **usr\_share\_nginx** subdirectory from the cloned repo to the local **/usr/share/nginx** directory. Create the local directory if necessary. (If you choose not to clone the repository, you need to download each file from the GitHub repository one at a time.)
3. Copy the right configuration file from the **etc\_nginx\_conf.d** subdirectory of the cloned repository to **/etc/nginx/conf.d**:
- On both **nginx-plus-app-1-vm** and **nginx-plus-app-2-vm**, copy **gce-all-active-app.conf**.
You can also run these commands to download the configuration file from GitHub:
```shell
cd /etc/nginx/conf.d/
curl -o gce-all-active-app.conf https://github.com/nginxinc/NGINX-Demos/blob/master/gce-nginx-plus-deployment-guide-files/etc_nginx_conf.d/gce-all-active-app.conf
```
or
```none
cd /etc/nginx/conf.d/
wget https://github.com/nginxinc/NGINX-Demos/blob/master/gce-nginx-plus-deployment-guide-files/etc_nginx_conf.d/gce-all-active-app.conf
```
- On **nginx-plus-lb-vm**, copy **gce-all-active-lb.conf**.
You can also run the following commands to download the configuration file directly from the GitHub repository:
```none
cd /etc/nginx/conf.d/
curl -o gce-all-active-lb.conf https://github.com/nginxinc/NGINX-Demos/blob/master/gce-nginx-plus-deployment-guide-files/etc_nginx_conf.d/gce-all-active-lb.conf
```
or
```none
cd /etc/nginx/conf.d/
wget https://github.com/nginxinc/NGINX-Demos/blob/master/gce-nginx-plus-deployment-guide-files/etc_nginx_conf.d/gce-all-active-lb.conf
```
4. On the LB instance (**nginx-plus-lb-vm**), use a text editor to open **gce-all-active-lb.conf**. Change the `server` directives in the `upstream` block to reference the internal IP addresses of the **nginx-plus-app-1-vm** and **nginx-plus-app-2-vm** instances. (No action is required on the two application instances themselves.)
You can look up internal IP addresses in the **Internal IP** column of the table on the **Compute Engine > VM instances** summary page.
```nginx
upstream upstream_app_pool {
server ;
server ;
zone upstream-apps 64k;
sticky cookie GCPPersist expires=300;
}
```
Directive documentation: [server](https://nginx.org/en/docs/http/ngx_http_upstream_module.html#server), [`sticky cookie`](https://nginx.org/en/docs/http/ngx_http_upstream_module.html#sticky), [upstream](https://nginx.org/en/docs/http/ngx_http_upstream_module.html#upstream), [zone](https://nginx.org/en/docs/http/ngx_http_upstream_module.html#zone)
5. Rename **default.conf** to **default.conf.bak** so that NGINX Plus does not load it. The configuration files for the all-active deployment include equivalent instructions. They also have extra, function-specific directives.
```shell
mv default.conf default.conf.bak
```
6. Enable the NGINX Plus [live activity monitoring](https://www.nginx.com/products/nginx/live-activity-monitoring/) dashboard for the instance. To do this, copy **status.html** from the **etc\_nginx\_conf.d** subdirectory of the cloned repository to **/etc/nginx/conf.d**.
You can also run the following commands to download the configuration file directly from the GitHub repository:
```shell
cd /etc/nginx/conf.d/
curl -o status.conf https://github.com/nginxinc/NGINX-Demos/blob/master/gce-nginx-plus-deployment-guide-files/etc_nginx_conf.d/status.conf
```
or
```shell
cd /etc/nginx/conf.d/
wget https://github.com/nginxinc/NGINX-Demos/blob/master/gce-nginx-plus-deployment-guide-files/etc_nginx_conf.d/status.conf
```
7. Validate the NGINX Plus configuration and restart NGINX Plus:
```shell
nginx -t
nginx -s reload
```
8. Verify the instance is working by accessing it at its external IP address. (As noted, we recommend blocking access, in production, to the external IPs of the app.) The external IP address for the instance appears on the **Compute Engine > VM instances** summary page, in the **External IP** column of the table.
- Access the **index.html** page either in a browser or by running this `curl` command.
```shell
curl http://
```
- Access the NGINX Plus live activity monitoring dashboard in a browser, at:
**https://_external-IP-address-of-NGINX-Plus-server_:8080/dashboard.html**
9. Proceed to [Task 3: Creating "Gold" Images](#gold).
## Task 3: Creating "Gold" Images
Create _gold images_, which are base images that GCE clones automatically when it needs to scale up the number of instances. They are derived from the instances you created in [Creating Source Instances](#source). Before creating the images, delete the source instances. This breaks the attachment between them and the disk. (you can't create an image from a disk attached to a VM instance).
1. Verify that the **NGINX Plus All-Active-LB** project is still selected in the Google Cloud Platform header bar.
2. Navigate to the **Compute Engine > VM instances** tab.
3. In the table, select all three instances:
- If you created source instances from [VM (Ubuntu) images](#source-vm): **nginx-plus-app-1**, **nginx-plus-app-2**, and **nginx-plus-lb**
- If you created source instances from [prebuilt NGINX Plus images](#source-prebuilt): **nginx-plus-app-1-vm**, **nginx-plus-app-2-vm**, and **nginx-plus-lb-vm**
4. Click STOP in the top toolbar to stop the instances.
 5. Click DELETE in the top toolbar to delete the instances.
**Note:** If the pop-up warns that it will delete the boot disk for any instance, cancel the deletion. Then, perform the steps below for each affected instance:
- Navigate to the **Compute Engine > VM instances** tab and click the instance in the Name column in the table. (The screenshot shows **nginx-plus-app-1-vm**.)
- On the **VM instances** page that opens, click EDIT at the top of the page. In fields that can be edited, the value changes from static text to text boxes, drop‑down menus, and checkboxes.
- In the **Boot disk and local disks** field, uncheck the checkbox labeled **Delete boot disk when instance is deleted**.
- Click the Save button.
- On the **VM instances** summary page, select the instance in the table and click DELETE in the top toolbar to delete it.
6. Navigate to the **Compute Engine > Images** tab.
7. Click [+] CREATE IMAGE.
8. On the **Create an image** page that opens, modify or verify the fields as indicated:
- **Name** – **nginx-plus-app-1-image**
- **Family** – Leave the field empty
- **Description** – **NGINX Plus Application 1 Gold Image**
- **Encryption** – **Automatic (recommended)** (the default)
- **Source** – **Disk** (the default)
- **Source disk** – **nginx-plus-app-1** or **nginx-plus-app-1-vm**, depending on the method you used to create source instances (select the source instance from the drop‑down menu)
9. Click the Create button.
10. Repeat Steps 7 through 9 to create a second image with the following values (retain the default values in all other fields):
- **Name** – **nginx-plus-app-2-image**
- **Description** – **NGINX Plus Application 2 Gold Image**
- **Source disk** – **nginx-plus-app-2** or **nginx-plus-app-2-vm**, depending on the method you used to create source instances (select the source instance from the drop‑down menu)
11. Repeat Steps 7 through 9 to create a third image with the following values (retain the default values in all other fields):
- **Name** – **nginx-plus-lb-image**
- **Description** – **NGINX Plus LB Gold Image**
- **Source disk** – **nginx-plus-lb** or **nginx-plus-lb-vm**, depending on the method you used to create source instances (select the source instance from the drop‑down menu)
12. Verify that the three images appear at the top of the table on the **Compute Engine > Images** tab.
## Task 4: Creating Instance Templates
Create _instance templates_. They are the compute workloads in instance groups. These are created manually or automatically when GCE detects a failure.
### Creating the First Application Instance Template
1. Verify that the **NGINX Plus All-Active-LB** project is still selected in the Google Cloud Platform header bar.
2. Navigate to the **Compute Engine > Instance templates** tab.
3. Click the Create instance template button.
4. On the **Create an instance template** page that opens, modify or verify the fields as indicated:
- **Name** – **nginx-plus-app-1-instance-template**
- **Machine type** – The appropriate size for the level of traffic you anticipate. We're selecting **micro**, which is ideal for testing purposes.
- **Boot disk** – Click **Change**. The **Boot disk** page opens. Perform the following steps:
- Open the **Custom Images** subtab.
5. Click DELETE in the top toolbar to delete the instances.
**Note:** If the pop-up warns that it will delete the boot disk for any instance, cancel the deletion. Then, perform the steps below for each affected instance:
- Navigate to the **Compute Engine > VM instances** tab and click the instance in the Name column in the table. (The screenshot shows **nginx-plus-app-1-vm**.)
- On the **VM instances** page that opens, click EDIT at the top of the page. In fields that can be edited, the value changes from static text to text boxes, drop‑down menus, and checkboxes.
- In the **Boot disk and local disks** field, uncheck the checkbox labeled **Delete boot disk when instance is deleted**.
- Click the Save button.
- On the **VM instances** summary page, select the instance in the table and click DELETE in the top toolbar to delete it.
6. Navigate to the **Compute Engine > Images** tab.
7. Click [+] CREATE IMAGE.
8. On the **Create an image** page that opens, modify or verify the fields as indicated:
- **Name** – **nginx-plus-app-1-image**
- **Family** – Leave the field empty
- **Description** – **NGINX Plus Application 1 Gold Image**
- **Encryption** – **Automatic (recommended)** (the default)
- **Source** – **Disk** (the default)
- **Source disk** – **nginx-plus-app-1** or **nginx-plus-app-1-vm**, depending on the method you used to create source instances (select the source instance from the drop‑down menu)
9. Click the Create button.
10. Repeat Steps 7 through 9 to create a second image with the following values (retain the default values in all other fields):
- **Name** – **nginx-plus-app-2-image**
- **Description** – **NGINX Plus Application 2 Gold Image**
- **Source disk** – **nginx-plus-app-2** or **nginx-plus-app-2-vm**, depending on the method you used to create source instances (select the source instance from the drop‑down menu)
11. Repeat Steps 7 through 9 to create a third image with the following values (retain the default values in all other fields):
- **Name** – **nginx-plus-lb-image**
- **Description** – **NGINX Plus LB Gold Image**
- **Source disk** – **nginx-plus-lb** or **nginx-plus-lb-vm**, depending on the method you used to create source instances (select the source instance from the drop‑down menu)
12. Verify that the three images appear at the top of the table on the **Compute Engine > Images** tab.
## Task 4: Creating Instance Templates
Create _instance templates_. They are the compute workloads in instance groups. These are created manually or automatically when GCE detects a failure.
### Creating the First Application Instance Template
1. Verify that the **NGINX Plus All-Active-LB** project is still selected in the Google Cloud Platform header bar.
2. Navigate to the **Compute Engine > Instance templates** tab.
3. Click the Create instance template button.
4. On the **Create an instance template** page that opens, modify or verify the fields as indicated:
- **Name** – **nginx-plus-app-1-instance-template**
- **Machine type** – The appropriate size for the level of traffic you anticipate. We're selecting **micro**, which is ideal for testing purposes.
- **Boot disk** – Click **Change**. The **Boot disk** page opens. Perform the following steps:
- Open the **Custom Images** subtab.
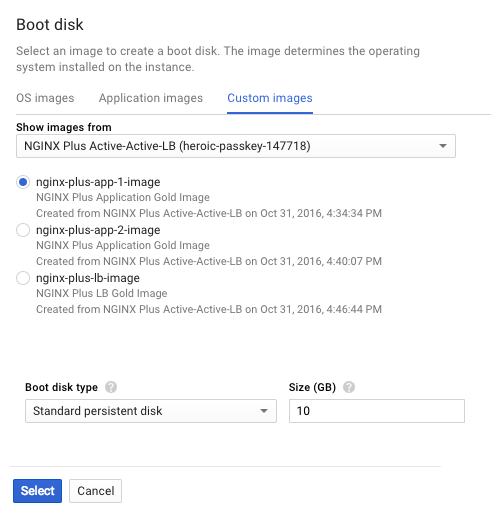 - Select **NGINX Plus All-Active-LB** from the drop-down menu labeled **Show images from**.
- Click the **nginx-plus-app-1-image** radio button.
- Accept the default values in the **Boot disk type** and **Size (GB)** fields (**Standard persistent disk** and **10** respectively).
- Click the Select button.
- **Identity and API access** – Unless you want more granular control over access, keep the defaults in the **Service account** field (**Compute Engine default service account**) and **Access scopes** field (**Allow default access**).
- **Firewall** – Verify that neither check box is checked (the default). The firewall rule invoked in the **Tags** field on the **Management** subtab (see Step 6 below) controls this type of access.
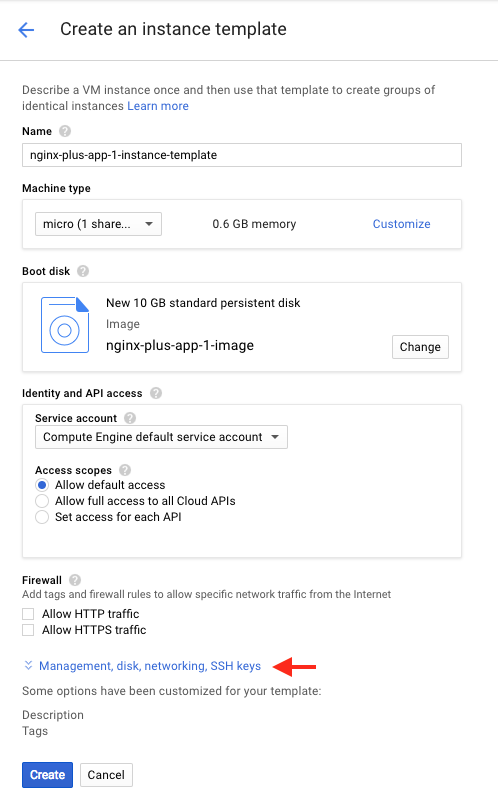
5. Select Management, disk, networking, SSH keys (indicated with a red arrow in the following screenshot) to open that set of subtabs.
- Select **NGINX Plus All-Active-LB** from the drop-down menu labeled **Show images from**.
- Click the **nginx-plus-app-1-image** radio button.
- Accept the default values in the **Boot disk type** and **Size (GB)** fields (**Standard persistent disk** and **10** respectively).
- Click the Select button.
- **Identity and API access** – Unless you want more granular control over access, keep the defaults in the **Service account** field (**Compute Engine default service account**) and **Access scopes** field (**Allow default access**).
- **Firewall** – Verify that neither check box is checked (the default). The firewall rule invoked in the **Tags** field on the **Management** subtab (see Step 6 below) controls this type of access.
5. Select Management, disk, networking, SSH keys (indicated with a red arrow in the following screenshot) to open that set of subtabs.
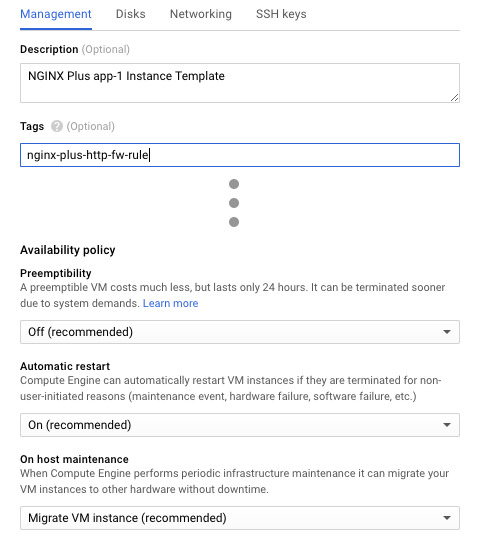
 6. On the **Management** subtab, modify or verify the fields as indicated:
- **Description** – **NGINX Plus app-1 Instance Template**
- **Tags** – **nginx-plus-http-fw-rule**
- **Preemptibility** – **Off (recommended)** (the default)
- **Automatic restart** – **On (recommended)** (the default)
- **On host maintenance** – **Migrate VM instance (recommended)** (the default)
6. On the **Management** subtab, modify or verify the fields as indicated:
- **Description** – **NGINX Plus app-1 Instance Template**
- **Tags** – **nginx-plus-http-fw-rule**
- **Preemptibility** – **Off (recommended)** (the default)
- **Automatic restart** – **On (recommended)** (the default)
- **On host maintenance** – **Migrate VM instance (recommended)** (the default)
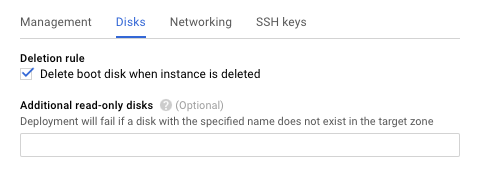
 7. On the **Disks** subtab, verify that the checkbox labeled **Delete boot disk when instance is deleted** is checked.
Instances from this template are ephemeral instantiations of the gold image. So, we want GCE to reclaim the disk when the instance is terminated. New instances are always based on the gold image. So, there is no reason to keep the instantiations on disk when the instance is deleted.
7. On the **Disks** subtab, verify that the checkbox labeled **Delete boot disk when instance is deleted** is checked.
Instances from this template are ephemeral instantiations of the gold image. So, we want GCE to reclaim the disk when the instance is terminated. New instances are always based on the gold image. So, there is no reason to keep the instantiations on disk when the instance is deleted.
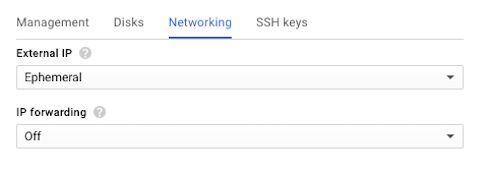
 8. On the **Networking** subtab, verify the default settings of **Ephemeral** for **External IP** and **Off** for **IP Forwarding**.
 9. If you're using your own SSH public key instead of your default keys, paste the hexadecimal key string on the **SSH Keys** subtab. Right into the box that reads **Enter entire key data**.
10. Click the Create button.
### Creating the Second Application Instance Template
1. On the **Instance templates** summary page, click CREATE INSTANCE TEMPLATE.
2. Repeat Steps 4 through 10 of Creating the First Application Instance Template to create a second application instance template. Use the same values as for the first instance template, except as noted:
- In Step 4:
- **Name** – **nginx-plus-app-2-instance-template**
- **Boot disk** – Click the **nginx-plus-app-2-image** radio button
- In Step 6, **Description** – **NGINX Plus app-2 Instance Template**
### Creating the Load-Balancing Instance Template
1. On the **Instance templates** summary page, click CREATE INSTANCE TEMPLATE.
2. Repeat Steps 4 through 10 of Creating the First Application Instance Template to create the load‑balancing instance template. Use the same values as for the first instance template, except as noted:
- In Step 4:
- **Name** – **nginx-plus-lb-instance-template**.
- **Boot disk** – Click the **nginx-plus-lb-image** radio button
- In Step 6, **Description** – **NGINX Plus Load‑Balancing Instance Template**
## Task 5: Creating Image Health Checks
Define the simple HTTP health check that GCE uses. This verifies that each NGINX Plus LB image is running (and to re-create any LB instance that isn't running).
1. Verify that the **NGINX Plus All-Active-LB** project is still selected in the Google Cloud Platform header bar.
2. Navigate to the **Compute Engine > Health checks** tab.
3. Click the Create a health check button.
4. On the **Create a health check** page that opens, modify or verify the fields as indicated:
- **Name** – **nginx-plus-http-health-check**
- **Description** – **Basic HTTP health check to monitor NGINX Plus instances**
- **Protocol** – **HTTP** (the default)
- **Port** – **80** (the default)
- **Request path** – **/status-old.html**
5. If the **Health criteria** section is not already open, click More.
6. Modify or verify the fields as indicated:
- **Check interval** – **10 seconds**
- **Timeout** – **10 seconds**
- **Healthy threshold** – **2 consecutive successes** (the default)
- **Unhealthy threshold** – **10 consecutive failures**
7. Click the Create button.
9. If you're using your own SSH public key instead of your default keys, paste the hexadecimal key string on the **SSH Keys** subtab. Right into the box that reads **Enter entire key data**.
10. Click the Create button.
### Creating the Second Application Instance Template
1. On the **Instance templates** summary page, click CREATE INSTANCE TEMPLATE.
2. Repeat Steps 4 through 10 of Creating the First Application Instance Template to create a second application instance template. Use the same values as for the first instance template, except as noted:
- In Step 4:
- **Name** – **nginx-plus-app-2-instance-template**
- **Boot disk** – Click the **nginx-plus-app-2-image** radio button
- In Step 6, **Description** – **NGINX Plus app-2 Instance Template**
### Creating the Load-Balancing Instance Template
1. On the **Instance templates** summary page, click CREATE INSTANCE TEMPLATE.
2. Repeat Steps 4 through 10 of Creating the First Application Instance Template to create the load‑balancing instance template. Use the same values as for the first instance template, except as noted:
- In Step 4:
- **Name** – **nginx-plus-lb-instance-template**.
- **Boot disk** – Click the **nginx-plus-lb-image** radio button
- In Step 6, **Description** – **NGINX Plus Load‑Balancing Instance Template**
## Task 5: Creating Image Health Checks
Define the simple HTTP health check that GCE uses. This verifies that each NGINX Plus LB image is running (and to re-create any LB instance that isn't running).
1. Verify that the **NGINX Plus All-Active-LB** project is still selected in the Google Cloud Platform header bar.
2. Navigate to the **Compute Engine > Health checks** tab.
3. Click the Create a health check button.
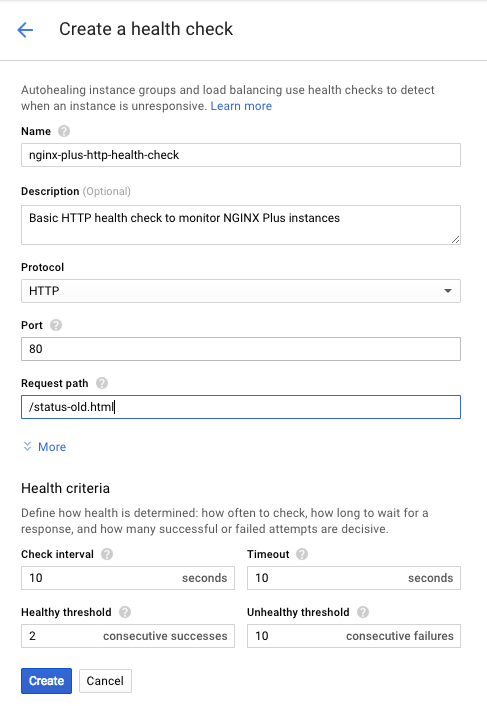
4. On the **Create a health check** page that opens, modify or verify the fields as indicated:
- **Name** – **nginx-plus-http-health-check**
- **Description** – **Basic HTTP health check to monitor NGINX Plus instances**
- **Protocol** – **HTTP** (the default)
- **Port** – **80** (the default)
- **Request path** – **/status-old.html**
5. If the **Health criteria** section is not already open, click More.
6. Modify or verify the fields as indicated:
- **Check interval** – **10 seconds**
- **Timeout** – **10 seconds**
- **Healthy threshold** – **2 consecutive successes** (the default)
- **Unhealthy threshold** – **10 consecutive failures**
7. Click the Create button.
 ## Task 6: Creating Instance Groups
Create three independent instance groups, one for each type of function-specific instance.
1. Verify that the **NGINX Plus All-Active-LB** project is still selected in the Google Cloud Platform header bar.
2. Navigate to the **Compute Engine > Instance groups** tab.
3. Click the Create instance group button.
### Creating the First Application Instance Group
1. On the **Create a new instance group** page that opens, modify or verify the fields as indicated. Ignore fields that are not mentioned:
- **Name** – **nginx-plus-app-1-instance-group**
- **Description** – **Instance group to host NGINX Plus app-1 instances**
- **Location** –
- Click the **Single-zone** radio button (the default).
- **Zone** – The GCP zone you specified when you created source instances (Step 1 of [Creating the First Application Instance from a VM Image](#source-vm-app-1) or Step 5 of [Creating the First Application Instance from a Prebuilt Image](#source-prebuilt)). We're using **us-west1-a**.
- **Creation method** – **Use instance template** radio button (the default)
- **Instance template** – **nginx-plus-app-1-instance-template** (select from the drop-down menu)
- **Autoscaling** – **Off** (the default)
- **Number of instances** – **2**
- **Health check** – **nginx-plus-http-health-check** (select from the drop-down menu)
- **Initial delay** – **300 seconds** (the default)
3. Click the Create button.
## Task 6: Creating Instance Groups
Create three independent instance groups, one for each type of function-specific instance.
1. Verify that the **NGINX Plus All-Active-LB** project is still selected in the Google Cloud Platform header bar.
2. Navigate to the **Compute Engine > Instance groups** tab.
3. Click the Create instance group button.
### Creating the First Application Instance Group
1. On the **Create a new instance group** page that opens, modify or verify the fields as indicated. Ignore fields that are not mentioned:
- **Name** – **nginx-plus-app-1-instance-group**
- **Description** – **Instance group to host NGINX Plus app-1 instances**
- **Location** –
- Click the **Single-zone** radio button (the default).
- **Zone** – The GCP zone you specified when you created source instances (Step 1 of [Creating the First Application Instance from a VM Image](#source-vm-app-1) or Step 5 of [Creating the First Application Instance from a Prebuilt Image](#source-prebuilt)). We're using **us-west1-a**.
- **Creation method** – **Use instance template** radio button (the default)
- **Instance template** – **nginx-plus-app-1-instance-template** (select from the drop-down menu)
- **Autoscaling** – **Off** (the default)
- **Number of instances** – **2**
- **Health check** – **nginx-plus-http-health-check** (select from the drop-down menu)
- **Initial delay** – **300 seconds** (the default)
3. Click the Create button.
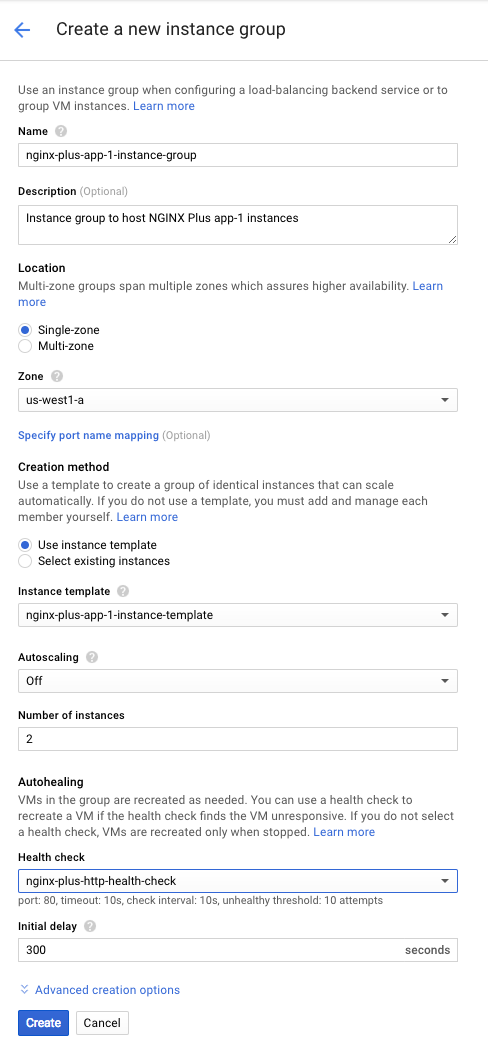 ### Creating the Second Application Instance Group
1. On the Instance groups summary page, click CREATE INSTANCE GROUP.
2. Repeat the steps in [Creating the First Application Instance Group](#groups-app-1) to create a second application instance group. Specify the same values as for the first instance template, except for these fields:
- **Name** – **nginx-plus-app-2-instance-group**
- **Description** – **Instance group to host NGINX Plus app-2 instances**
- **Instance template** – **nginx-plus-app-2-instance-template** (select from the drop-down menu)
### Creating the Load-Balancing Instance Group
1. On the **Instance groups** summary page, click CREATE INSTANCE GROUP.
2. Repeat the steps in [Creating the First Application Instance Group](#groups-app-1) to create the load‑balancing instance group. Specify the same values as for the first instance template, except for these fields:
- **Name** – **nginx-plus-lb-instance-group**
- **Description** – **Instance group to host NGINX Plus load balancing instances**
- **Instance template** – **nginx-plus-lb-instance-template** (select from the drop-down menu)
### Updating and Testing the NGINX Plus Configuration
Update the NGINX Plus configuration on the two LB instances (**nginx-plus-lb-instance-group-[a...z]**). It should list the internal IP addresses of the four application servers (two instances each of **nginx-plus-app-1-instance-group-[a...z]** and **nginx-plus-app-2-instance-group-[a...z]**).
Repeat these instructions for both LB instances.
**Note:** Some commands require `root` privilege. If appropriate for your environment, prefix commands with the `sudo` command.
1. Connect to the LB instance over SSH using the method of your choice. GCE provides a built-in mechanism:
- Navigate to the **Compute Engine > VM instances** tab.
- In the table, find the row for the instance. Click the triangle icon in the **Connect** column at the far right. Then, select a method (for example, **Open in browser window**).
2. In the SSH terminal, use your preferred text editor to edit **gce-all-active-lb.conf**. Change the `server` directives in the `upstream` block to reference the internal IPs of the two **nginx-plus-app-1-instance-group-[a...z]** instances and the two **nginx-plus-app-2-instance-group-[a...z]** instances. You can check the addresses in the **Internal IP** column of the table on the **Compute Engine > VM instances** summary page. For example:
```nginx
upstream upstream_app_pool {
zone upstream-apps 64k;
server 10.10.10.1;
server 10.10.10.2;
server 10.10.10.3;
server 10.10.10.4;
sticky cookie GCPPersist expires=300;
}
```
Directive documentation: [server](https://nginx.org/en/docs/http/ngx_http_upstream_module.html#server), [`sticky cookie`](https://nginx.org/en/docs/http/ngx_http_upstream_module.html#sticky), [upstream](https://nginx.org/en/docs/http/ngx_http_upstream_module.html#upstream), [zone](https://nginx.org/en/docs/http/ngx_http_upstream_module.html#zone)
3. Validate the NGINX Plus configuration and restart NGINX Plus:
```shell
nginx -t
nginx -s reload
```
4. Verify that the four application instances are receiving traffic and responding. To do this, access the NGINX Plus live activity monitoring dashboard on the load-balancing instance (**nginx-plus-lb-instance-group-[a...z]**). You can see the instance's external IP address on the **Compute Engine > VM instances** summary page in the **External IP** column of the table.
**https://_LB-external-IP-address_:8080/status.html**
5. Verify that NGINX Plus is load balancing traffic among the four application instance groups. Do this by running this command on a separate client machine:
```shell
while true; do curl -s | grep Server: ;done
```
If load balancing is working properly, the unique **Server** field from the index page for each application instance appears in turn.
## Task 7: Configuring GCE Network Load Balancer
Set up a GCE network load balancer. It will distribute incoming client traffic to the NGINX Plus LB instances. First, reserve the static IP address the GCE network load balancer advertises to clients.
1. Verify that the **NGINX Plus All-Active-LB** project is still selected in the Google Cloud Platform header bar.
2. Navigate to the **Networking > External IP addresses** tab.
3. Click the Reserve static address button.
4. On the **Reserve a static address** page that opens, modify or verify the fields as indicated:
- **Name** – **nginx-plus-network-lb-static-ip**
- **Description** – **Static IP address for Network LB frontend to NGINX Plus LB instances**
- **Type** – Click the **Regional** radio button (the default)
- **Region** – The GCP zone you specified when you created source instances (Step 1 of [Creating the First Application Instance from a VM Image](#source-vm-app-1) or Step 5 of [Creating the First Application Instance from a Prebuilt Image](#source-prebuilt)). We're using **us-west1**.
- **Attached to** – **None** (the default)
5. Click the Reserve button.
### Creating the Second Application Instance Group
1. On the Instance groups summary page, click CREATE INSTANCE GROUP.
2. Repeat the steps in [Creating the First Application Instance Group](#groups-app-1) to create a second application instance group. Specify the same values as for the first instance template, except for these fields:
- **Name** – **nginx-plus-app-2-instance-group**
- **Description** – **Instance group to host NGINX Plus app-2 instances**
- **Instance template** – **nginx-plus-app-2-instance-template** (select from the drop-down menu)
### Creating the Load-Balancing Instance Group
1. On the **Instance groups** summary page, click CREATE INSTANCE GROUP.
2. Repeat the steps in [Creating the First Application Instance Group](#groups-app-1) to create the load‑balancing instance group. Specify the same values as for the first instance template, except for these fields:
- **Name** – **nginx-plus-lb-instance-group**
- **Description** – **Instance group to host NGINX Plus load balancing instances**
- **Instance template** – **nginx-plus-lb-instance-template** (select from the drop-down menu)
### Updating and Testing the NGINX Plus Configuration
Update the NGINX Plus configuration on the two LB instances (**nginx-plus-lb-instance-group-[a...z]**). It should list the internal IP addresses of the four application servers (two instances each of **nginx-plus-app-1-instance-group-[a...z]** and **nginx-plus-app-2-instance-group-[a...z]**).
Repeat these instructions for both LB instances.
**Note:** Some commands require `root` privilege. If appropriate for your environment, prefix commands with the `sudo` command.
1. Connect to the LB instance over SSH using the method of your choice. GCE provides a built-in mechanism:
- Navigate to the **Compute Engine > VM instances** tab.
- In the table, find the row for the instance. Click the triangle icon in the **Connect** column at the far right. Then, select a method (for example, **Open in browser window**).
2. In the SSH terminal, use your preferred text editor to edit **gce-all-active-lb.conf**. Change the `server` directives in the `upstream` block to reference the internal IPs of the two **nginx-plus-app-1-instance-group-[a...z]** instances and the two **nginx-plus-app-2-instance-group-[a...z]** instances. You can check the addresses in the **Internal IP** column of the table on the **Compute Engine > VM instances** summary page. For example:
```nginx
upstream upstream_app_pool {
zone upstream-apps 64k;
server 10.10.10.1;
server 10.10.10.2;
server 10.10.10.3;
server 10.10.10.4;
sticky cookie GCPPersist expires=300;
}
```
Directive documentation: [server](https://nginx.org/en/docs/http/ngx_http_upstream_module.html#server), [`sticky cookie`](https://nginx.org/en/docs/http/ngx_http_upstream_module.html#sticky), [upstream](https://nginx.org/en/docs/http/ngx_http_upstream_module.html#upstream), [zone](https://nginx.org/en/docs/http/ngx_http_upstream_module.html#zone)
3. Validate the NGINX Plus configuration and restart NGINX Plus:
```shell
nginx -t
nginx -s reload
```
4. Verify that the four application instances are receiving traffic and responding. To do this, access the NGINX Plus live activity monitoring dashboard on the load-balancing instance (**nginx-plus-lb-instance-group-[a...z]**). You can see the instance's external IP address on the **Compute Engine > VM instances** summary page in the **External IP** column of the table.
**https://_LB-external-IP-address_:8080/status.html**
5. Verify that NGINX Plus is load balancing traffic among the four application instance groups. Do this by running this command on a separate client machine:
```shell
while true; do curl -s | grep Server: ;done
```
If load balancing is working properly, the unique **Server** field from the index page for each application instance appears in turn.
## Task 7: Configuring GCE Network Load Balancer
Set up a GCE network load balancer. It will distribute incoming client traffic to the NGINX Plus LB instances. First, reserve the static IP address the GCE network load balancer advertises to clients.
1. Verify that the **NGINX Plus All-Active-LB** project is still selected in the Google Cloud Platform header bar.
2. Navigate to the **Networking > External IP addresses** tab.
3. Click the Reserve static address button.
4. On the **Reserve a static address** page that opens, modify or verify the fields as indicated:
- **Name** – **nginx-plus-network-lb-static-ip**
- **Description** – **Static IP address for Network LB frontend to NGINX Plus LB instances**
- **Type** – Click the **Regional** radio button (the default)
- **Region** – The GCP zone you specified when you created source instances (Step 1 of [Creating the First Application Instance from a VM Image](#source-vm-app-1) or Step 5 of [Creating the First Application Instance from a Prebuilt Image](#source-prebuilt)). We're using **us-west1**.
- **Attached to** – **None** (the default)
5. Click the Reserve button.
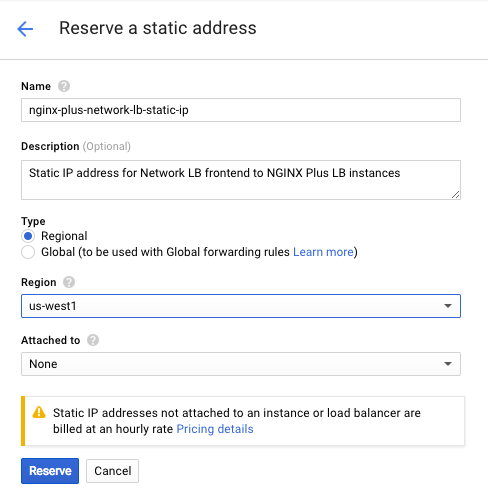 6. Navigate to the **Networking > Load balancing** tab.
7. Click the Create load balancer button.
8. On the **Load balancing** page that opens, click **Start configuration** in the **TCP Load Balancing** box.
9. On the page that opens, click the **From Internet to my VMs** and **No (TCP)** radio buttons (the defaults).
10. Click the Continue button. The **New TCP load balancer** page opens.
11. In the **Name** field, type **nginx-plus-network-lb-frontend**.
12. Click **Backend configuration** in the left column to open the **Backend configuration** interface in the right column. Fill in the fields as indicated:
- **Region** – The GCP region you specified in Step 4. We're using **us-west1**.
- **Backends** – With **Select existing instance groups** selected, select **nginx-plus-lb-instance-group** from the drop-down menu
- **Backup pool** – **None** (the default)
- **Failover ratio** – **10** (the default)
- **Health check** – **nginx-plus-http-health-check**
- **Session affinity** – **Client IP**
6. Navigate to the **Networking > Load balancing** tab.
7. Click the Create load balancer button.
8. On the **Load balancing** page that opens, click **Start configuration** in the **TCP Load Balancing** box.
9. On the page that opens, click the **From Internet to my VMs** and **No (TCP)** radio buttons (the defaults).
10. Click the Continue button. The **New TCP load balancer** page opens.
11. In the **Name** field, type **nginx-plus-network-lb-frontend**.
12. Click **Backend configuration** in the left column to open the **Backend configuration** interface in the right column. Fill in the fields as indicated:
- **Region** – The GCP region you specified in Step 4. We're using **us-west1**.
- **Backends** – With **Select existing instance groups** selected, select **nginx-plus-lb-instance-group** from the drop-down menu
- **Backup pool** – **None** (the default)
- **Failover ratio** – **10** (the default)
- **Health check** – **nginx-plus-http-health-check**
- **Session affinity** – **Client IP**
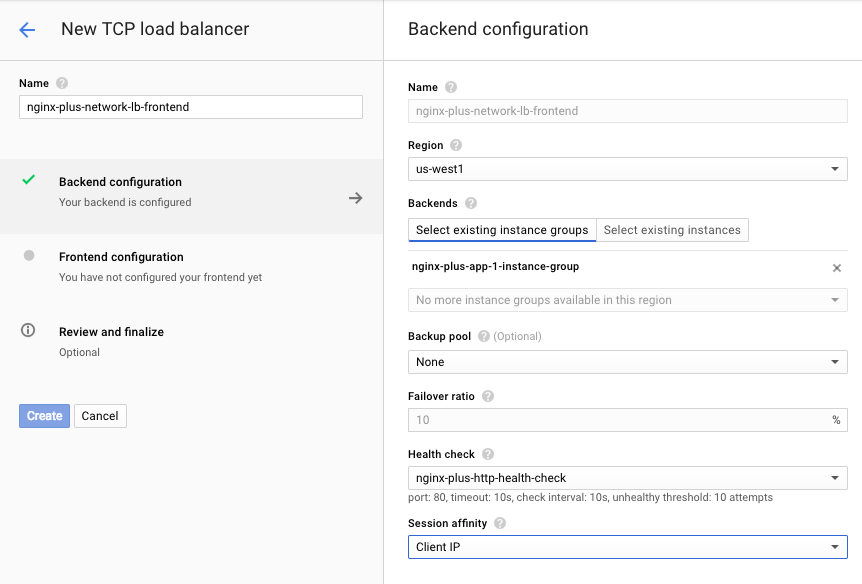 13. Select **Frontend configuration** in the left column. This opens up the **Frontend configuration** interface on the right column.
14. Create three **Protocol-IP-Port** tuples, each with:
- **Protocol** – **TCP**
- **IP** – The address you reserved in Step 5, selected from the drop-down menu (if there is more than one address, select the one labeled in parentheses with the name you specified in Step 5)
- **Port** – **80**, **8080**, and **443** in the three tuples respectively
15. Click the Create button.
13. Select **Frontend configuration** in the left column. This opens up the **Frontend configuration** interface on the right column.
14. Create three **Protocol-IP-Port** tuples, each with:
- **Protocol** – **TCP**
- **IP** – The address you reserved in Step 5, selected from the drop-down menu (if there is more than one address, select the one labeled in parentheses with the name you specified in Step 5)
- **Port** – **80**, **8080**, and **443** in the three tuples respectively
15. Click the Create button.
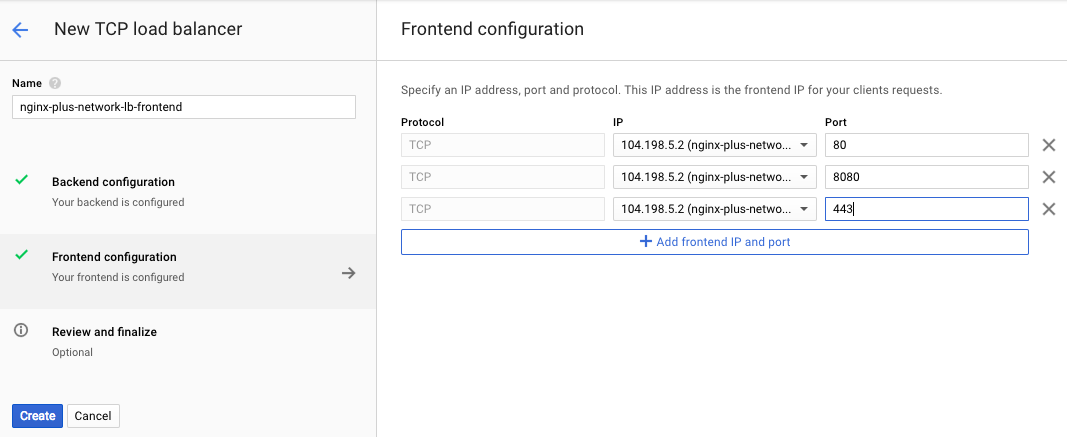 ## Task 8: Testing the All-Active Load Balancing Deployment
Verify that GCE network load balancer is properly routing traffic to both NGINX Plus LB instances.
**Note:** Some commands require `root` privilege. If appropriate for your environment, prefix commands with the `sudo` command.
Working on a separate client machine, run this command, using the static IP address you set in the previous section for GCE network load balancer:
```shell
while true; do curl -s | grep Server: ;done
```
Alternatively, you can use a web browser to access this URL:
**http://**_GCE-Network-LB-external-static-IP-address_
If load balancing is working properly, the unique **Server** field from the index page for each application instance appears in turn.
To verify that high availability is working:
1. Connect to one of the instances in the **nginx-plus-lb-instance-group** over SSH and run this command to force it offline:
```shell
iptables -A INPUT -p tcp --destination-port 80 -j DROP
```
2. Verify that with one LB instance offline, the other LB instance still forwards traffic to the application instances (there might be a delay before GCE network load balancer detects that the first instance is offline). Continue monitoring and verify that GCE network load balancer then re-creates the first LB instance and brings it online.
3. When the LB instance is back online, run this command to return it to its working state:
```shell
iptables -F
```
### Revision History
- Version 3 (July 2018) – Updates for Google Cloud Platform Marketplace
- Version 2 (April 2018) – Standardized information about root privilege and links to directive documentation
- Version 1 (November 2016) – Initial version (NGINX Plus R11)
## Task 8: Testing the All-Active Load Balancing Deployment
Verify that GCE network load balancer is properly routing traffic to both NGINX Plus LB instances.
**Note:** Some commands require `root` privilege. If appropriate for your environment, prefix commands with the `sudo` command.
Working on a separate client machine, run this command, using the static IP address you set in the previous section for GCE network load balancer:
```shell
while true; do curl -s | grep Server: ;done
```
Alternatively, you can use a web browser to access this URL:
**http://**_GCE-Network-LB-external-static-IP-address_
If load balancing is working properly, the unique **Server** field from the index page for each application instance appears in turn.
To verify that high availability is working:
1. Connect to one of the instances in the **nginx-plus-lb-instance-group** over SSH and run this command to force it offline:
```shell
iptables -A INPUT -p tcp --destination-port 80 -j DROP
```
2. Verify that with one LB instance offline, the other LB instance still forwards traffic to the application instances (there might be a delay before GCE network load balancer detects that the first instance is offline). Continue monitoring and verify that GCE network load balancer then re-creates the first LB instance and brings it online.
3. When the LB instance is back online, run this command to return it to its working state:
```shell
iptables -F
```
### Revision History
- Version 3 (July 2018) – Updates for Google Cloud Platform Marketplace
- Version 2 (April 2018) – Standardized information about root privilege and links to directive documentation
- Version 1 (November 2016) – Initial version (NGINX Plus R11)