# Single Sign-On with Keycloak and njs
Type of document: How-to guide
Product: NGINX Plus
> Enable OpenID Connect-based single-sign for applications proxied by NGINX Plus, using Keycloak as the identity provider (IdP).
---
**Note:** This guide applies to NGINX Plus [Release 15](nginx/releases.md#r15) and later, based on the [`nginx-openid-connect`](https://github.com/nginxinc/nginx-openid-connect) GitHub repo. Starting with NGINX Plus [Release 34](nginx/releases.md#r34), use the simpler solution with the [native OpenID connect module](https://nginx.org/en/docs/http/ngx_http_oidc_module.html).
See [Single Sign-On With Keycloak](nginx/deployment-guides/single-sign-on/keycloak.md) for details.
This guide explains how to enable single sign-on (SSO) for applications being proxied by F5 NGINX Plus. The solution uses OpenID Connect as the authentication mechanism, with [Keycloak](https://www.keycloak.org/) as the identity provider (IdP), and NGINX Plus as the relying party.
**Note:** You can find more information about the NGINX Plus OpenID Connect integration in the project's [GitHub repo](https://github.com/nginxinc/nginx-openid-connect#nginx-openid-connect).
## Prerequisites
The instructions assume you have the following:
- A running Keycloak server. See the Keycloak documentation for [Getting Started](https://www.keycloak.org/guides#getting-started) and [Server](https://www.keycloak.org/guides#server) configuration instructions.
- An NGINX Plus subscription and NGINX Plus R15 or later. For installation instructions, see the [NGINX Plus Admin Guide](https://docs.nginx.com/nginx/admin-guide/installing-nginx/installing-nginx-plus/).
- The [NGINX JavaScript module](https://nginx.org/en/docs/njs/index.html) (njs), required for handling the interaction between NGINX Plus and the IdP. After installing NGINX Plus, install the module with the command for your operating system.
For Debian and Ubuntu:
```none
sudo apt install nginx-plus-module-njs
```
For CentOS, RHEL, and Oracle Linux:
```shell
sudo yum install nginx-plus-module-njs
```
- The following directive included in the top-level ("main") configuration context in **/etc/nginx/nginx.conf**, to load the NGINX JavaScript module:
```nginx
load_module modules/ngx_http_js_module.so;
```
## Configuring Keycloak
**Note:** The following procedure reflects the Keycloak GUI at the time of publication, but the GUI is subject to change. Use this guide as a reference and adapt to the current Keycloak GUI as necessary.
Create a Keycloak client for NGINX Plus in the Keycloak GUI:
1. Access the Keycloak Admin Console at **http://_keycloak-server-address_:8080/auth/admin/** and log in.
2. In the left navigation column, click **Clients**. On the **Clients** page that opens, click the **Create** button in the upper right corner.
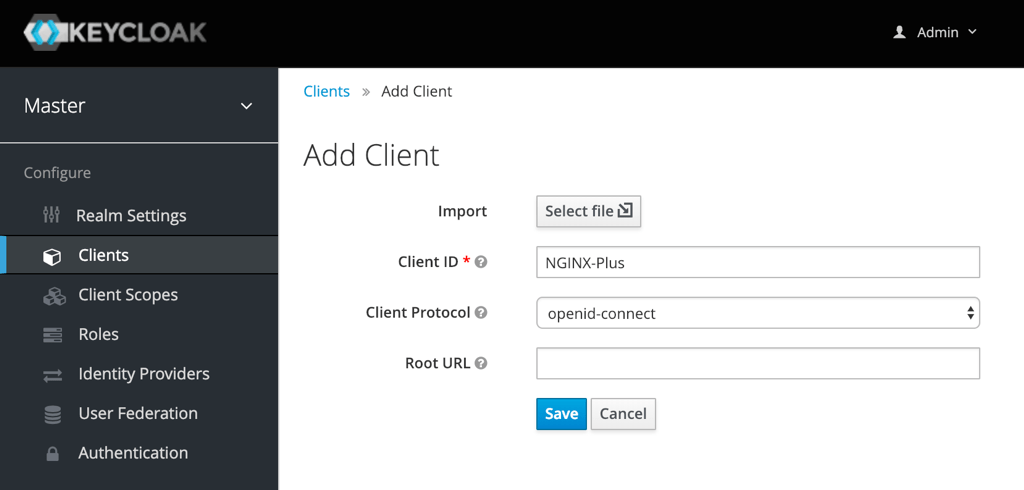
3. On the **Add Client** page that opens, enter or select these values, then click the Save button.
- **Client ID** – The name of the application for which you're enabling SSO (Keycloak refers to it as the “client”). Here we're using **NGINX-Plus**.
- **Client Protocol** – **openid-connect**.
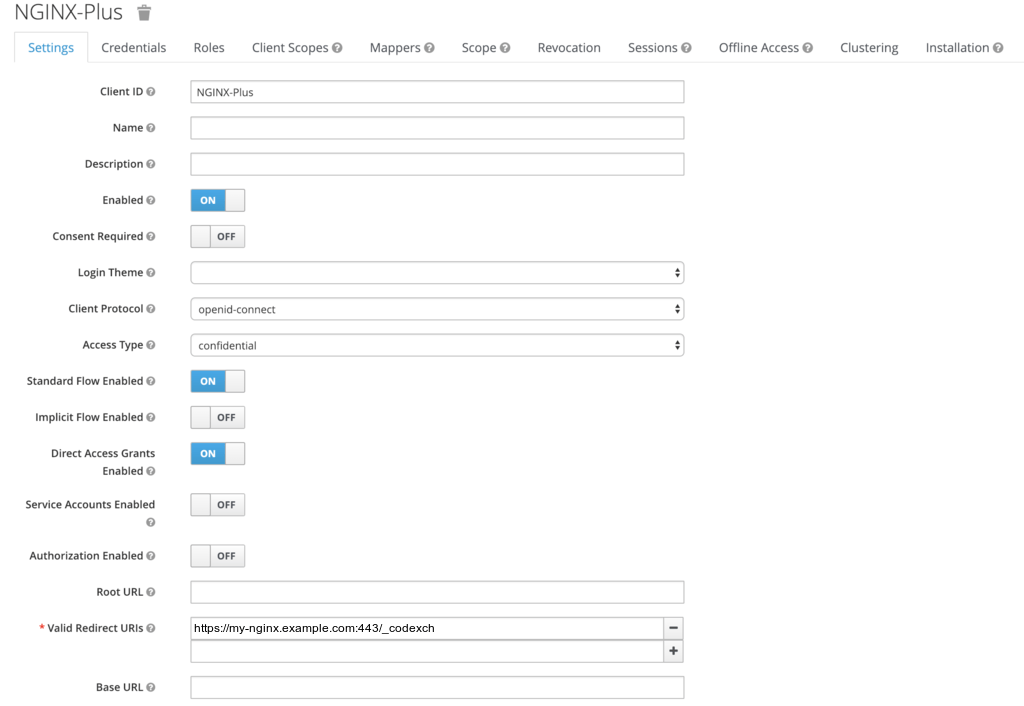
 4. On the **NGINX Plus** page that opens, enter or select these values on the Settings tab:
- **Access Type** – **confidential**
- **Valid Redirect URIs** – The URI of the NGINX Plus instance, including the port number, and ending in **/\_codexch** (in this guide it is **https://my-nginx.example.com:443/_codexch**)
**Notes:**
- For production, we strongly recommend that you use SSL/TLS (port 443).
- The port number is mandatory even when you're using the default port for HTTP (80) or HTTPS (443).
4. On the **NGINX Plus** page that opens, enter or select these values on the Settings tab:
- **Access Type** – **confidential**
- **Valid Redirect URIs** – The URI of the NGINX Plus instance, including the port number, and ending in **/\_codexch** (in this guide it is **https://my-nginx.example.com:443/_codexch**)
**Notes:**
- For production, we strongly recommend that you use SSL/TLS (port 443).
- The port number is mandatory even when you're using the default port for HTTP (80) or HTTPS (443).
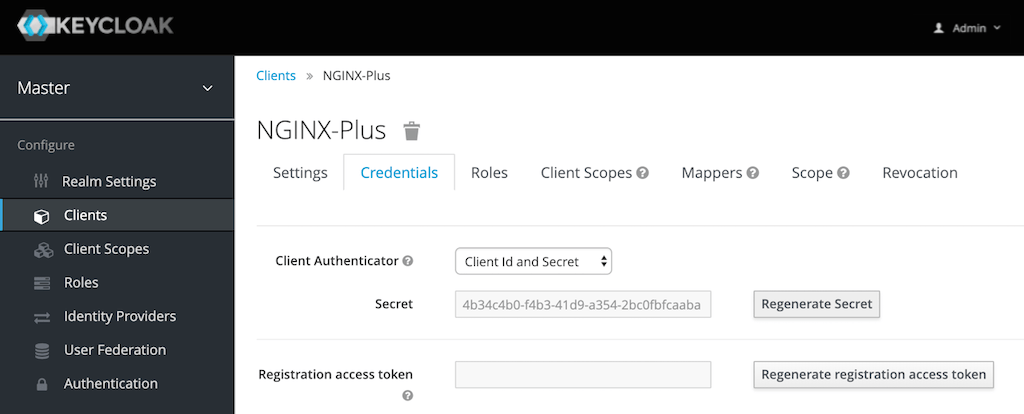
 5. Click the Credentials tab and make a note of the value in the **Secret** field. You will copy it into the NGINX Plus configuration file in [Step 4 of _Configuring NGINX Plus_](#nginx-plus-variables).
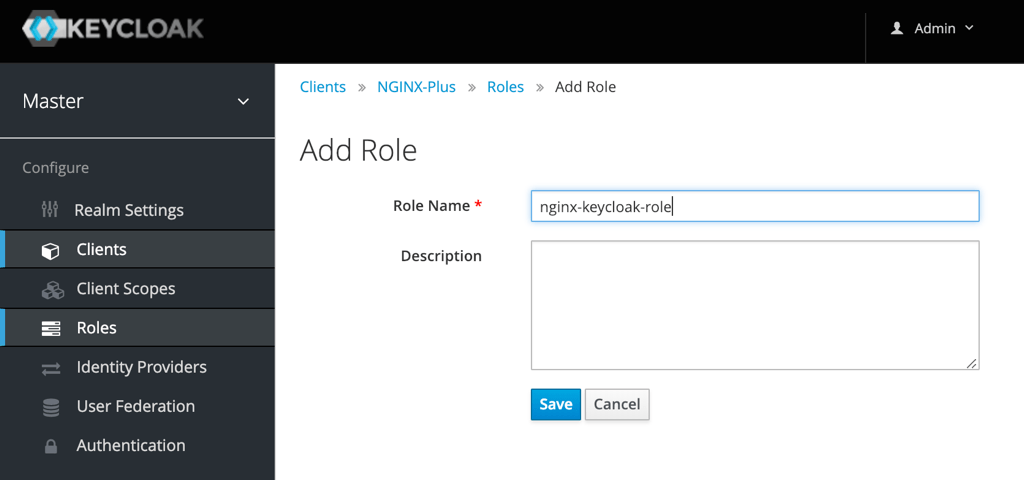
 6. Click the Roles tab, then click the **Add Role** button in the upper right corner of the page that opens.
7. On the **Add Role** page that opens, type a value in the **Role Name** field (here it is **nginx-keycloak-role**) and click the Save button.
6. Click the Roles tab, then click the **Add Role** button in the upper right corner of the page that opens.
7. On the **Add Role** page that opens, type a value in the **Role Name** field (here it is **nginx-keycloak-role**) and click the Save button.
 8. In the left navigation column, click **Users**. On the **Users** page that opens, either click the name of an existing user, or click the **Add user** button in the upper right corner to create a new user. For complete instructions, see the [Keycloak documentation](https://www.keycloak.org/docs/latest/server_admin/index.html#user-management).
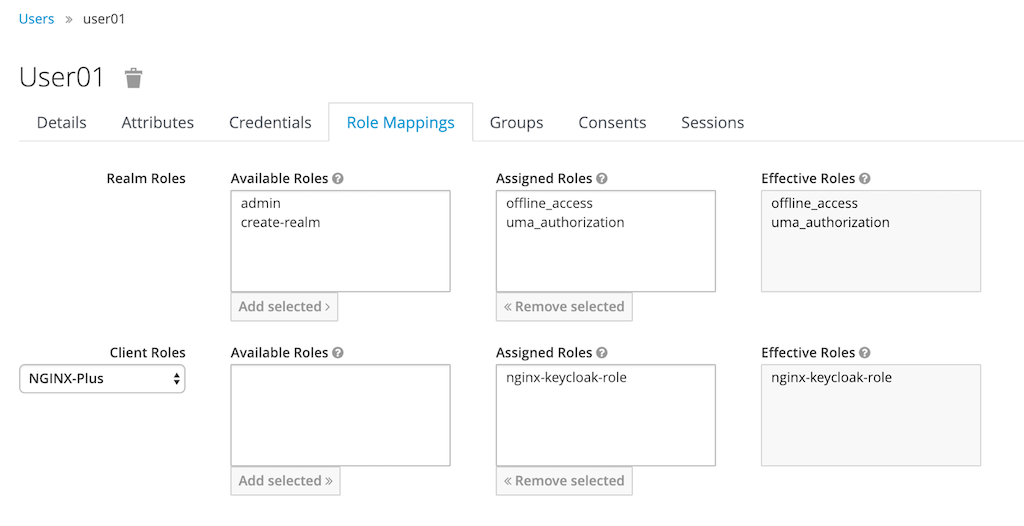
9. On the management page for the user (here, **user01**), click the Role Mappings tab. On the page that opens, select **NGINX-Plus** on the **Client Roles** drop‑down menu. Click **nginx-keycloak-role** in the **Available Roles** box, then click the **Add selected** button below the box. The role then appears in the **Assigned Roles** and **Effective Roles** boxes, as shown in the screenshot.
8. In the left navigation column, click **Users**. On the **Users** page that opens, either click the name of an existing user, or click the **Add user** button in the upper right corner to create a new user. For complete instructions, see the [Keycloak documentation](https://www.keycloak.org/docs/latest/server_admin/index.html#user-management).
9. On the management page for the user (here, **user01**), click the Role Mappings tab. On the page that opens, select **NGINX-Plus** on the **Client Roles** drop‑down menu. Click **nginx-keycloak-role** in the **Available Roles** box, then click the **Add selected** button below the box. The role then appears in the **Assigned Roles** and **Effective Roles** boxes, as shown in the screenshot.
 ## Configuring NGINX Plus
Configure NGINX Plus as the OpenID Connect relying party:
1. Create a clone of the [**nginx-openid-connect**](https://github.com/nginxinc/nginx-openid-connect) GitHub repository.
```shell
git clone https://github.com/nginxinc/nginx-openid-connect
```
2. Copy these files from the clone to **/etc/nginx/conf.d**:
- **frontend.conf**
- **openid\_connect.js**
- **openid\_connect.server\_conf**
- **openid\_connect\_configuration.conf**
3. Get the URLs for the authorization endpoint, token endpoint, and JSON Web Key (JWK) file from the Keycloak configuration. Run the following `curl` command in a terminal, piping the output to the indicated `python` command to output the entire configuration in an easily readable format. We've abridged the output to show only the relevant fields.
```shell
$ curl https:///realms/master/.well-known/openid-configuration | python -m json.tool
...
{
"authorization_endpoint": "https:///realms/master/protocol/openid-connect/auth",
...
"jwks_uri": "https:///realms/master/protocol/openid-connect/certs",
...
"token_endpoint": "https:///realms/master/protocol/openid-connect/token",
...
}
```
4. Using your preferred text editor, open **/etc/nginx/conf.d/openid_connect_configuration.conf**. Change the "default" parameter value of each of the following [map](https://nginx.org/en/docs/http/ngx_http_map_module.html#map) directives to the specified value:
- `map $host $oidc_authz_endpoint` – Value of `authorization_endpoint` from [Step 3](#nginx-plus-urls) (in this guide, `https:///realms/master/protocol/openid-connect/auth`)
- `map $host $oidc_token_endpoint` – Value of `token_endpoint` from [Step 3](#nginx-plus-urls) (in this guide, `https:///realms/master/protocol/openid-connect/token`)
- `map $host $oidc_client` – Value in the **Client ID** field from [Step 3 of _Configuring Keycloak_](#keycloak-client-id) (in this guide, `NGINX Plus`)
- `map $host $oidc_client_secret` – Value in the **Secret** field from [Step 5 of _Configuring Keycloak_](#keycloak-secret) (in this guide, ``)
- `map $host $oidc_hmac_key` – A unique, long, and secure phrase
5. Configure the JWK file. The procedure depends on which version of NGINX Plus you are using.
- In NGINX Plus R17 and later, NGINX Plus can read the JWK file directly from the URL reported as `jwks_uri` in [Step 3](#nginx-plus-urls). Change **/etc/nginx/conf.d/frontend.conf** as follows:
1. Comment out (or remove) the [auth_jwt_key_file](http://nginx.org/en/docs/http/ngx_http_auth_jwt_module.html#auth_jwt_key_file) directive.
2. Uncomment the [auth_jwt_key_request](http://nginx.org/en/docs/http/ngx_http_auth_jwt_module.html#auth_jwt_key_request) directive. (Its parameter, `/_jwks_uri`, refers to the value of the `$oidc_jwt_keyfile` variable, which you set in the next step.)
3. Change the "default" parameter of the `map $host $oidc_jwt_keyfile` directive to the value reported in the `jwks_uri` field in [Step 3](#nginx-plus-urls) (in this guide, `https:///realms/master/protocol/openid-connect/certs`).
- In NGINX Plus R16 and earlier, the JWK file must be on the local disk. (You can also use this method with NGINX Plus R17 and later if you wish.)
1. Copy the JSON contents from the JWK file named in the `jwks_uri` field in [Step 3](#nginx-plus-urls) (in this guide, `https:///realms/master/protocol/openid-connect/certs`) to a local file (for example, `/etc/nginx/my_keycloak_jwk.json`).
2. In **/etc/nginx/conf.d/openid_connect_configuration.conf**, change the "default" parameter of the `map $host $oidc_jwt_keyfile` directive to the local file path.
6. Confirm that the user named by the [user](http://nginx.org/en/docs/ngx_core_module.html#user) directive in the NGINX Plus configuration (in **/etc/nginx/nginx.conf** by convention) has read permission on the JWK file.
## Testing
In a browser, enter the address of your NGINX Plus instance and try to log in using the credentials of a user mapped to the role for NGINX Plus (see [Step 9 of _Configuring Keycloak_](#keycloak-users)).
## Configuring NGINX Plus
Configure NGINX Plus as the OpenID Connect relying party:
1. Create a clone of the [**nginx-openid-connect**](https://github.com/nginxinc/nginx-openid-connect) GitHub repository.
```shell
git clone https://github.com/nginxinc/nginx-openid-connect
```
2. Copy these files from the clone to **/etc/nginx/conf.d**:
- **frontend.conf**
- **openid\_connect.js**
- **openid\_connect.server\_conf**
- **openid\_connect\_configuration.conf**
3. Get the URLs for the authorization endpoint, token endpoint, and JSON Web Key (JWK) file from the Keycloak configuration. Run the following `curl` command in a terminal, piping the output to the indicated `python` command to output the entire configuration in an easily readable format. We've abridged the output to show only the relevant fields.
```shell
$ curl https:///realms/master/.well-known/openid-configuration | python -m json.tool
...
{
"authorization_endpoint": "https:///realms/master/protocol/openid-connect/auth",
...
"jwks_uri": "https:///realms/master/protocol/openid-connect/certs",
...
"token_endpoint": "https:///realms/master/protocol/openid-connect/token",
...
}
```
4. Using your preferred text editor, open **/etc/nginx/conf.d/openid_connect_configuration.conf**. Change the "default" parameter value of each of the following [map](https://nginx.org/en/docs/http/ngx_http_map_module.html#map) directives to the specified value:
- `map $host $oidc_authz_endpoint` – Value of `authorization_endpoint` from [Step 3](#nginx-plus-urls) (in this guide, `https:///realms/master/protocol/openid-connect/auth`)
- `map $host $oidc_token_endpoint` – Value of `token_endpoint` from [Step 3](#nginx-plus-urls) (in this guide, `https:///realms/master/protocol/openid-connect/token`)
- `map $host $oidc_client` – Value in the **Client ID** field from [Step 3 of _Configuring Keycloak_](#keycloak-client-id) (in this guide, `NGINX Plus`)
- `map $host $oidc_client_secret` – Value in the **Secret** field from [Step 5 of _Configuring Keycloak_](#keycloak-secret) (in this guide, ``)
- `map $host $oidc_hmac_key` – A unique, long, and secure phrase
5. Configure the JWK file. The procedure depends on which version of NGINX Plus you are using.
- In NGINX Plus R17 and later, NGINX Plus can read the JWK file directly from the URL reported as `jwks_uri` in [Step 3](#nginx-plus-urls). Change **/etc/nginx/conf.d/frontend.conf** as follows:
1. Comment out (or remove) the [auth_jwt_key_file](http://nginx.org/en/docs/http/ngx_http_auth_jwt_module.html#auth_jwt_key_file) directive.
2. Uncomment the [auth_jwt_key_request](http://nginx.org/en/docs/http/ngx_http_auth_jwt_module.html#auth_jwt_key_request) directive. (Its parameter, `/_jwks_uri`, refers to the value of the `$oidc_jwt_keyfile` variable, which you set in the next step.)
3. Change the "default" parameter of the `map $host $oidc_jwt_keyfile` directive to the value reported in the `jwks_uri` field in [Step 3](#nginx-plus-urls) (in this guide, `https:///realms/master/protocol/openid-connect/certs`).
- In NGINX Plus R16 and earlier, the JWK file must be on the local disk. (You can also use this method with NGINX Plus R17 and later if you wish.)
1. Copy the JSON contents from the JWK file named in the `jwks_uri` field in [Step 3](#nginx-plus-urls) (in this guide, `https:///realms/master/protocol/openid-connect/certs`) to a local file (for example, `/etc/nginx/my_keycloak_jwk.json`).
2. In **/etc/nginx/conf.d/openid_connect_configuration.conf**, change the "default" parameter of the `map $host $oidc_jwt_keyfile` directive to the local file path.
6. Confirm that the user named by the [user](http://nginx.org/en/docs/ngx_core_module.html#user) directive in the NGINX Plus configuration (in **/etc/nginx/nginx.conf** by convention) has read permission on the JWK file.
## Testing
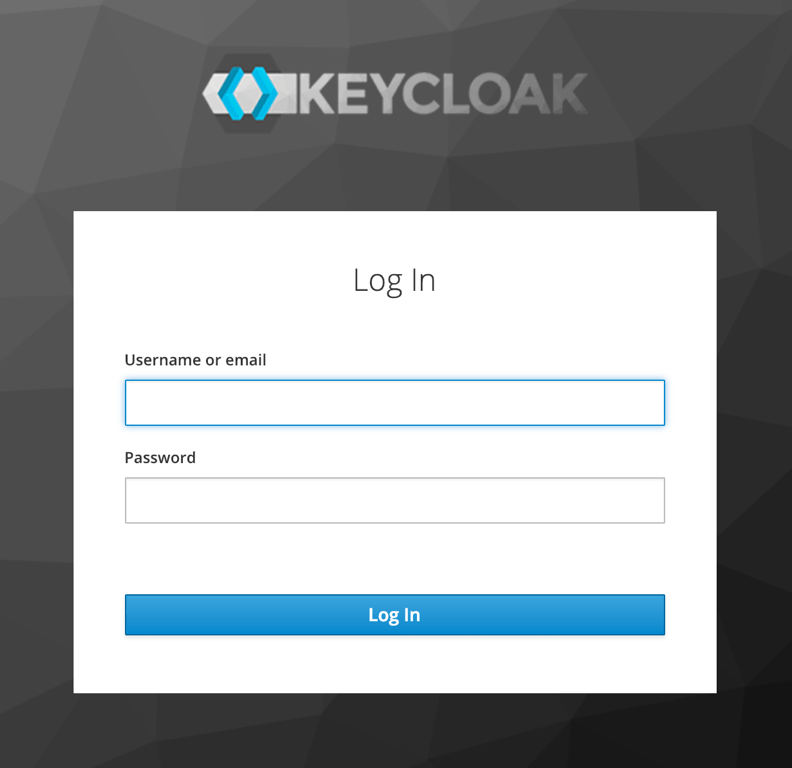
In a browser, enter the address of your NGINX Plus instance and try to log in using the credentials of a user mapped to the role for NGINX Plus (see [Step 9 of _Configuring Keycloak_](#keycloak-users)).
 ## Troubleshooting
See the [**Troubleshooting**](https://github.com/nginxinc/nginx-openid-connect#troubleshooting) section at the **nginx-openid-connect** repository on GitHub.
### Revision History
- Version 2 (March 2020) – Updates to _Configuring NGINX Plus_ section
- Version 1 (November 2019) – Initial version (NGINX Plus Release 19)
## Troubleshooting
See the [**Troubleshooting**](https://github.com/nginxinc/nginx-openid-connect#troubleshooting) section at the **nginx-openid-connect** repository on GitHub.
### Revision History
- Version 2 (March 2020) – Updates to _Configuring NGINX Plus_ section
- Version 1 (November 2019) – Initial version (NGINX Plus Release 19)