Lab 4: Config Sync Groups
In this lab, you create and manage Config Sync Groups in NGINX One Console. Config Sync Groups keep your NGINX instances in sync with a shared configuration. You learn to create a group, add instances, apply a shared config, and fix sync errors.
By the end of this lab, you’ll know how to:
- Create a Config Sync Group
- Add instances to a Config Sync Group
- Update the shared configuration for a Config Sync Group
Make sure you have:
-
Docker and Docker Compose installed and running
-
Your data plane key in the
TOKENenvironment variable (set in Lab 2):export TOKEN="your-data-plane-key" -
Your NGINX Plus JWT license file saved as
nginx-repo.jwt, andJWTset (set in Lab 2):export JWT=$(cat path/to/nginx-repo.jwt) -
Your unique identifier in the NAME environment variable (set in Lab 2), for example
s.jobs:export NAME="s.jobs" -
Basic familiarity with Linux command line and NGINX concepts
A Config Sync Group lets you apply one configuration to multiple NGINX instances and keep them in sync.
- In the NGINX One Console, select Manage > Config Sync Groups.
- In the Config Sync Groups pane, select Add Config Sync Group.
- In the Add Config Sync Group form, in the Name field, enter
$NAME-sync-group(for example,s.jobs-sync-group). - Select Create. The new group appears with Details and Configuration tabs.
- The Details tab shows:
- Object ID
- Last publication status and config version ID
- Config Sync Status (for example, Unknown)
- Instance status counts (In Sync, Out of Sync, Offline, Unavailable)
- The Details tab shows:
- Switch to the Configuration tab to view your group’s configuration files. It’s empty for now. You’ll add one in Exercise 2.
Note
You can mix OSS and Plus instances in one group. But any config feature you use must work on every instance. If you need Plus-only features, put them in a separate group.
When you create a Config Sync Group, it has no shared config to begin with. You can add a shared config in two ways:
- Define config manually: select your group, go to the Configuration tab, then select Edit Configuration. Add or paste your NGINX config, select Next, review the diff, and select Save and Publish.
- Populate from first instance: add one NGINX instance. The console uses that instance’s existing config as the group’s shared config.
Add a single NGINX instance so the console uses its existing config as the group’s shared config.
-
Select Manage > Config Sync Groups.
-
Select your
$NAME-sync-groupgroup. (For example,s.jobs-sync-group.) -
On the Details tab, in the Instances pane, select Add Instance to Config Sync Group.
-
Select Register a new instance with NGINX One then add to config sync group, then select Next.
-
Select Use existing key, paste
$TOKEN(or your actual data plane key) into the Data Plane Key box. -
Select the Docker Container tab. The tab shows sample commands for logging in, pulling an image, and running the container. Copy those sample commands and modify them as follows:
-
Log in to the private registry:
echo "$JWT" \ | docker login private-registry.nginx.com \ --username "$JWT" --password-stdin -
Pull a Docker (replace version as needed). Subject to availability, you can replace the agent with the specific NGINX Plus version, OS type, and OS version you need. Here we are going to pull the r31 version of NGINX+ on alpine to demonstrate that.See Pulling the image.
docker pull private-registry.nginx.com/nginx-plus/agent:nginx-plus-r31-alpine-3.19-20240522 -
Copy the docker run command from the user interface and modify it as follows:
- Replace
YOUR_JWT_HEREin--env NGINX_LICENSE_JWTwith$JWT - Replace
YOUR_DATA_PLANE_KEYin--env NGINX_AGENT_SERVER_TOKENwith$TOKEN - Add
--hostname "$NAME-one-manual"and--name "$NAME-one-manual"flags - Ensure
--env NGINX_AGENT_INSTANCE_GROUP="$NAME-sync-group"is set
docker run \ --hostname "$NAME-one-manual" \ --name "$NAME-one-manual" \ --env NGINX_LICENSE_JWT="$JWT" \ --env NGINX_AGENT_SERVER_GRPCPORT=443 \ --env NGINX_AGENT_SERVER_HOST=agent.connect.nginx.com \ --env NGINX_AGENT_SERVER_TOKEN="$TOKEN" \ --env NGINX_AGENT_INSTANCE_GROUP="$NAME-sync-group" \ --env NGINX_AGENT_TLS_ENABLE=true \ --restart always \ --runtime runc \ -d private-registry.nginx.com/nginx-plus/agent:nginx-plus-r31-alpine-3.19-20240522 - Replace
-
In the Config Sync Groups panel, select Refresh. The new instance appears and the shared config populates. The first instance added becomes the default config source.
-
Select the Configuration tab to view the shared config.
Instead of registering each container manually, you can set the sync group in your compose file and restart all containers at once.
You can edit the docker-config.yaml file to add those instances to the config sync group:
-
Stop the running containers:
docker compose down -
Open
docker-compose.yamlin a text editor. -
Uncomment the lines beginning with:
NGINX_AGENT_INSTANCE_GROUP: $NAME-sync-group -
Restart all containers:
docker compose up --force-recreate -d -
In the NGINX One Console, select Refresh. The instances with
NGINX_AGENT_INSTANCE_GROUPset appear in the Config Sync Group. -
Instances automatically sync the existing NGINX config. When the sync finishes, the Config Sync Status shows
In Sync.
Modify the shared group configuration and apply those changes to all group members.
-
Select Manage > Config Sync Groups, then choose your
$NAME-sync-group(for example,s-jobs-sync-group). -
Select the Configuration tab.
-
Select Edit Configuration (pencil icon).
-
In the file list, select
default.conf. -
In the editor pane, add these lines at 21–24:
location /test_header {
    add_header X-Test-App true;
    return 200 'HTTP/1.1 200 OK\nContent-Type: text/html\n\n<html><body>Welcome to Lab 4 of the NGINX One Console Workshop!</body></html>';
}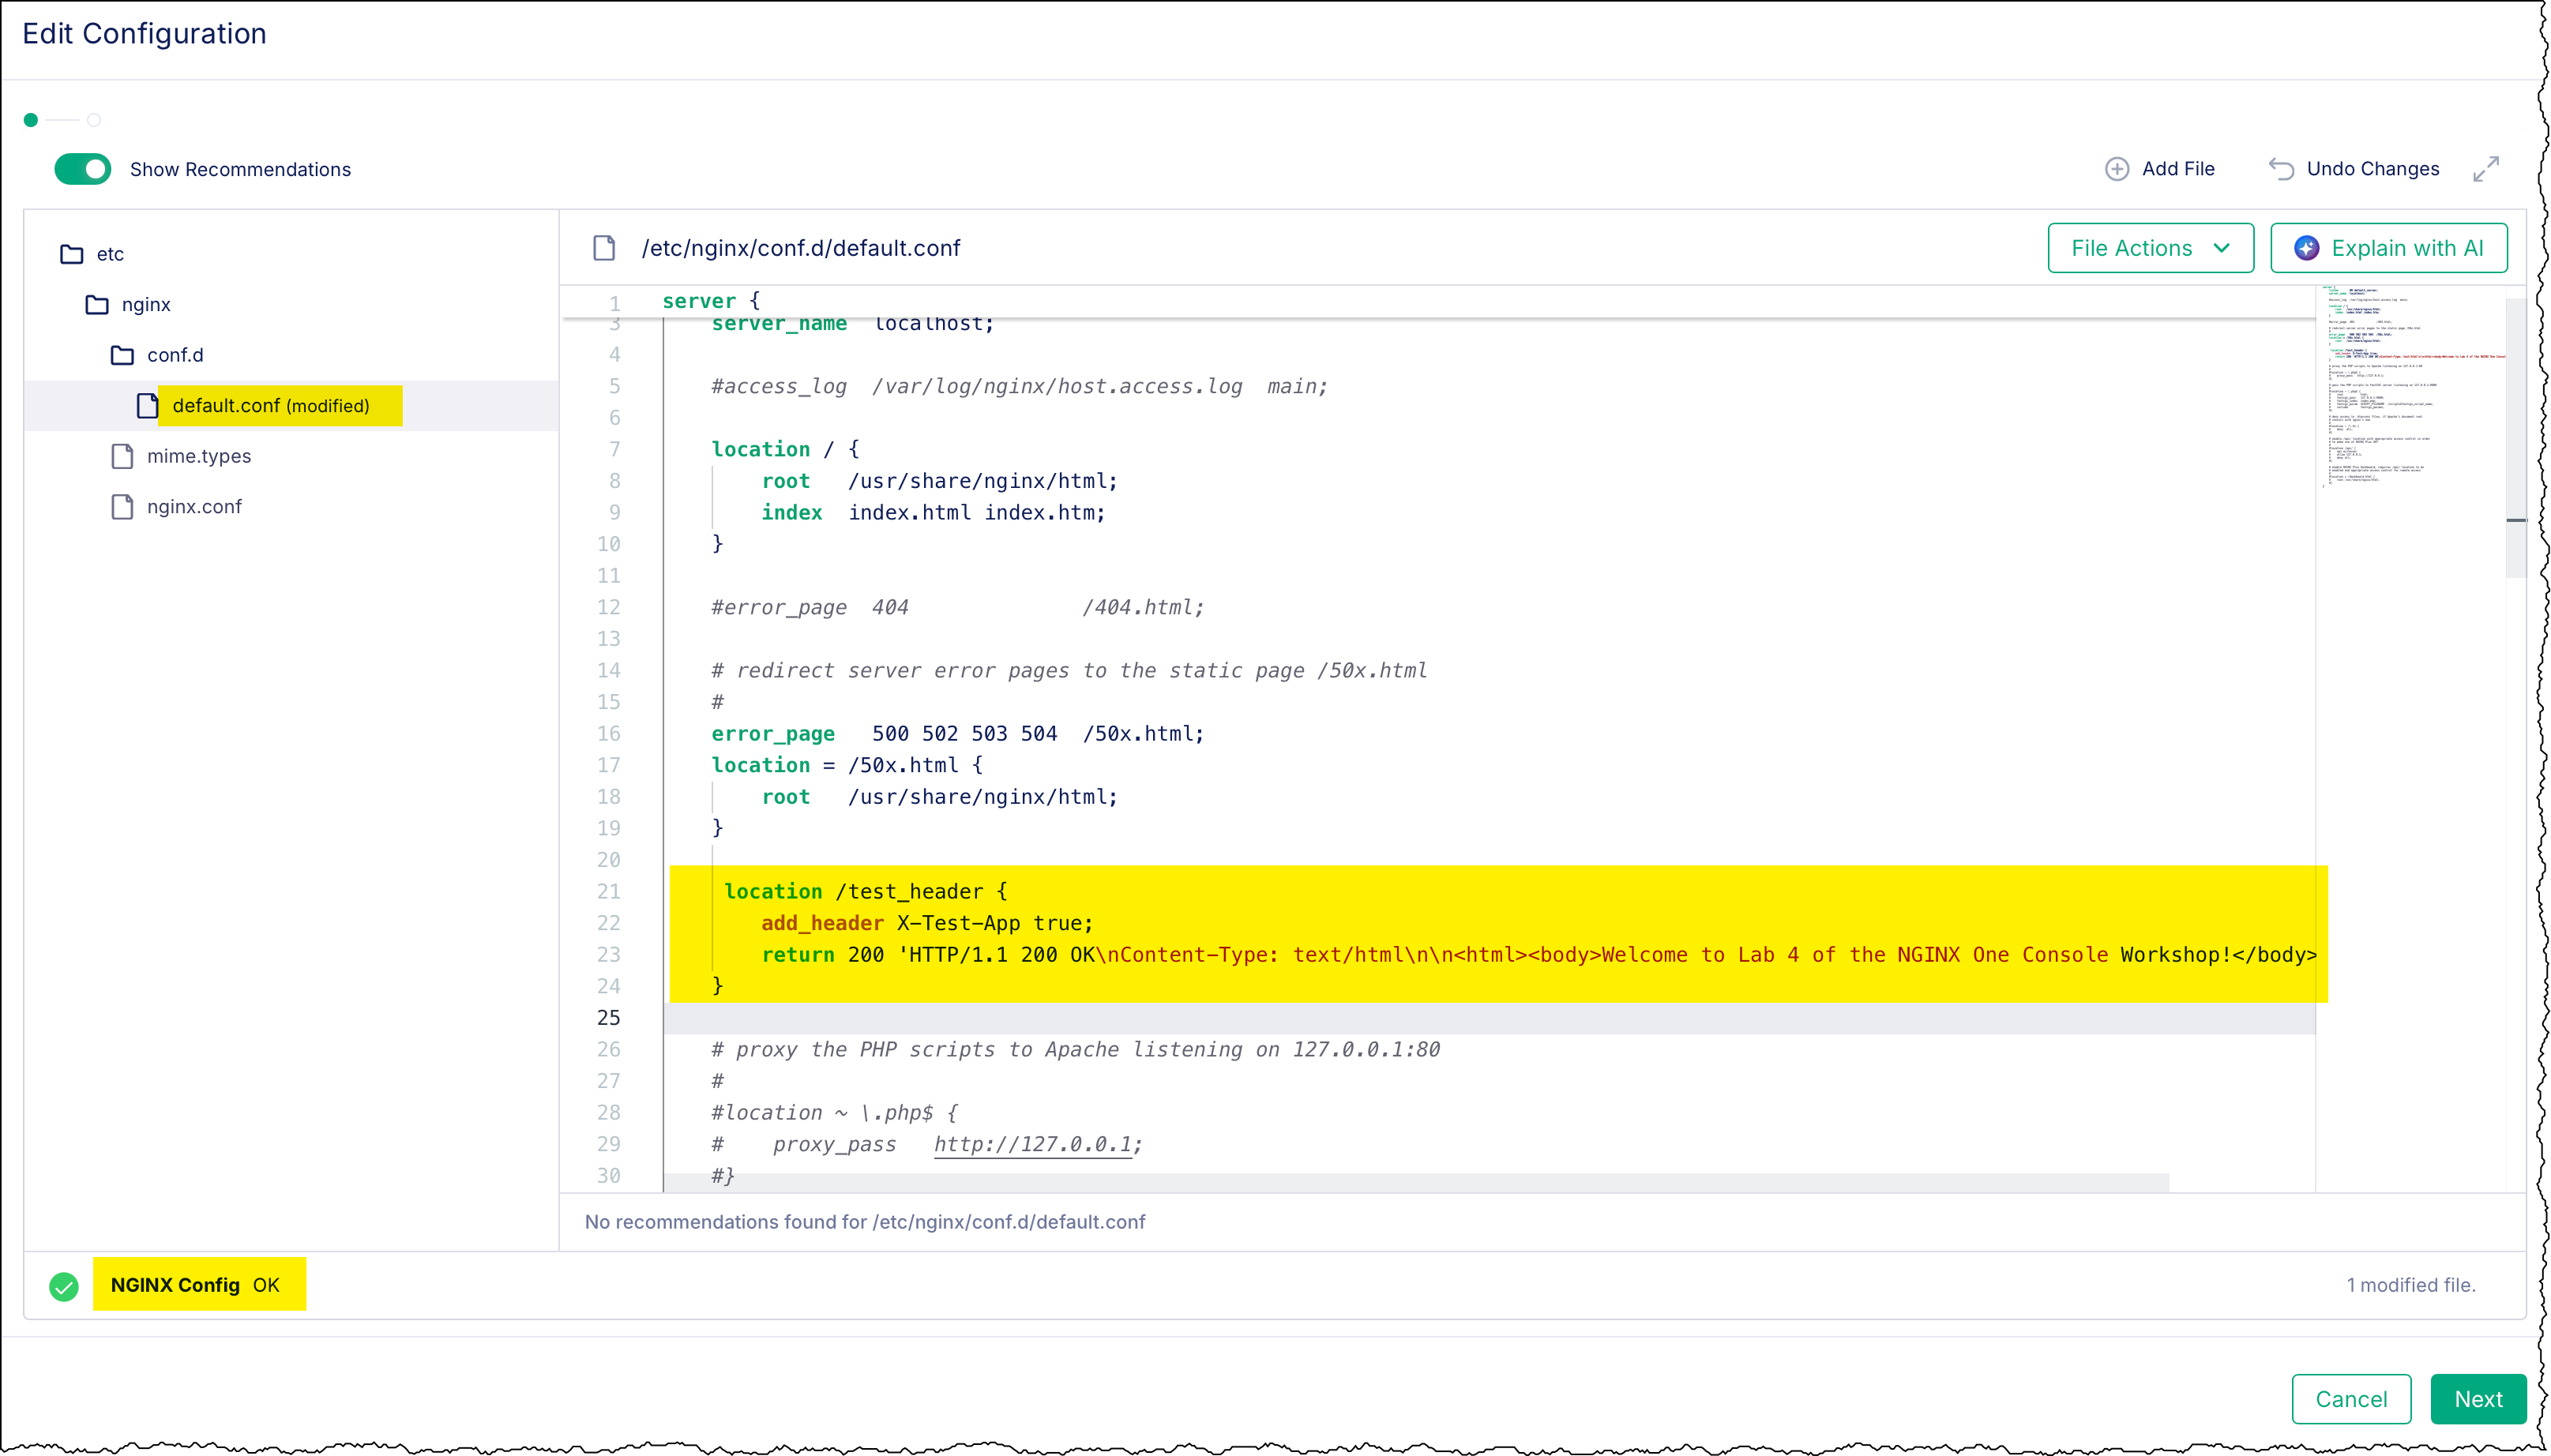
When you make these edits, the file is marked “modified” and the validator shows NGINX Config OK.
-
Select Next, review the diff, then select Save and Publish.
-
Select the Details tab and confirm Last Publication Status shows Succeeded.
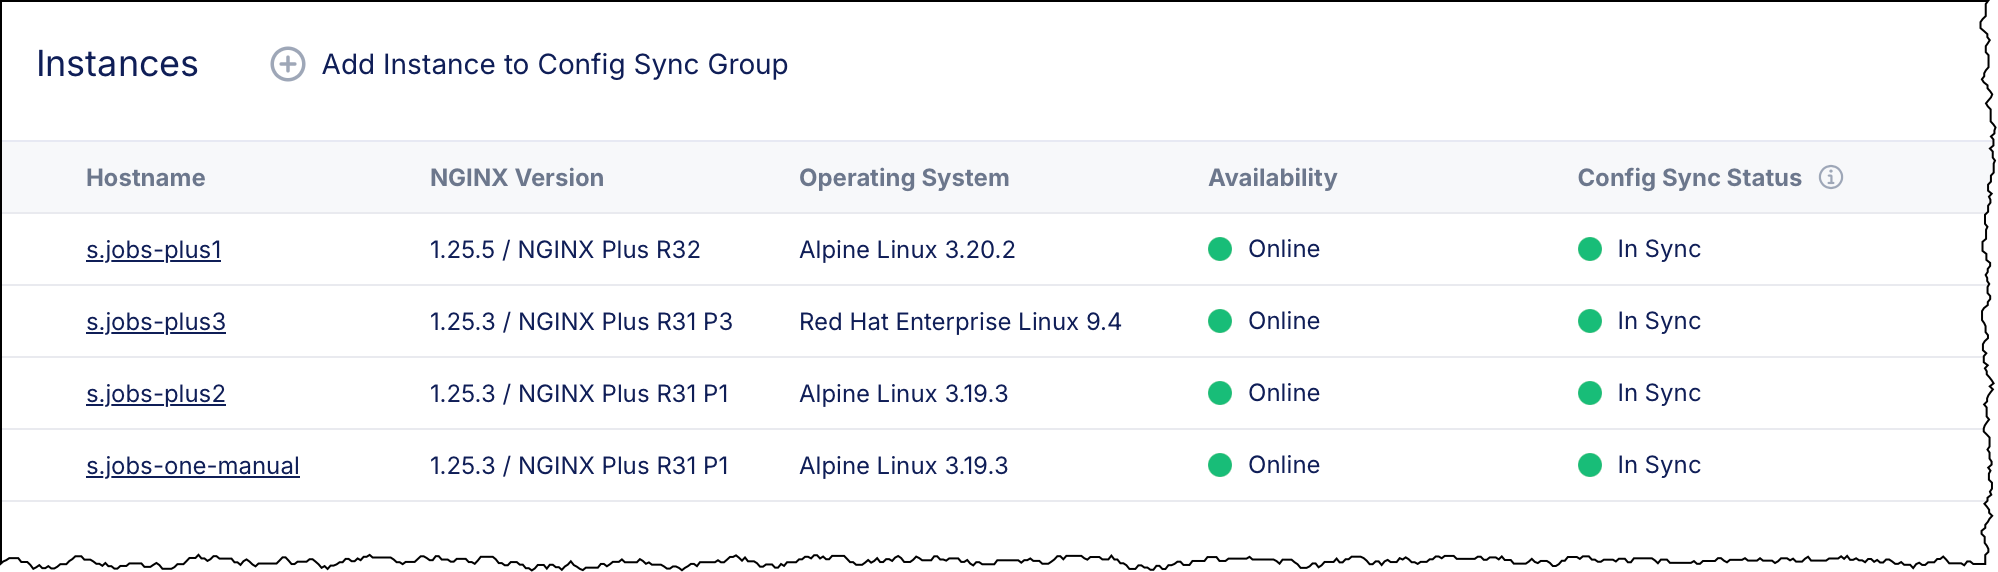
-
In the Instances table, confirm each host shows Config Sync Status = In Sync.
-
Test your change by curling any instance’s HTTP endpoint. Replace
<HOST>and<PORT>with your instance’s host name or IP and the port shown in the Instances table (for example,localhost:80):curl http://localhost:80/test_headerYou should see:
HTTP/1.1 200 OK
Content-Type: text/html

<html><body>Welcome to Lab 4 of the NGINX One Console Workshop!</body></html>
You have created a Config Sync Group and added instances. In Lab 5, you will install your NGINX Plus license (JWT) on each instance so you can upgrade them to NGINX R34.
Go to Lab 5: Upgrade to R34