Lab 5: Upgrade NGINX Plus to the latest version
In this lab, you upgrade NGINX Plus from R32 (or earlier) to the latest version in two ways:
- Docker: Deploy a new container running the latest NGINX Plus image, add it to your Config Sync Group, then shift traffic and retire older containers.
- VM: Push your JWT license to an existing VM instance, install the new NGINX Plus package, and restart the service.
Pick the scenario that matches your setup.
By the end of this lab, you’ll know how to:
- Deploy a Docker container running the latest NGINX Plus with NGINX Agent installed
- Add a VM to a Config Sync Group and push your JWT license
- Install or upgrade to the latest NGINX Plus on a VM
- Check version and sync status in the NGINX One Console
- Clean up unavailable instances in the NGINX One Console
Make sure you have:
- Completed Lab 4: Config Sync Groups
- Docker and Docker Compose installed and running (for Docker scenario)
- A trial or paid NGINX One JWT license (saved as
nginx-repo.jwt) from MyF5. - A VM with NGINX Plus R32 (or earlier), SSH access, and the NGINX Agent installed (for VM scenario)
Set these environment variables:
-
TOKEN: your data plane key, for example:
export TOKEN="your-data-plane-key" -
JWT: your NGINX Plus license JWT. Save it as
nginx-repo.jwt, then run:export JWT=$(cat path/to/nginx-repo.jwt) -
NAME: a unique ID for your workshop (for example,
s.jobs):export NAME="s.jobs"
-
- Basic familiarity with Linux command line and NGINX concepts
-
In your shell, log in to the private registry:
echo "$JWT" | docker login private-registry.nginx.com \ --username "$JWT" --password-stdin -
Open
compose.yamlin a text editor and uncomment the plus4 service block (lines 74–95). This block pulls the latest Debian NGINX Plus image with the latest NGINX Agent installed, and sets your data plane key, JWT, and config sync group.plus4: # Debian latest NGINX Plus Web / Load Balancer environment: NGINX_AGENT_SERVER_HOST: 'agent.connect.nginx.com' NGINX_AGENT_SERVER_GRPCPORT: '443' NGINX_AGENT_TLS_ENABLE: 'true' NGINX_AGENT_SERVER_TOKEN: $TOKEN # Data plane key from NGINX One Console NGINX_LICENSE_JWT: $JWT NGINX_AGENT_INSTANCE_GROUP: $NAME-sync-group hostname: $NAME-plus4 container_name: $NAME-plus4 image: private-registry.nginx.com/nginx-plus/agent:debian # From NGINX Private Registry volumes: # Sync these folders to container - ./nginx-plus/etc/nginx/nginx.conf:/etc/nginx/nginx.conf - ./nginx-plus/etc/nginx/conf.d:/etc/nginx/conf.d - ./nginx-plus/etc/nginx/includes:/etc/nginx/includes - ./nginx-plus/usr/share/nginx/html:/usr/share/nginx/html ports: - '80' # Open for HTTP - '443' # Open for HTTPS - '9000' # Open for API / Dashboard page - '9113' # Open for Prometheus Scraper page restart: alwaysTip
If you use VS Code, highlight lines 74–95 and pressCtrl+/to uncomment them. -
Restart your containers:
docker compose down && docker compose up --force-recreate -d -
In the NGINX One Console, go to Instances.
-
You should see your new instance (
$NAME-plus4) in the list (for example,s.jobs-plus4). -
Select that instance and verify it runs the latest versions of NGINX Plus and NGINX Agent.
-
The
$NAME-plus4container was added to the$NAME-sync-groupconfig sync group and inherited the shared config.Tip
Because new containers in a sync group automatically pick up the shared config, you get a consistent, tested setup across versions. You can shift traffic to the new container one at a time for a safer, zero-downtime upgrade, and avoid any manual copy-and-paste steps.
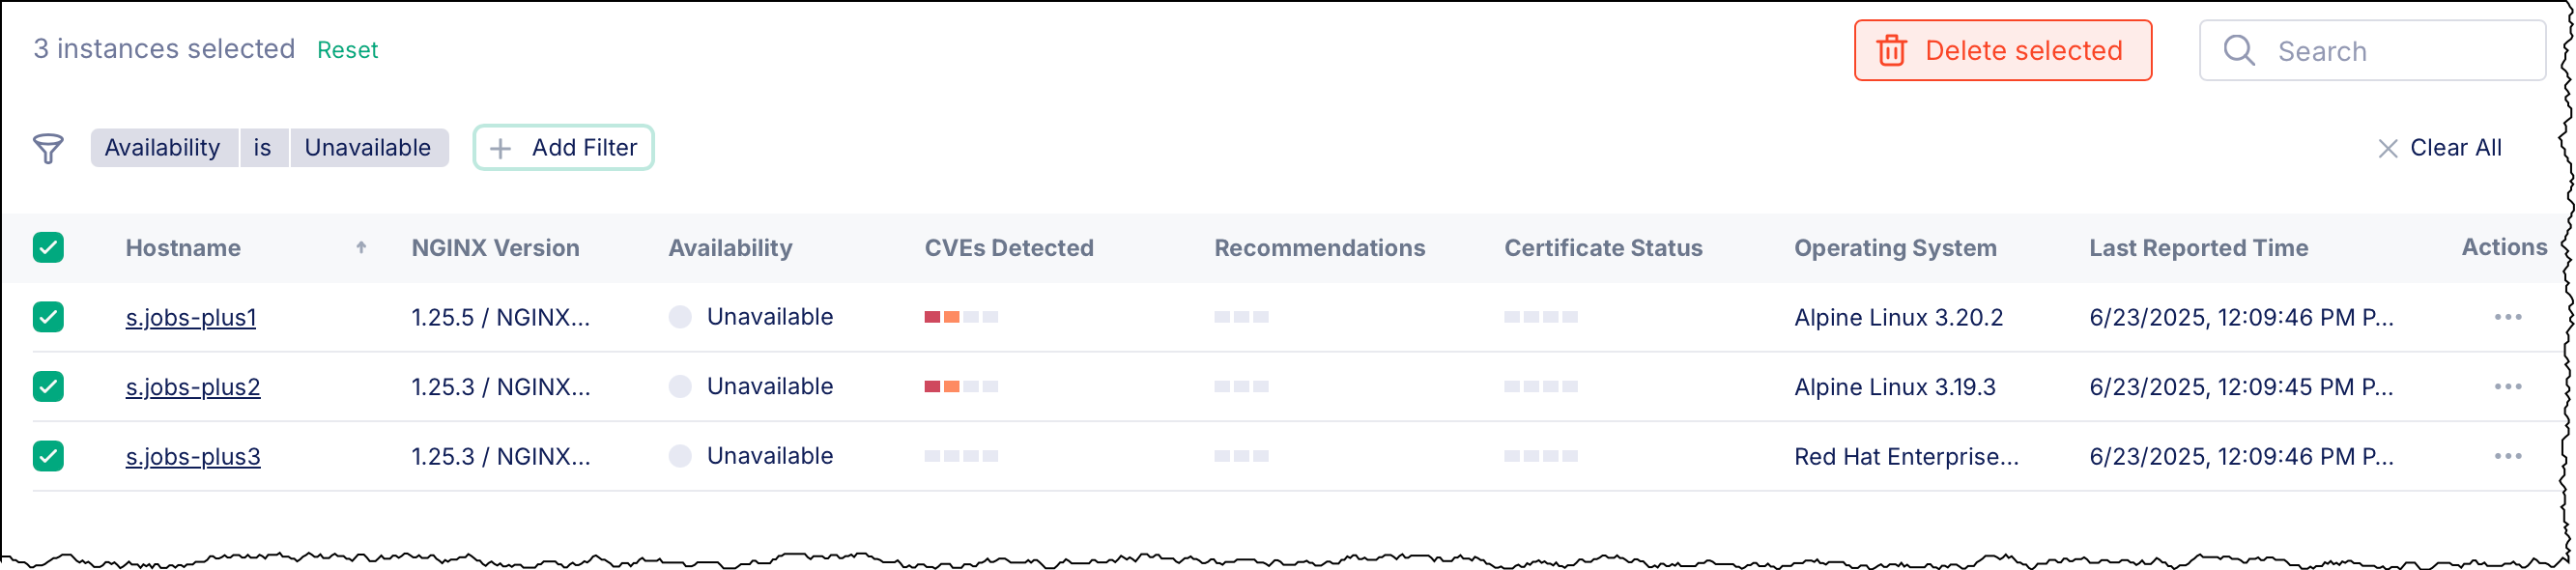
When you recreate containers, they re-register in the NGINX One Console. Use the filter to clean up old entries:
- In the NGINX One Console, go Instances.
- Select Add filter > Availability > Unavailable.
- Check the boxes next to the unavailable hosts.
- Select Delete selected, then confirm.
- Remove the filter: Hover over the Availability is Unavailable filter tag, then select X to clear it and show all instances again.
Note
These steps cover RHEL, Amazon Linux, CentOS, Oracle Linux, AlmaLinux, Rocky Linux, Debian, and Ubuntu only. Other systems (for example, FreeBSD) aren’t covered here.
- In the NGINX One Console, go to Manage > Config Sync Groups.
- Select Add Config Sync Group.
- In the Name field, enter
$NAME-sync-group-vm(for example,s.jobs-sync-group-vm), then select Create.
-
Select Manage > Config Sync Groups, then pick your config sync group’s name.
-
On the Details tab, in the Instances pane, select Add Instance to Config Sync Group.
-
Select Register a new instance with NGINX One then add to config sync group, then select Next.
-
Select Use existing key, paste
<your-key>into the Data Plane Key box. -
Copy the pre-filled
curlcommand and run it on your VM:Example:
curl https://agent.connect.nginx.com/nginx-agent/install | \ DATA_PLANE_KEY="<your-key>" \ sh -s -- -y -c "<config-sync-group-name>" -
Back in the NGINX One Console, select Refresh. Your VM appears in the list and its Config Sync Status shows In Sync.
In this exercise, you add a new configuration file (/etc/nginx/conf.d/dashboard.conf) to your shared group config. This file enables the NGINX Plus API and dashboard. Any instance you add to the group will pick up these settings automatically.
- In the NGINX One Console, select Manage > Config Sync Groups, then pick your config sync group’s name.
- Select the Configuration tab, then select Edit Configuration.
- Select Add File.
- Select New Configuration File.
- In the File name box, enter
/etc/nginx/conf.d/dashboard.conf, then select Add. - Paste the following into the new file workspace:
# This block enables the NGINX Plus API and dashboard
# For configuration and security recommendations, see:
# https://docs.nginx.com/nginx/admin-guide/monitoring/live-activity-monitoring/#configuring-the-api
server {
    # Change the listen port if 9000 conflicts
    # (8080 is the conventional API port)
    listen 9000;

    location /api/ {
        # To restrict write methods (POST, PATCH, DELETE), uncomment:
        # limit_except GET {
        #     auth_basic "NGINX Plus API";
        #     auth_basic_user_file /path/to/passwd/file;
        # }

        # Enable API in write mode
        api write=on;

        # To restrict access by network, uncomment and set your network:
        # allow 192.0.2.0/24   # replace with your network
        # deny  all;
    }

    # Serve the built-in dashboard at /dashboard.html
    location = /dashboard.html {
        root /usr/share/nginx/html;
    }
}- Select Next, review the diff, then select Save and Publish.
You need your NGINX One JWT license (from MyF5) on each instance before you upgrade to the latest NGINX Plus. You can add it in your Config Sync Group so every member gets it automatically.
- In the NGINX One Console, select Manage > Config Sync Groups, then pick your config sync group’s name.
- Select the Configuration tab, then Edit Configuration.
- Select Add File.
- Select New Configuration File.
- In the File name box, enter
/etc/nginx/license.jwt(the filename must match exactly), then select Add. - Paste the contents of your JWT file into new file workspace.
- Select Next, review the diff, then select Save and Publish.
For more information, see About subscription licenses.
-
Upgrade the NGINX Plus package on your VM:
-
RHEL, Amazon Linux, CentOS, Oracle Linux, AlmaLinux, Rocky Linux
sudo yum upgrade nginx-plus -
Debian, Ubuntu
sudo apt update && sudo apt install nginx-plus
-
-
In the NGINX One Console, go to Manage > Instances.
-
Select your VM instance in the list.
-
In the Instance Details panel, confirm the NGINX Plus version has been updated.
-
If the version doesn’t update right away, refresh the page after a few seconds.