Tracing
Learn how to configure tracing in NGINX Gateway Fabric.
Overview
NGINX Gateway Fabric supports tracing using OpenTelemetry. The official NGINX OpenTelemetry Module instruments the NGINX data plane to export traces to a configured collector. Tracing data can be used with an OpenTelemetry Protocol (OTLP) exporter, such as the OpenTelemetry Collector. This collector can then export data to one or more upstream collectors like Jaeger, DataDog, and many others. This is called the Agent model.
This guide explains how to enable tracing on HTTPRoutes using NGINX Gateway Fabric. It uses the OpenTelemetry Collector and Jaeger to process and collect the traces.
Install the collectors
The first step is to install the collectors. NGINX Gateway Fabric will be configured to export to the OpenTelemetry Collector, which is configured to export to Jaeger. This model allows the visualization collector (Jaeger) to be swapped with something else, or to add more collectors without needing to reconfigure NGINX Gateway Fabric. It is also possible to configure NGINX Gateway Fabric to export directly to Jaeger.
Create the namespace:
kubectl create namespace tracing
Download the following files containing the configurations for the collectors:
Note:
These collectors are for demonstration purposes and are not tuned for production use.
Then install them:
kubectl apply -f otel-collector.yaml -f jaeger.yaml -n tracing
Ensure the Pods are running:
kubectl -n tracing get pods
NAME                             READY   STATUS    RESTARTS   AGE
jaeger-8469f69b86-bfpk9          1/1     Running   0          9s
otel-collector-f786b7dfd-h2x9l   1/1     Running   0          9s
Once running, you can access the Jaeger dashboard by using port-forwarding in the background:
kubectl port-forward -n tracing svc/jaeger 16686:16686 &
Visit http://127.0.0.1:16686 to view the dashboard.
Enable tracing
To enable tracing, you must configure two resources:
-
NginxProxy: This resource contains global settings relating to the NGINX data plane. It is created and managed by the cluster operator, and is referenced in theparametersReffield of the GatewayClass. This resource can be created and linked when we install NGINX Gateway Fabric using its helm chart, or it can be added later. This guide installs the resource using the helm chart, but the resource can also be created for an existing deployment.The
NginxProxyresource contains configuration for the collector, and applies to all Gateways and routes under the GatewayClass. It does not enable tracing, but is a prerequisite to the next piece of configuration. -
ObservabilityPolicy: This resource is a Direct PolicyAttachment that targets HTTPRoutes or GRPCRoutes. It is created by the application developer and enables tracing for a specific route or routes. It requires theNginxProxyresource to exist in order to complete the tracing configuration.
For all the possible configuration options for these resources, see the API reference.
Install NGINX Gateway Fabric with global tracing configuration
Note:
Ensure that you install the Gateway API resources.
Referencing the previously deployed collector, create the following values.yaml file for installing NGINX Gateway Fabric:
cat <<EOT > values.yaml
nginx:
  config:
    telemetry:
      exporter:
        endpoint: otel-collector.tracing.svc:4317
      spanAttributes:
      - key: cluster-attribute-key
        value: cluster-attribute-value
EOT
The span attribute will be added to all tracing spans.
To install:
helm install ngf oci://ghcr.io/nginxinc/charts/nginx-gateway-fabric --create-namespace -n nginx-gateway -f values.yaml
You should see the following configuration:
kubectl get nginxproxies.gateway.nginx.org ngf-proxy-config -o yaml
apiVersion: gateway.nginx.org/v1alpha1
kind: NginxProxy
metadata:
  name: ngf-proxy-config
spec:
  telemetry:
    exporter:
      endpoint: otel-collector.tracing.svc:4317
    spanAttributes:
    - key: cluster-attribute-key
      value: cluster-attribute-value
kubectl get gatewayclasses.gateway.networking.k8s.io nginx -o yaml
apiVersion: gateway.networking.k8s.io/v1
kind: GatewayClass
metadata:
  name: nginx
spec:
  controllerName: gateway.nginx.org/nginx-gateway-controller
  parametersRef:
    group: gateway.nginx.org
    kind: NginxProxy
    name: ngf-proxy-config
status:
  conditions:
  - lastTransitionTime: "2024-05-22T15:18:35Z"
    message: GatewayClass is accepted
    observedGeneration: 1
    reason: Accepted
    status: "True"
    type: Accepted
  - lastTransitionTime: "2024-05-22T15:18:35Z"
    message: Gateway API CRD versions are supported
    observedGeneration: 1
    reason: SupportedVersion
    status: "True"
    type: SupportedVersion
  - lastTransitionTime: "2024-05-22T15:18:35Z"
    message: parametersRef resource is resolved
    observedGeneration: 1
    reason: ResolvedRefs
    status: "True"
    type: ResolvedRefs
If you already have NGINX Gateway Fabric installed, then you can create the NginxProxy resource and link it to the GatewayClass parametersRef:
kubectl edit gatewayclasses.gateway.networking.k8s.io nginx
Save the public IP address and port of NGINX Gateway Fabric into shell variables:
GW_IP=XXX.YYY.ZZZ.III
GW_PORT=<port number>
You can now create the application, route, and tracing policy.
Create the application and route
Create the basic coffee application:
kubectl apply -f - <<EOF
apiVersion: apps/v1
kind: Deployment
metadata:
  name: coffee
spec:
  replicas: 2
  selector:
    matchLabels:
      app: coffee
  template:
    metadata:
      labels:
        app: coffee
    spec:
      containers:
      - name: coffee
        image: nginxdemos/nginx-hello:plain-text
        ports:
        - containerPort: 8080
---
apiVersion: v1
kind: Service
metadata:
  name: coffee
spec:
  ports:
  - port: 80
    targetPort: 8080
    protocol: TCP
    name: http
  selector:
    app: coffee
EOF
Create the Gateway resource and HTTPRoute for the application:
kubectl apply -f - <<EOF
apiVersion: gateway.networking.k8s.io/v1
kind: Gateway
metadata:
  name: cafe
spec:
  gatewayClassName: nginx
  listeners:
  - name: http
    port: 80
    protocol: HTTP
---
apiVersion: gateway.networking.k8s.io/v1
kind: HTTPRoute
metadata:
  name: coffee
spec:
  parentRefs:
  - name: cafe
  hostnames:
  - "cafe.example.com"
  rules:
  - matches:
    - path:
        type: PathPrefix
        value: /coffee
    backendRefs:
    - name: coffee
      port: 80
EOF
Check that traffic can flow to the application.
Note:
If you have a DNS record allocated forcafe.example.com, you can send the request directly to that hostname, without needing to resolve.
curl --resolve cafe.example.com:$GW_PORT:$GW_IP http://cafe.example.com:$GW_PORT/coffee
You should receive a response from the coffee Pod.
Server address: 10.244.0.69:8080
Server name: coffee-6b8b6d6486-k5w5w
URI: /coffee
You shouldn’t see any information from the Jaeger dashboard yet: you need to create the ObservabilityPolicy.
Create the ObservabilityPolicy
To enable tracing for the coffee HTTPRoute, create the following policy:
kubectl apply -f - <<EOF
apiVersion: gateway.nginx.org/v1alpha1
kind: ObservabilityPolicy
metadata:
  name: coffee
spec:
  targetRefs:
  - group: gateway.networking.k8s.io
    kind: HTTPRoute
    name: coffee
  tracing:
    strategy: ratio
    ratio: 75
    spanAttributes:
    - key: coffee-key
      value: coffee-value
EOF
This policy attaches to the coffee HTTPRoute and enables ratio-based tracing, sampling 75% of requests. The span attribute is only included in the spans for the routes referenced in this policy.
Check the status of the policy:
kubectl describe observabilitypolicies.gateway.nginx.org coffee
Status:
  Ancestors:
    Ancestor Ref:
      Group:      gateway.networking.k8s.io
      Kind:       HTTPRoute
      Name:       coffee
      Namespace:  default
    Conditions:
      Last Transition Time:  2024-05-23T18:13:03Z
      Message:               Policy is accepted
      Observed Generation:   1
      Reason:                Accepted
      Status:                True
      Type:                  Accepted
    Controller Name:         gateway.nginx.org/nginx-gateway-controller
The message field shows the policy is accepted. Run the next command multiple times to create new traffic.
curl --resolve cafe.example.com:$GW_PORT:$GW_IP http://cafe.example.com:$GW_PORT/coffee
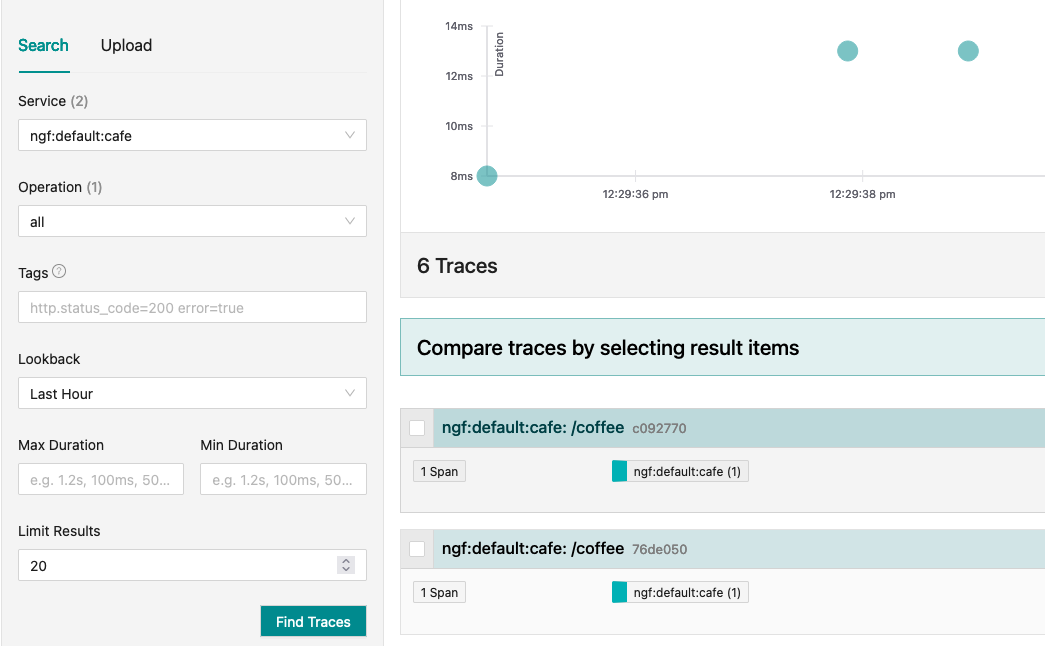
Once complete, refresh the Jaeger dashboard. You should see a service entry called ngf:default:cafe, and a few traces. The default service name is ngf:<gateway-namespace>:<gateway-name>.

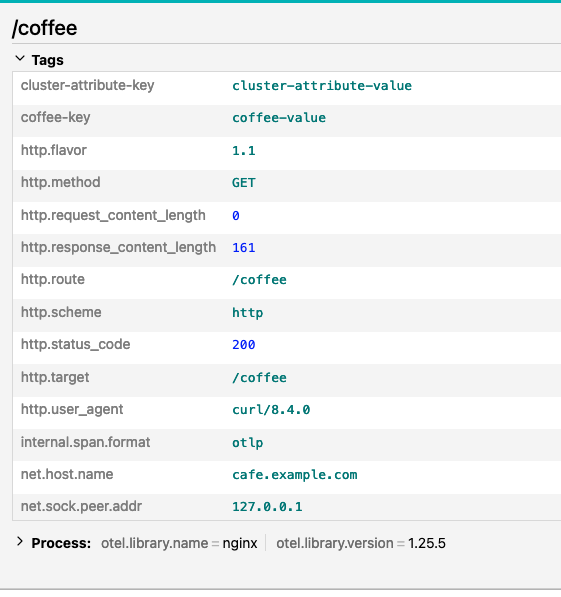
Select a trace to view the attributes.

The trace includes the attribute from the global NginxProxy resource as well as the attribute from the ObservabilityPolicy.
Further reading
- Custom policies: learn about how NGINX Gateway Fabric custom policies work.
- API reference: all configuration fields for the policies mentioned in this guide